Parent info
Parts you need
Affiliate links — we may earn a small commission
Try this circuit in your browser!
Run the code, press the buttons and watch what happens — before you buy any parts. No account needed.
Open in Simulator →Open a URL. Steer a robot.
Imagine this: your car is on the floor. You open your phone browser, type an IP address, and a joystick appears. You drag it forward — the car drives. You drag it right — it turns. You let go — it stops.
No app install. No Bluetooth pairing. No code on your phone. Just WiFi and a browser.
That’s what we’re building. In 3 hours. For about $45.
What you’ll need
| Part | What it does | Price |
|---|---|---|
| ESP32-S3 Dev Board | Brain + web server. Hosts the joystick page on its own WiFi. | ~$12 |
| L298N Motor Driver | Controls all four wheels (left pair + right pair). | ~$6 |
| 4-wheel robot chassis kit | Platform with 4 motors, wheels, and mounting plate included. | ~$15 |
| 18650 battery holder (2-cell) | Holds two 18650 batteries — cleaner power than 9V blocks. | ~$4 |
| 2x 18650 batteries | 7.4V combined — good power for fast, responsive driving. | ~$6 |
| Jumper wires | Connects everything. | ~$2 |
Total: ~$45 | Time: ~3 hours | Difficulty: ●●●○○
How it works (60 seconds)
Think of it like this: the ESP32 is a tiny web server in your robot.
When you power it on, the ESP32 creates its own WiFi network (“BuildCoolCar”). Your phone joins that network and opens 192.168.4.1 in the browser. The ESP32 serves a web page — one that fills your screen with a circular touch pad.
When you drag your finger on that pad, JavaScript calculates how far you dragged in each direction (X and Y). It applies tank mixing math — Left = Y + X, Right = Y - X — to convert joystick position into two motor speeds. Then it sends those speeds to the ESP32 as a tiny web request: /drive?L=200&R=150.
The ESP32 receives the request, calls setMotors(), and the wheels spin. From finger movement to wheel spin: under 30ms on local WiFi.
Step 0: Assemble the 4-wheel chassis
Time: ~20 minutes
Your chassis kit comes with 4 motors and mounting hardware. Follow its included diagram to bolt everything together.
Key rule: wire the left-side pair of motors together (front-left and rear-left), and the right-side pair together (front-right and rear-right). Each pair shares one L298N output channel.
- Bolt all 4 motors to the chassis plate.
- Connect the front-left and rear-left motor wires to a single pair — twist each color together (red to red, black to black).
- Repeat for the right side.
- Attach all wheels.
Check: Spin each wheel by hand. All four should roll smoothly. The pairs should spin in the same direction when both wires are connected the same way.
Step 1: Wire it up
Time: ~15 minutes
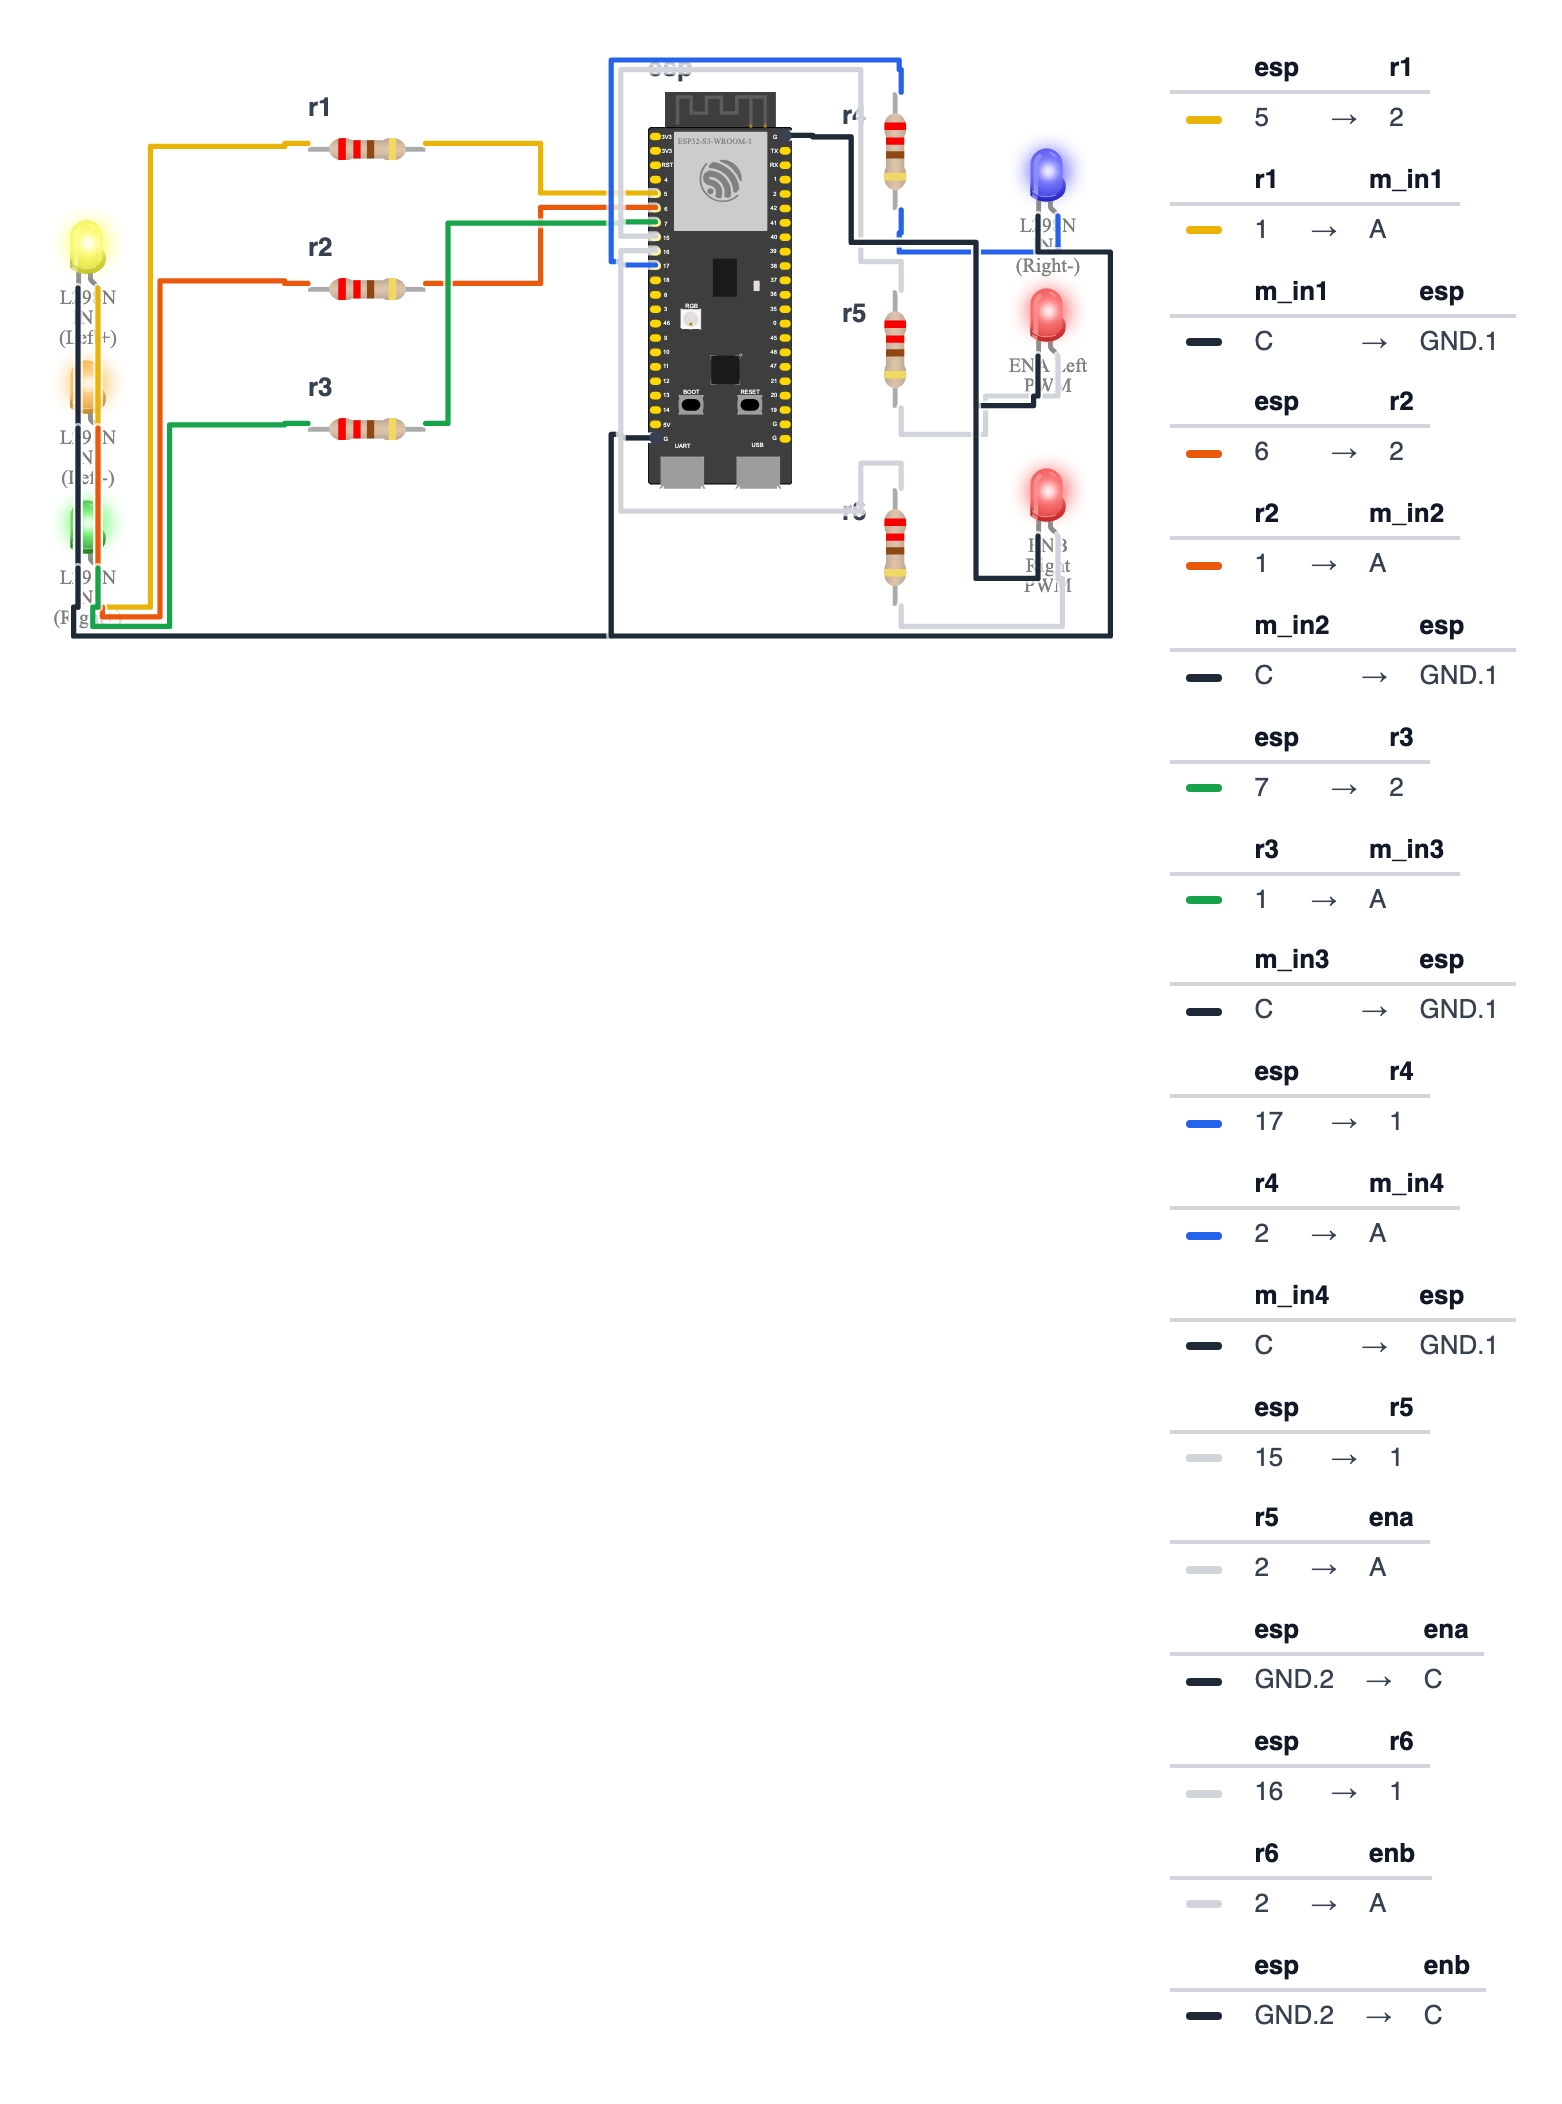
| ESP32-S3 | ESP32-C6 | L298N Pin | What it does |
|---|---|---|---|
| GPIO 5 | GPIO 19 | IN1 | Left motors forward |
| GPIO 6 | GPIO 20 | IN2 | Left motors backward |
| GPIO 7 | GPIO 22 | IN3 | Right motors forward |
| GPIO 17 | GPIO 23 | IN4 | Right motors backward |
| GPIO 15 | GPIO 3 | ENA | Left motor speed (PWM) |
| GPIO 16 | GPIO 4 | ENB | Right motor speed (PWM) |
| 5V | 5V | +5V | Logic power for L298N |
| GND | GND | GND | Shared ground |
Battery to L298N:
- Battery pack (+) → L298N 12V terminal
- Battery pack (−) → L298N GND terminal
Motors to L298N:
- Left pair (front-left + rear-left joined) → OUT1 and OUT2
- Right pair (front-right + rear-right joined) → OUT3 and OUT4
Check: Six wires to L298N control pins, 2 battery wires, 4 motor wires. Before plugging in batteries, verify ESP32 GND connects to L298N GND — they need a shared ground.
Step 2: Flash the code
Time: ~5 minutes
- Install the ESPAsyncWebServer library in Arduino IDE (Tools → Manage Libraries).
- Select ESP32S3 Dev Module as your board.
- Copy the code below, paste and upload.
The big picture first. This program turns the ESP32 into a web server with a joystick page. When you drag your finger on the circular pad, JavaScript calculates how far left/right and up/down you dragged, converts that into two motor speed numbers using “tank mixing” math (Left = Y + X, Right = Y - X), and sends them to the ESP32 as a tiny web request. The ESP32 receives the numbers and spins the motors. The whole chain takes under 30 milliseconds.
// ========== CHOOSE YOUR BOARD ==========
// Uncomment the line for YOUR board:
#define BOARD_S3    // ESP32-S3-DevKitC-1
//#define BOARD_C6  // ESP32-C6-DevKitC-1
// ========================================

#ifdef BOARD_S3
  #define PIN_IN1              5
  #define PIN_IN2              6
  #define PIN_IN3              7
  #define PIN_IN4              17
  #define PIN_ENA              15
  #define PIN_ENB              16
#endif
#ifdef BOARD_C6
  #define PIN_IN1              19
  #define PIN_IN2              20
  #define PIN_IN3              22
  #define PIN_IN4              23
  #define PIN_ENA              3
  #define PIN_ENB              4
#endif

#include <WiFi.h>
#include <ESPAsyncWebServer.h>

const char* ssid = "BuildCoolCar";
const char* pass = "driveit99";

AsyncWebServer server(80);

const char joystickHTML[] PROGMEM = R"rawliteral(
<!DOCTYPE html><html>
<head>
<meta name="viewport" content="width=device-width, initial-scale=1, user-scalable=no">
<title>RC Car</title>
<style>
  *{box-sizing:border-box;margin:0;padding:0}
  body{background:#1a1a2e;display:flex;flex-direction:column;
       align-items:center;justify-content:center;height:100vh;
       font-family:monospace;color:#e94560}
  h1{font-size:2em;margin-bottom:30px;letter-spacing:4px}
  #pad{width:220px;height:220px;background:#16213e;border-radius:50%;
       border:4px solid #e94560;position:relative;touch-action:none}
  #stick{width:70px;height:70px;background:#e94560;border-radius:50%;
         position:absolute;top:75px;left:75px;cursor:pointer}
  #status{margin-top:20px;font-size:0.9em;color:#0f3460}
</style></head>
<body>
<h1>RC CAR</h1>
<div id="pad">
  <div id="stick"></div>
</div>
<div id="status">Waiting...</div>
<script>
const pad   = document.getElementById('pad');
const stick = document.getElementById('stick');
const status = document.getElementById('status');
let active = false, padRect, lastCmd = '';

function clamp(v,lo,hi){return Math.max(lo,Math.min(hi,v));}

pad.addEventListener('touchstart', e=>{
  active = true;
  padRect = pad.getBoundingClientRect();
  e.preventDefault();
},{passive:false});

document.addEventListener('touchmove', e=>{
  if(!active) return;
  e.preventDefault();
  let t = e.touches[0];
  let cx = padRect.left + padRect.width/2;
  let cy = padRect.top  + padRect.height/2;
  let dx = clamp((t.clientX - cx) / (padRect.width/2),  -1, 1);
  let dy = clamp((t.clientY - cy) / (padRect.height/2), -1, 1);

  stick.style.left = (75 + dx*75) + 'px';
  stick.style.top  = (75 + dy*75) + 'px';

  let Y = -dy;
  let X =  dx;
  let L = Math.round((Y + X) * 255);
  let R = Math.round((Y - X) * 255);
  L = clamp(L,-255,255);
  R = clamp(R,-255,255);

  let cmd = `?L=${L}&R=${R}`;
  if(cmd !== lastCmd){
    fetch('/drive' + cmd);
    lastCmd = cmd;
    status.textContent = `L:${L}  R:${R}`;
  }
},{passive:false});

document.addEventListener('touchend', ()=>{
  if(!active) return;
  active = false;
  stick.style.left = '75px'; stick.style.top = '75px';
  fetch('/drive?L=0&R=0');
  status.textContent = 'STOPPED';
  lastCmd = '';
});
</script></body></html>
)rawliteral";

void setMotors(int L, int R) {
  if (L >= 0) { digitalWrite(PIN_IN1,HIGH); digitalWrite(PIN_IN2,LOW); }
  else         { digitalWrite(PIN_IN1,LOW);  digitalWrite(PIN_IN2,HIGH); L=-L; }
  ledcWrite(PIN_ENA, L);

  if (R >= 0) { digitalWrite(PIN_IN3,HIGH); digitalWrite(PIN_IN4,LOW); }
  else         { digitalWrite(PIN_IN3,LOW);  digitalWrite(PIN_IN4,HIGH); R=-R; }
  ledcWrite(PIN_ENB, R);
}

void setup() {
  Serial.begin(115200);

  for (int p : {PIN_IN1,PIN_IN2,PIN_IN3,PIN_IN4}) pinMode(p, OUTPUT);
  ledcAttach(PIN_ENA,5000,8);
  ledcAttach(PIN_ENB,5000,8);

  WiFi.softAP(ssid, pass);
  Serial.println(WiFi.softAPIP());

  server.on("/", HTTP_GET, [](AsyncWebServerRequest* r){
    r->send_P(200,"text/html", joystickHTML);
  });

  server.on("/drive", HTTP_GET, [](AsyncWebServerRequest* r){
    int L = r->hasParam("L") ? r->getParam("L")->value().toInt() : 0;
    int R = r->hasParam("R") ? r->getParam("R")->value().toInt() : 0;
    setMotors(L, R);
    r->send(200,"text/plain","OK");
  });

  server.begin();
  Serial.println("WiFi RC Car ready!");
  Serial.println("Connect to: BuildCoolCar / driveit99");
}

void loop() {
  delay(10);
}
Line-by-line: what every line does and why
Lines 1–2: Instruction books
#include <WiFi.h>
#include <ESPAsyncWebServer.h>
WiFi.h lets the ESP32 create its own wireless network. ESPAsyncWebServer.h lets it serve web pages and handle requests without pausing between them. “Async” means it can handle a browser asking for the page AND a joystick command at the same time.
Lines 7–22: Motor pin names
#define PIN_IN1              5
#define PIN_IN2              6
#define PIN_IN3              7
#define PIN_IN4              17
#define PIN_ENA              15
#define PIN_ENB              16
Six pins control the motors. These are the ESP32-S3 numbers; the #ifdef BOARD_C6 block gives the C6 numbers (19, 20, 22, 23, 3, 4). IN1/IN2 set the left motor direction. IN3/IN4 set the right motor direction. ENA and ENB set the speed of each motor via PWM. Think of direction and speed as two separate controls on the same motor.
joystickHTML with PROGMEM: The entire web page stored in the chip
const char joystickHTML[] PROGMEM = R"rawliteral(...)rawliteral";PROGMEM stores this text in flash memory (the chip’s long-term storage) instead of the working RAM. The ESP32 has 512 KB of RAM — web pages waste space there. R"rawliteral(...)" is a way to write text that spans many lines without worrying about special characters.
JavaScript — Tank mixing math
let Y = -dy;
let X =  dx;
let L = Math.round((Y + X) * 255);
let R = Math.round((Y - X) * 255);
dy is how far up or down you dragged, from -1 (top) to +1 (bottom). We flip it: Y = -dy so pushing up gives a positive number (forward). dx is left-right. Then:
L = Y + X— left motor gets forward speed PLUS turning contributionR = Y - X— right motor gets forward speed MINUS turning contribution
Example: push forward (Y=1, X=0): L=1, R=1 — both motors full forward. Push right (Y=0, X=1): L=1, R=-1 — left motor forward, right motor backward = spin right in place. This formula works for every diagonal too.
JavaScript — lastCmd deduplication
if(cmd !== lastCmd){
  fetch('/drive' + cmd);
  lastCmd = cmd;
}
Your finger touching the screen fires touchmove dozens of times per second. Without this check, the ESP32 would receive hundreds of identical /drive?L=200&R=200 messages per second — flooding its WiFi stack. By comparing to lastCmd, we only send when something actually changed. This reduces traffic by about 95% and makes the car feel more responsive.
setMotors(int L, int R): Making numbers into movement
if (L >= 0) { digitalWrite(PIN_IN1,HIGH); digitalWrite(PIN_IN2,LOW); }
else         { digitalWrite(PIN_IN1,LOW);  digitalWrite(PIN_IN2,HIGH); L=-L; }
ledcWrite(PIN_ENA, L);
L is from -255 to +255. Positive = forward, negative = backward. The if/else sets direction: flip IN1/IN2 based on the sign. When L is negative, we flip the pins AND convert L to positive (L = -L) because ledcWrite only accepts positive numbers — the direction is already encoded in the pin states.
setup(): Creating the hotspot and routes
WiFi.softAP(ssid, pass);
server.on("/", ...);
server.on("/drive", ...);
server.begin();
softAP creates the WiFi hotspot — the ESP32 becomes a tiny router. server.on("/", ...) says “when someone opens the main page, send the joystick HTML.” server.on("/drive", ...) says “when someone sends motor commands, run setMotors().” server.begin() starts the server listening.
The whole thing in one sentence
The ESP32 creates a WiFi hotspot, serves a joystick page, and whenever your finger moves, the phone sends the two motor speeds as a URL that the ESP32 translates into wheel movement.
First thing to try: Upload, connect to BuildCoolCar WiFi, open 192.168.4.1. Drag the joystick forward — watch the status text at the bottom show L:255 R:255. Drag right — it should show L:255 R:-255.
Check: Serial Monitor shows
192.168.4.1. Connect phone to BuildCoolCar WiFi (password: driveit99). Open192.168.4.1in browser. You see a red circle joystick on a dark background.
Step 3: First drive
Time: ~2 minutes
Put the car on the floor. Make sure the battery pack is plugged in.
Open the browser joystick. Drag the red dot forward. The car should move forward. Drag sideways — it turns.
If wheels spin the wrong direction: Swap the two wires going to that motor pair at the L298N output terminals (OUT1/OUT2 or OUT3/OUT4). No code change needed — the L298N direction simply depends on which wire is which.
If car turns left when you push right: Swap the right motor pair wires (OUT3/OUT4). Or swap left (OUT1/OUT2). One of them is reversed.
Step 4: Drive it!
The joystick snaps back to center when you lift your finger — motors stop. This is the safety behavior. Keep your USB cable disconnected for wireless driving.
Tips for better driving:
- Slow surfaces (carpet): the wheels grip more — smoother turns
- Slippery surfaces (tile): less grip — it slides a bit on tight turns. Fun.
- Long press and drag diagonally = smooth curve. Instant hard sideways drag = sharp spin in place.
What just happened (what you learned)
-
Tank mixing math — A joystick outputs X (left/right) and Y (forward/back). To drive a differential robot:
Left = Y + X,Right = Y - X. Straight forward (Y=1, X=0): L=1, R=1. Push right (Y=0, X=1): L=1, R=−1 = spin right. Push forward-right (Y=0.7, X=0.7): L=1.4, R=0 = curve right. After mixing, clamp both to ±255 and you have motor commands. -
ESPAsyncWebServer callbacks — Each joystick movement fires a
fetch('/drive?L=200&R=150'). ESPAsyncWebServer processes this in an interrupt-driven callback — the lambda runs, callssetMotors(), sends “OK”. The mainloop()never gets involved. That’s whyloop()is almost empty. -
lastCmd deduplication — The joystick fires
touchmoveevents dozens of times per second. Withoutif(cmd !== lastCmd), you’d flood the ESP32’s WiFi stack with identical requests. Only sending when the command changes reduces traffic by ~95% and makes response feel snappier. -
Touch events on mobile —
touchstart,touchmove,touchendreplace mouse events on phones.e.preventDefault()stops the browser from interpreting finger movement as scrolling.passive:falsetells the browser it must wait forpreventDefault()— required for custom touch controls.
Level Up
Add headlights: Wire an LED (220Ω resistor) to GPIO 38 (C6: GPIO 5). Add a web button: <button onclick="fetch('/light')">LIGHTS</button>. Register a /light route that toggles GPIO 38 (C6: GPIO 5). Driving in the dark with headlights on is more satisfying than it should be.
Add a speed limiter slider: <input type="range" min="25" max="100" value="100"> above the joystick. Multiply L and R by slider.value / 100 before sending. 25% = slow mode. 100% = race mode.
Upgrade to WebSocket: HTTP requests have ~20-50ms latency from TCP overhead. WebSockets maintain a persistent connection — under 5ms. Create a WebSocketsServer on port 81. Send motor commands as plain text. Noticeably more responsive at full speed.
Add the FPV camera (see Project 8): Mount an ESP32-CAM on the car. Stream live video to the same joystick page using an <img src="..."> tag. You’re now driving FPV from your phone.
★★ You completed: WiFi RC Car!
Troubleshooting
| Problem | Fix |
|---|---|
| Browser shows “Can’t reach site” | Check phone is on BuildCoolCar WiFi, not home WiFi. Try 192.168.4.1 (not https). |
| Joystick appears but car doesn’t move | Check 18650 battery pack is plugged into L298N (not just USB to ESP32). USB powers the brain, battery powers the motors. |
| Car goes backward when joystick is forward | Swap both motor output pairs at L298N (OUT1/OUT2 AND OUT3/OUT4). |
| Car turns left when joystick says right | Swap only the right motor pair (OUT3/OUT4). |
| Car drifts to one side on straight | One motor pair slightly weaker. Adjust speeds: change (Y + X) * 255 to (Y + X) * 200 for the faster side to equalize. |
| Joystick is laggy | Phone reconnected to home WiFi. Check WiFi settings. Or switch from fetch() to WebSocket (see Level Up). |
| L298N gets hot | Normal for L298N under load. If it gets too hot to touch, your battery voltage may be too high. 7.4V (2x18650) is ideal. |