Parent info
Parts you need
Affiliate links — we may earn a small commission
Try this circuit in your browser!
Run the code, press the buttons and watch what happens — before you buy any parts. No account needed.
Open in Simulator →Same adrenaline as a drone. Zero ceiling damage.
Imagine this: your phone screen shows a live camera feed from floor level. You tap the forward button. The rover drives under the couch and the video pans with it. You can see the dust bunny colony your parents don’t know about. You navigate back out. The whole thing fits in your hand and cost $39.
No drone license. No propellers. No altitude limit. Just WiFi, a camera, and a chassis that goes anywhere your phone goes.
Builds in 3 hours. For about $39.
What you’ll need
| Part | What it does | Price |
|---|---|---|
| ESP32-CAM (AI-Thinker) | Camera + WiFi in one $8 module. Streams MJPEG video. | ~$8 |
| FTDI USB-to-serial adapter | Programs the ESP32-CAM (it has no USB chip). One-time use. | ~$5 |
| L298N Motor Driver | Controls both drive motors. | ~$6 |
| 2WD robot chassis kit | Frame + motors + wheels. Comes as a kit ready to assemble. | ~$10 |
| 18650 battery holder (2-cell) + batteries | 7.4V — more power and lighter than 9V blocks. | ~$8 |
| Jumper wires | Connects everything. | ~$2 |
Total: ~$39 | Time: ~3 hours | Difficulty: ●●●○○
ESP32-CAM important note: The AI-Thinker ESP32-CAM has no USB chip — you can’t program it with a regular USB cable. You need an FTDI USB-to-serial adapter to flash it. This is a one-time setup. After flashing, you power cycle and it runs normally.
How it works (60 seconds)
Think of it like this: the ESP32-CAM is two devices in one chip — a camera and a web server.
One server (port 81) handles the video stream. It runs in an infinite loop: grab a JPEG frame, send it to the browser, grab another, send it. The browser receives these frames using a special MIME type (multipart/x-mixed-replace) that tells it to keep updating the image automatically — no JavaScript needed for the video.
Another server (port 80) handles driving. It serves the control web page with four buttons (F/B/L/R). When you tap a button, the browser sends a request like /go?d=F. The ESP32-CAM’s handler runs motorCmd("F") which drives the motors. Both servers run simultaneously in FreeRTOS tasks — that’s why the video keeps playing while you drive.
Your phone connects to the rover’s WiFi (“FPV-Rover”), opens the control page, and you see: live video at the top, drive buttons at the bottom.
Step 0: Program the ESP32-CAM BEFORE assembling
Time: ~10 minutes
Do this before mounting the ESP32-CAM to the chassis. Programming requires holding GPIO 0 to GND and you need easy access to the board.
FTDI to ESP32-CAM connections:
| FTDI | ESP32-CAM |
|---|---|
| VCC (5V) | 5V |
| GND | GND |
| TX | U0R (GPIO 3) |
| RX | U0T (GPIO 1) |
| GND | GPIO 0 (flash mode only) |
Connecting GPIO 0 to GND puts the chip in bootloader mode. After uploading, you MUST disconnect GPIO 0 from GND before powering on for normal operation.
In Arduino IDE:
- Install ESP32 board support (if not already installed)
- Select AI Thinker ESP32-CAM as your board
- Select the COM port of your FTDI adapter
- Connect GPIO 0 to GND on the FTDI
- Click Upload
- After upload completes: disconnect GPIO 0 from GND
- Press the reset button on the ESP32-CAM
Check: Serial Monitor shows
FPV Rover ready!andControl: http://192.168.4.1.
Step 1: Wire the motors
Time: ~10 minutes
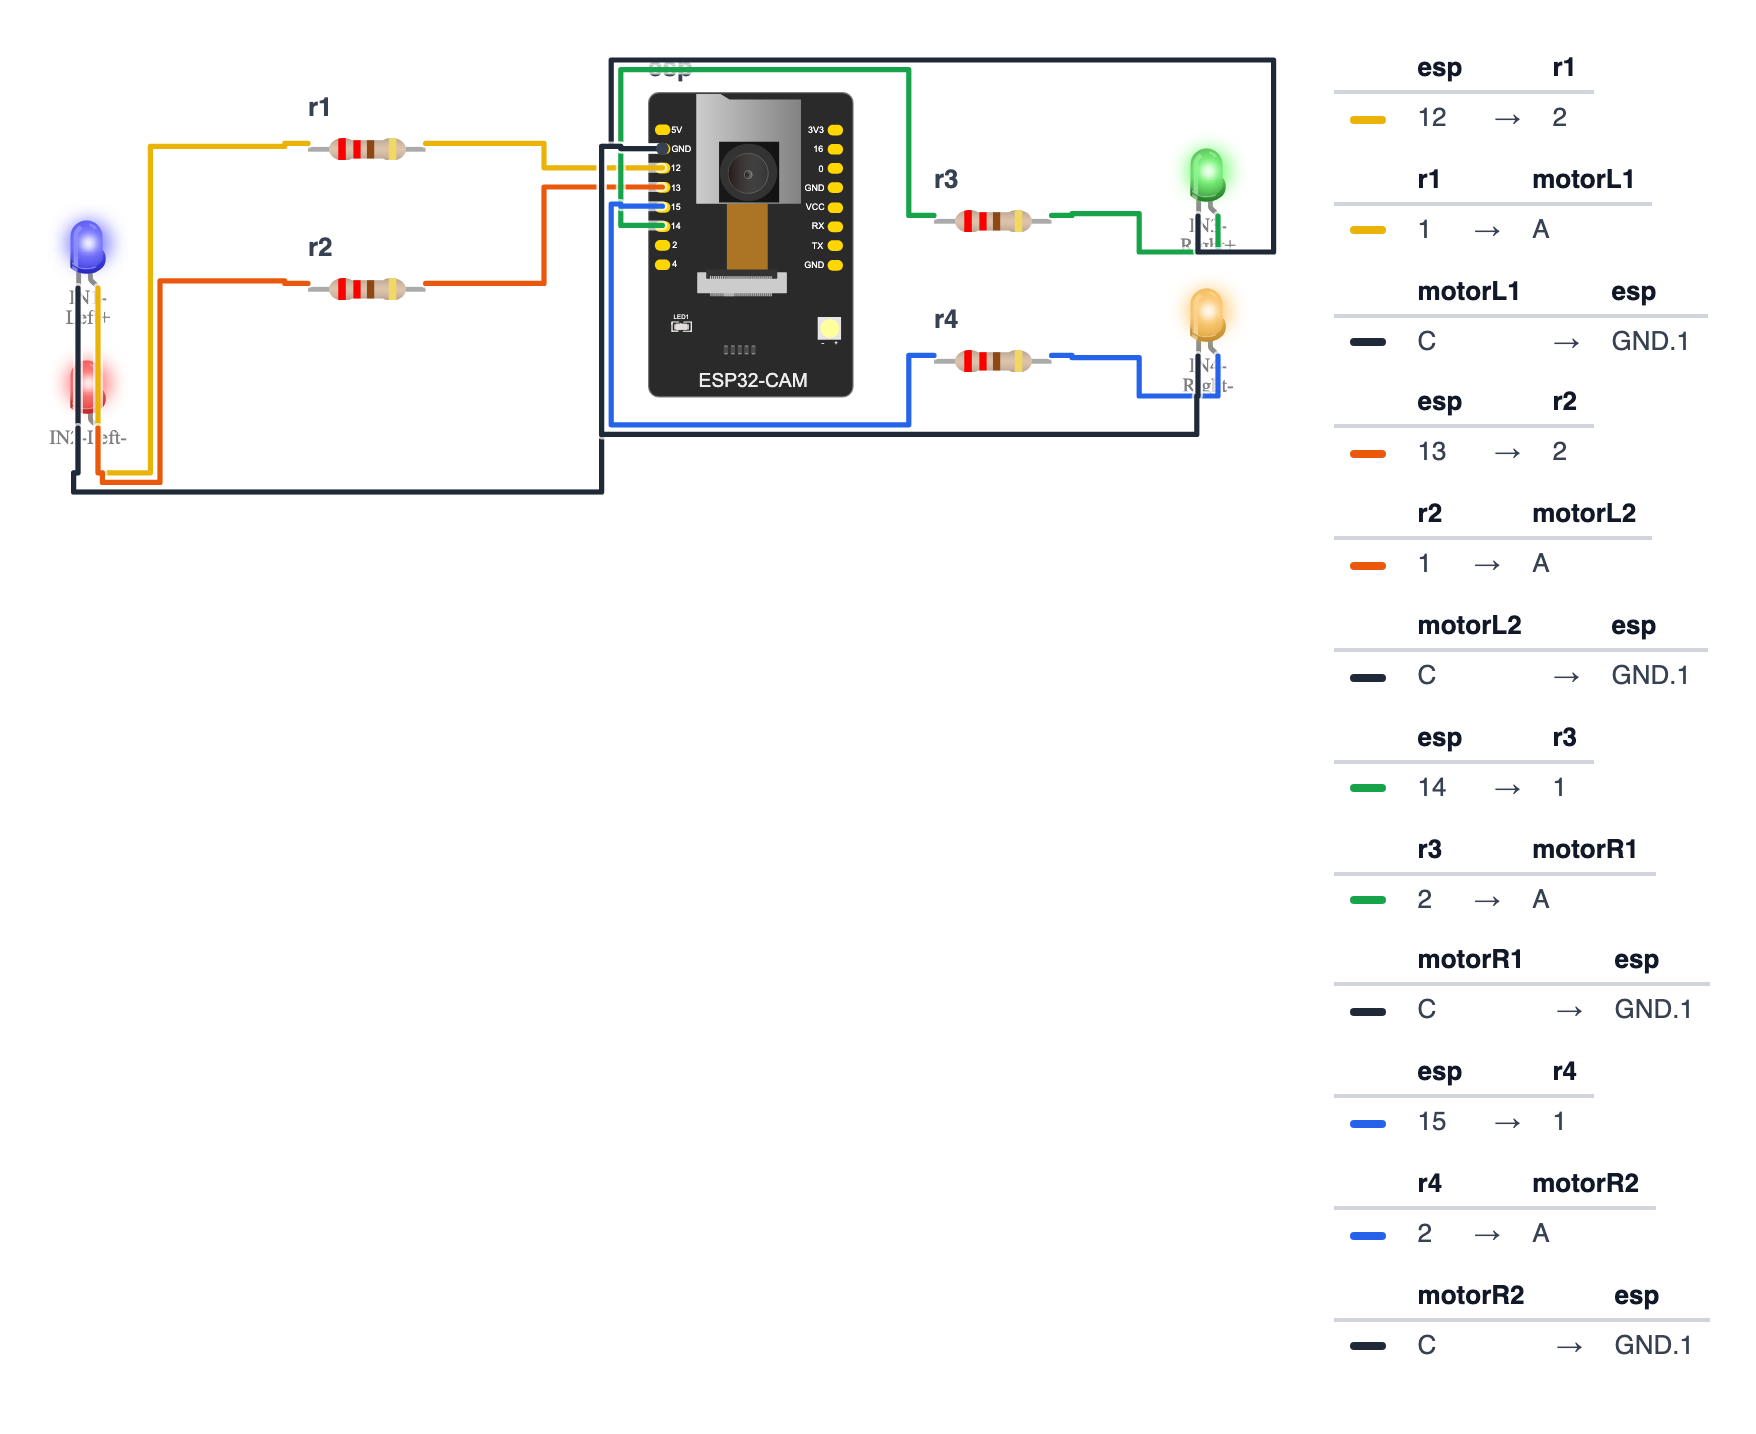
This rover is built on the AI-Thinker ESP32-CAM (not an ESP32-S3 or C6 DevKit). Its camera uses almost every pin, so use exactly these:
| ESP32-CAM GPIO | L298N Pin | What it does |
|---|---|---|
| GPIO 12 | IN1 (Left motor +) | Output |
| GPIO 13 | IN2 (Left motor −) | Output |
| GPIO 14 | IN3 (Right motor +) | Output |
| GPIO 15 | IN4 (Right motor −) | Output |
| 5V | +5V | Logic power |
| GND | GND | Shared ground |
ENA and ENB: leave the two little jumpers on the L298N’s ENA and ENB pins in place. They connect both enable pins to 5V, so the motors run at full speed whenever the IN pins say go. Don’t run any wire from ENA/ENB to the ESP32-CAM.
Battery to L298N:
- 18650 pack (+) → L298N 12V terminal
- 18650 pack (−) → L298N GND terminal
Motors:
- Left motor → OUT1 and OUT2
- Right motor → OUT3 and OUT4
No PWM note: The code below switches the motors fully on or off (no PWM speed control). The rover runs at full speed or stopped — that’s why the ENA/ENB jumpers stay on. Speed control would need two more pins for ENA and ENB, and the camera board has only one left (GPIO 2): GPIO 12–15 drive the motors, GPIO 16 is used by the board’s PSRAM memory chip, GPIO 0 is the camera clock, GPIO 4 is the flash LED, and GPIO 1 and 3 are the serial wires you upload through.
Step 2: Flash the code
Time: ~5 minutes (if already wired per Step 0)
Go back to Step 0’s FTDI setup, connect GPIO 0 to GND, and upload this code.
The big picture first. This program turns the ESP32-CAM into a mobile camera server that does two things at the same time:
- It runs a web page (port 80) with five drive buttons you tap on your phone.
- It runs a live video stream (port 81) that your phone browser displays as the camera feed.
Both servers run simultaneously — like two clerks in a shop, each handling their own customers. The camera grabs one JPEG photo, sends it to your phone, grabs the next, sends it — 10–15 photos per second. That is video. Copy this entire program into Arduino IDE and upload it:
// Note: This project requires ESP32-S3 or ESP32-CAM (camera)
#include "esp_camera.h"
#include <WiFi.h>
#include "esp_http_server.h"
#define CAM_PIN_PWDN 32
#define CAM_PIN_RESET -1
#define CAM_PIN_XCLK 0
#define CAM_PIN_SIOD 26
#define CAM_PIN_SIOC 27
#define CAM_PIN_D7 35
#define CAM_PIN_D6 34
#define CAM_PIN_D5 39
#define CAM_PIN_D4 36
#define CAM_PIN_D3 21
#define CAM_PIN_D2 19
#define CAM_PIN_D1 18
#define CAM_PIN_D0 5
#define CAM_PIN_VSYNC 25
#define CAM_PIN_HREF 23
#define CAM_PIN_PCLK 22
#define IN1 12
#define IN2 13
#define IN3 14
#define IN4 15
const char* ssid = "FPV-Rover";
const char* pass = "explore99";
httpd_handle_t stream_httpd = NULL;
httpd_handle_t camera_httpd = NULL;
void startCamera() {
camera_config_t config;
config.ledc_channel = LEDC_CHANNEL_0;
config.ledc_timer = LEDC_TIMER_0;
config.pin_d0 = CAM_PIN_D0; config.pin_d1 = CAM_PIN_D1;
config.pin_d2 = CAM_PIN_D2; config.pin_d3 = CAM_PIN_D3;
config.pin_d4 = CAM_PIN_D4; config.pin_d5 = CAM_PIN_D5;
config.pin_d6 = CAM_PIN_D6; config.pin_d7 = CAM_PIN_D7;
config.pin_xclk = CAM_PIN_XCLK;
config.pin_pclk = CAM_PIN_PCLK;
config.pin_vsync = CAM_PIN_VSYNC;
config.pin_href = CAM_PIN_HREF;
config.pin_sscb_sda = CAM_PIN_SIOD;
config.pin_sscb_scl = CAM_PIN_SIOC;
config.pin_pwdn = CAM_PIN_PWDN;
config.pin_reset = CAM_PIN_RESET;
config.xclk_freq_hz = 20000000;
config.pixel_format = PIXFORMAT_JPEG;
config.frame_size = FRAMESIZE_VGA;
config.jpeg_quality = 12;
config.fb_count = 1;
esp_camera_init(&config);
}
void motorCmd(const char* cmd) {
if (strcmp(cmd,"F")==0){ digitalWrite(IN1,HIGH);digitalWrite(IN2,LOW);
digitalWrite(IN3,HIGH);digitalWrite(IN4,LOW); }
else if (strcmp(cmd,"B")==0){ digitalWrite(IN1,LOW); digitalWrite(IN2,HIGH);
digitalWrite(IN3,LOW); digitalWrite(IN4,HIGH); }
else if (strcmp(cmd,"L")==0){ digitalWrite(IN1,LOW); digitalWrite(IN2,HIGH);
digitalWrite(IN3,HIGH);digitalWrite(IN4,LOW); }
else if (strcmp(cmd,"R")==0){ digitalWrite(IN1,HIGH);digitalWrite(IN2,LOW);
digitalWrite(IN3,LOW); digitalWrite(IN4,HIGH); }
else { for(int p:{IN1,IN2,IN3,IN4}) digitalWrite(p,LOW); }
}
static esp_err_t index_handler(httpd_req_t* req) {
static const char html[] =
"<!DOCTYPE html><html><head>"
"<meta name='viewport' content='width=device-width,initial-scale=1'>"
"<title>FPV Rover</title></head>"
"<body style='background:#000;text-align:center;margin:0'>"
"<h2 style='color:#fff;font-family:monospace;margin:8px'>FPV ROVER</h2>"
"<img src='http://192.168.4.1:81/stream' style='width:100%;max-width:640px'><br>"
"<div style='margin-top:8px'>"
"<button onclick=\"fetch('/go?d=F')\" style='padding:18px 28px;margin:4px;font-size:1.2em;background:#222;color:#fff;border:1px solid #555'>▲</button><br>"
"<button onclick=\"fetch('/go?d=L')\" style='padding:18px 28px;margin:4px;font-size:1.2em;background:#222;color:#fff;border:1px solid #555'>◄</button>"
"<button onclick=\"fetch('/go?d=S')\" style='padding:18px 28px;margin:4px;font-size:1.2em;background:#222;color:#fff;border:1px solid #555'>■</button>"
"<button onclick=\"fetch('/go?d=R')\" style='padding:18px 28px;margin:4px;font-size:1.2em;background:#222;color:#fff;border:1px solid #555'>►</button><br>"
"<button onclick=\"fetch('/go?d=B')\" style='padding:18px 28px;margin:4px;font-size:1.2em;background:#222;color:#fff;border:1px solid #555'>▼</button>"
"</div></body></html>";
httpd_resp_set_type(req, "text/html");
httpd_resp_send(req, html, strlen(html));
return ESP_OK;
}
static esp_err_t go_handler(httpd_req_t* req) {
char buf[32];
httpd_req_get_url_query_str(req, buf, sizeof(buf));
char dir[4] = "S";
if (strstr(buf, "d=F")) strcpy(dir,"F");
else if (strstr(buf, "d=B")) strcpy(dir,"B");
else if (strstr(buf, "d=L")) strcpy(dir,"L");
else if (strstr(buf, "d=R")) strcpy(dir,"R");
motorCmd(dir);
httpd_resp_send(req, "OK", 2);
return ESP_OK;
}
#define PART_BOUNDARY "123456789000000000000987654321"
static const char* _STREAM_CONTENT_TYPE =
"multipart/x-mixed-replace;boundary=" PART_BOUNDARY;
static const char* _STREAM_BOUNDARY = "\r\n--" PART_BOUNDARY "\r\n";
static const char* _STREAM_PART =
"Content-Type: image/jpeg\r\nContent-Length: %u\r\n\r\n";
static esp_err_t stream_handler(httpd_req_t* req) {
camera_fb_t* fb = NULL;
char part_buf[64];
httpd_resp_set_type(req, _STREAM_CONTENT_TYPE);
while (true) {
fb = esp_camera_fb_get();
if (!fb) continue;
httpd_resp_send_chunk(req, _STREAM_BOUNDARY, strlen(_STREAM_BOUNDARY));
size_t hlen = snprintf(part_buf, 64, _STREAM_PART, fb->len);
httpd_resp_send_chunk(req, part_buf, hlen);
httpd_resp_send_chunk(req, (const char*)fb->buf, fb->len);
esp_camera_fb_return(fb);
}
return ESP_OK;
}
void startControlServer() {
httpd_config_t cfg = HTTPD_DEFAULT_CONFIG();
cfg.server_port = 80;
if (httpd_start(&camera_httpd, &cfg) == ESP_OK) {
httpd_uri_t index = {"/", HTTP_GET, index_handler, NULL};
httpd_uri_t go = {"/go", HTTP_GET, go_handler, NULL};
httpd_register_uri_handler(camera_httpd, &index);
httpd_register_uri_handler(camera_httpd, &go);
}
}
void startStreamServer() {
httpd_config_t cfg = HTTPD_DEFAULT_CONFIG();
cfg.server_port = 81;
if (httpd_start(&stream_httpd, &cfg) == ESP_OK) {
httpd_uri_t stream = {"/stream", HTTP_GET, stream_handler, NULL};
httpd_register_uri_handler(stream_httpd, &stream);
}
}
void setup() {
Serial.begin(115200);
for(int p:{IN1,IN2,IN3,IN4}) pinMode(p,OUTPUT);
motorCmd("S");
startCamera();
WiFi.softAP(ssid, pass);
Serial.println("FPV Rover ready!");
Serial.print("Control: http://"); Serial.println(WiFi.softAPIP());
Serial.println("Stream: http://192.168.4.1:81/stream");
startControlServer();
startStreamServer();
}
void loop() {
delay(10);
}Line-by-line: what every line does and why
Lines 1–3: Borrowing the instruction books
#include "esp_camera.h"
#include <WiFi.h>
#include "esp_http_server.h"#include means “grab this instruction book.” Someone already wrote how to talk to the camera, how to create a WiFi hotspot, and how to run a web server. We borrow all three so we don’t have to figure it out ourselves.
Lines 5–22: Naming the camera’s legs (pins)
#define CAM_PIN_PWDN    32
#define CAM_PIN_RESET   -1
...
#define CAM_PIN_PCLK    22
#define gives a number a name. The camera chip is connected to the board through 16 thin metal legs (called pins). Each pin has a number — like house numbers on a street. These names just make the code readable. CAM_PIN_PWDN sounds more descriptive than “32.” The -1 for RESET means “this pin doesn’t exist on this board.”
Lines 24–27: Naming the motor pins
#define IN1 12
#define IN2 13
#define IN3 14
#define IN4 15
Four pins control the two drive motors. IN1 and IN2 control the left motor (HIGH/LOW combination = direction). IN3 and IN4 control the right motor the same way.
Lines 29–30: The WiFi hotspot name and password
const char* ssid = "FPV-Rover";
const char* pass = "explore99";
const char* means “a piece of text that never changes.” ssid is the network name your phone sees in its WiFi list. pass is the password to join it. Change these to whatever you like.
Lines 32–33: Two server handles
httpd_handle_t stream_httpd = NULL;
httpd_handle_t camera_httpd = NULL;
Think of these as two phone numbers — one for the control page server, one for the video stream server. They start as empty (NULL) and get filled in when the servers start. You need two because the video stream runs in an endless loop and would block the control buttons if they shared a server.
Lines 35–55: startCamera() — waking up the camera
void startCamera() {
  camera_config_t config;
  config.ledc_channel  = LEDC_CHANNEL_0;
  ...
  config.pixel_format  = PIXFORMAT_JPEG;
  config.frame_size    = FRAMESIZE_VGA;
  config.jpeg_quality  = 12;
  config.fb_count      = 1;
  esp_camera_init(&config);
}
This function is like filling out a form for the camera before it turns on. Important settings:
PIXFORMAT_JPEG— camera compresses photos as JPEG before sending. Raw pixels would be 10x bigger and too slow for WiFi.FRAMESIZE_VGA— 640×480 pixels per photo. Big enough to see clearly, small enough for WiFi.jpeg_quality = 12— how compressed the JPEG is. Lower number = better quality. 12 is a good balance.esp_camera_init(&config)— hands the filled-out form to the camera driver and turns it on.
Lines 57–68: motorCmd() — four directions
void motorCmd(const char* cmd) {
  if      (strcmp(cmd,"F")==0){ ... }
  else if (strcmp(cmd,"B")==0){ ... }
  else if (strcmp(cmd,"L")==0){ ... }
  else if (strcmp(cmd,"R")==0){ ... }
  else                         { for(int p:{IN1,IN2,IN3,IN4}) digitalWrite(p,LOW); }
}
This function reads a letter (“F”, “B”, “L”, “R”) and sets four pins HIGH or LOW accordingly. Think of each motor as a water tap — turning IN1 HIGH and IN2 LOW makes water flow forward. Flip them and water flows backward. Different combinations on left vs right motor produce turns. strcmp compares two words — it returns 0 if they match. The last else stops both motors when the command is “S” (stop) or anything unknown — a safety default.
index_handler and go_handler: Two web page workers
index_handler runs when your phone browser opens 192.168.4.1. It sends back the HTML page with the five arrow buttons. Each button uses JavaScript fetch('/go?d=F') — which is like sending a tiny text message to the rover saying “drive forward.”
go_handler runs when a button sends that message. It reads the letter from the URL (the d=F part), calls motorCmd, and replies “OK.”
stream_handler: The endless photo sender
while (true) {
  fb = esp_camera_fb_get();
  if (!fb) continue;
  ...
  esp_camera_fb_return(fb);
}
This runs in an infinite loop — “true” means “always.” Each loop: grab a photo (fb_get), send it to the browser in small chunks, then return the photo buffer (fb_return). That last step is critical — it gives the memory back to the camera so it can take the next photo. Forgetting it is like never emptying your trash can. After a few photos, memory runs out and the camera freezes.
setup(): The morning routine
for(int p:{IN1,IN2,IN3,IN4}) pinMode(p,OUTPUT);
motorCmd("S");
startCamera();
WiFi.softAP(ssid, pass);
startControlServer();
startStreamServer();
setup() runs once when you power on. Step by step:
- Set all four motor pins as
OUTPUT(they will push voltage out, not read it in). motorCmd("S")— stop the motors immediately at startup so the rover doesn’t lurch.startCamera()— wake up the camera.WiFi.softAP(ssid, pass)— create the WiFi hotspot.softAPmeans “software access point” — your ESP32-CAM becomes a mini router.- Start both servers: control on port 80, stream on port 81.
loop(): Almost empty
void loop() {
  delay(10);
}
loop() runs forever after setup(). But this program does almost nothing here — the web servers handle everything in background tasks. delay(10) pauses 10 milliseconds each cycle so the processor doesn’t spin at full speed doing nothing.
The whole thing in one sentence
When powered on, the rover creates a WiFi hotspot, starts two web servers (one for driving, one for video), and waits. When your phone connects and opens the page, it sees live video and taps buttons that tell the motors which way to turn.
First thing to try: After upload and reset, open Serial Monitor at 115200 baud. You should see FPV Rover ready! and the IP address 192.168.4.1.
After uploading: disconnect GPIO 0 from GND. Press reset. Serial Monitor shows FPV Rover ready!.
Step 3: First drive
Time: ~5 minutes
- Disconnect FTDI. Power the rover with the 18650 battery pack.
- Connect your phone to FPV-Rover WiFi (password: explore99).
- Open browser:
192.168.4.1. - You should see: live camera feed at the top, five drive buttons at the bottom.
- Tap the forward button (▲). The rover drives forward.
If video shows but buttons don’t move motors: Check 18650 battery is connected to L298N. Motors need battery power — USB alone powers only the camera and code.
If video doesn’t appear: Browser may need a moment for the stream to connect. Try refreshing. Some mobile browsers handle MJPEG better than others — Chrome works best.
Step 4: Explore!
Drive the rover under furniture. Send it into the next room. Leave it running and watch what your pets do when you’re not around.
Frame rate: Expect 10–15 FPS at VGA resolution on local WiFi. Smooth enough for navigation. If it feels laggy, you can reduce resolution by changing FRAMESIZE_VGA to FRAMESIZE_QVGA (320×240) for higher frame rate.
What just happened (what you learned)
-
MJPEG streaming — MJPEG (Motion JPEG) is just JPEG images sent one after another in a
multipart/x-mixed-replaceHTTP response. The browser opens the connection, receives the first frame, displays it, immediately receives the next frame and replaces it. No video codec, no buffering, no JavaScript. At VGA + quality 12, it uses about 1–2 Mbps of WiFi bandwidth. -
Two servers on two ports — The stream handler runs in a
while(true)loop — it never returns. If it ran on the same server as the control page, no other requests could be handled while streaming. Two separatehttpd_start()instances run in independent FreeRTOS tasks, so streaming and driving happen simultaneously. -
esp_camera_fb_return() — The camera driver maintains a pool of frame buffers in PSRAM.
esp_camera_fb_get()takes one;esp_camera_fb_return()gives it back. If you forget this, the pool empties after a few frames, the camera freezes, and you need to restart. This is the most common bug in ESP32-CAM projects. -
ESP32-CAM GPIO constraints — The AI-Thinker board uses most GPIO pins for the camera itself. GPIOs 12–15 drive the motors here because they’re free when there’s no SD card. GPIO 16 belongs to the PSRAM memory chip. GPIO 4 has the onboard flash LED. GPIO 0 is the camera clock and the boot pin. GPIO 2 is the only pin still free — not enough for separate ENA and ENB speed control. Design around these constraints or you’ll conflict with the camera.
Level Up
Camera pan servo: Wire the servo’s signal wire to GPIO 2 (the one free pin — GPIO 4 would make the flash LED flicker). Add swipe detection on the video image: touchstart records finger X, touchend calculates deltaX. If deltaX > 30: pan right. If deltaX < -30: pan left. Send the new angle to a /pan?a=90 endpoint. Now you can look around without turning the rover.
Night vision: The ESP32-CAM has a white LED on GPIO 4. digitalWrite(4, !digitalRead(4)) toggles it. Add a /flash button to the control page. Full brightness washes out close objects — try PWM at 30% for useful illumination.
Drive from anywhere: Connect to your home WiFi (WiFi.begin() instead of softAP()). Then run ngrok on a computer: ngrok http [rover-IP]:80. You get a public URL. Now you can drive the rover from anywhere in the world through a browser. Latency increases (100–200ms over internet vs <30ms local) but it works.
★★ You completed: FPV Ground Rover!
Troubleshooting
| Problem | Fix |
|---|---|
| Can’t upload to ESP32-CAM | GPIO 0 must be connected to GND during upload. Try a different USB port. Check FTDI TX→U0R and RX→U0T (crossed correctly). |
| Camera init fails, Serial shows error | Power issue — ESP32-CAM needs clean 5V. Try from FTDI’s 5V pin or a dedicated 5V supply. |
| Video stream doesn’t load | Give it 5–10 seconds — stream takes a moment to start. Refresh the page. Use Chrome (best MJPEG support). |
| Video freezes after a few seconds | esp_camera_fb_return(fb) is missing from the stream handler — check your code copy. |
| Motors don’t respond to button taps | 18650 battery disconnected. Motors need the battery — USB alone powers only the board and camera. |
| One motor runs backward | Swap OUT1/OUT2 or OUT3/OUT4 wires at the L298N terminal for that motor. |
| Video blurry or dark | Adjust JPEG quality: config.jpeg_quality = 8 (better quality, slower). Ensure camera lens is clean. |
| Rover circles instead of going straight | One motor is slightly weaker — normal physical variation. With the ENA/ENB jumpers on, both motors always get full power, so the code can’t slow one side down. Check that no wheel rubs on the chassis, that the motor wires are tight in the L298N terminals, and that the battery is charged (a weak battery makes the difference bigger). Then correct your course while driving: tap ◄ or ► for a moment, then ▲ again. |
| Motors don’t move at all, even with the battery | The ENA/ENB jumpers are missing. Put them back on the L298N — without them the motors are switched off. |