Parent info
Parts you need
Affiliate links — we may earn a small commission
Try this circuit in your browser!
Run the code, press the buttons and watch what happens — before you buy any parts. No account needed.
Open in Simulator →Your LEGO Technic set is about to get WiFi.
Imagine this: you’ve got a LEGO Technic tracked vehicle — maybe the Land Rover, maybe an excavator, maybe anything with wheels or tracks and Power Functions motors. You clip a small electronics board onto a LEGO beam (no screws, no glue). You cut a $3 extension cable (not the one that came with your set). You flash some code. Now it drives from your phone browser with two virtual tank levers.
Every change is 100% reversible. Unplug the adapter and your LEGO set is back to stock in 90 seconds.
That’s what we’re building. In ~4 hours. For about $33 in add-ons.
What you’ll need
| Part | What it does | Price |
|---|---|---|
| Any LEGO Technic set with Power Functions motors | The chassis. The brain of this project goes inside it. | existing |
| ESP32-S3 Dev Board | Hosts the WiFi server and controls the L298N. | ~$12 |
| L298N Motor Driver | Replaces the LEGO IR receiver — drives PF motors directly. | ~$6 |
| LEGO PF Extension Cable | Cut this, not the cable that came with your set. | ~$3 |
| 7.4V LiPo battery (2S) | Powers the motors. Works perfectly with LEGO PF motors at 7.4V. | ~$10 |
| Jumper wires | Connects ESP32 to L298N. | ~$2 |
Total add-on cost: ~$33 | Time: ~4 hours | Difficulty: ●●●○○
Which LEGO sets work best? Tracked vehicles (42099, 42065, 42114) give perfect two-track steering. Cranes and arms (42009, 42023) have multiple joints you can control independently. Cars with differentials work too. Any set with Power Functions M-Motors, L-Motors, or XL-Motors is ready to hack.
How it works (60 seconds)
Think of it like this: the L298N is doing exactly what LEGO’s own IR receiver and battery box did — but now you control it from your phone.
LEGO Power Functions motors are just small DC motors with two wires. The LEGO battery box and IR receiver apply voltage to those wires in one direction (forward) or the other (backward). The L298N does the same thing — it’s an H-bridge that can push current in either direction. Your ESP32 tells the L298N which direction and how fast.
You cut a PF extension cable to get wires you can connect to the L298N’s screw terminals. The actual PF cable that came with your set stays untouched, stored in the box.
The ESP32 hosts a web page with two vertical sliders — one per track. Push both up: both tracks forward. Pull one back while pushing the other forward: spin in place. Just like a real tank.
Step 0: The reversibility rule — read this first
This is important. The golden rule of LEGO hacking: never cut, drill, or glue anything that came with the set.
- DO cut a LEGO PF extension cable ($3 on Amazon) — not your set’s cable
- DO use a 3D-printed clip-on electronics mount — not glue or screws through bricks
- DO use zip ties — not permanent adhesive
- Store the original cables in the set’s box
When you want to go back to stock: unplug the extension cable, re-plug the original, unclip the mount. Under 2 minutes. Zero damage. The set retains full value.
Step 1: Wire the LEGO PF motor to L298N
Time: ~15 minutes
First, understand the LEGO PF connector:
Looking at the flat side of the connector from outside:
  LEGO PF Connector (flat side, from outside):
  +-------+-------+-------+-------+
  |   1   |   2   |   3   |   4   |
  |  C1   |  GND  |  GND  |  C2   |
  | (Red) |(Black)|(Black)|(Blue) |
  +-------+-------+-------+-------+

  C1 and C2 drive the motor — reversing them reverses the motor.
  Pins 2 and 3 are both ground (internally connected).
Cut the extension cable and strip the ends. Identify the four wires: red (C1), blue (C2), and both black (GND).
Connect to L298N:
- Left track motor: Red (C1) → OUT1, Blue (C2) → OUT2, Black → GND rail
- Right track motor: Red (C1) → OUT3, Blue (C2) → OUT4, Black → GND rail
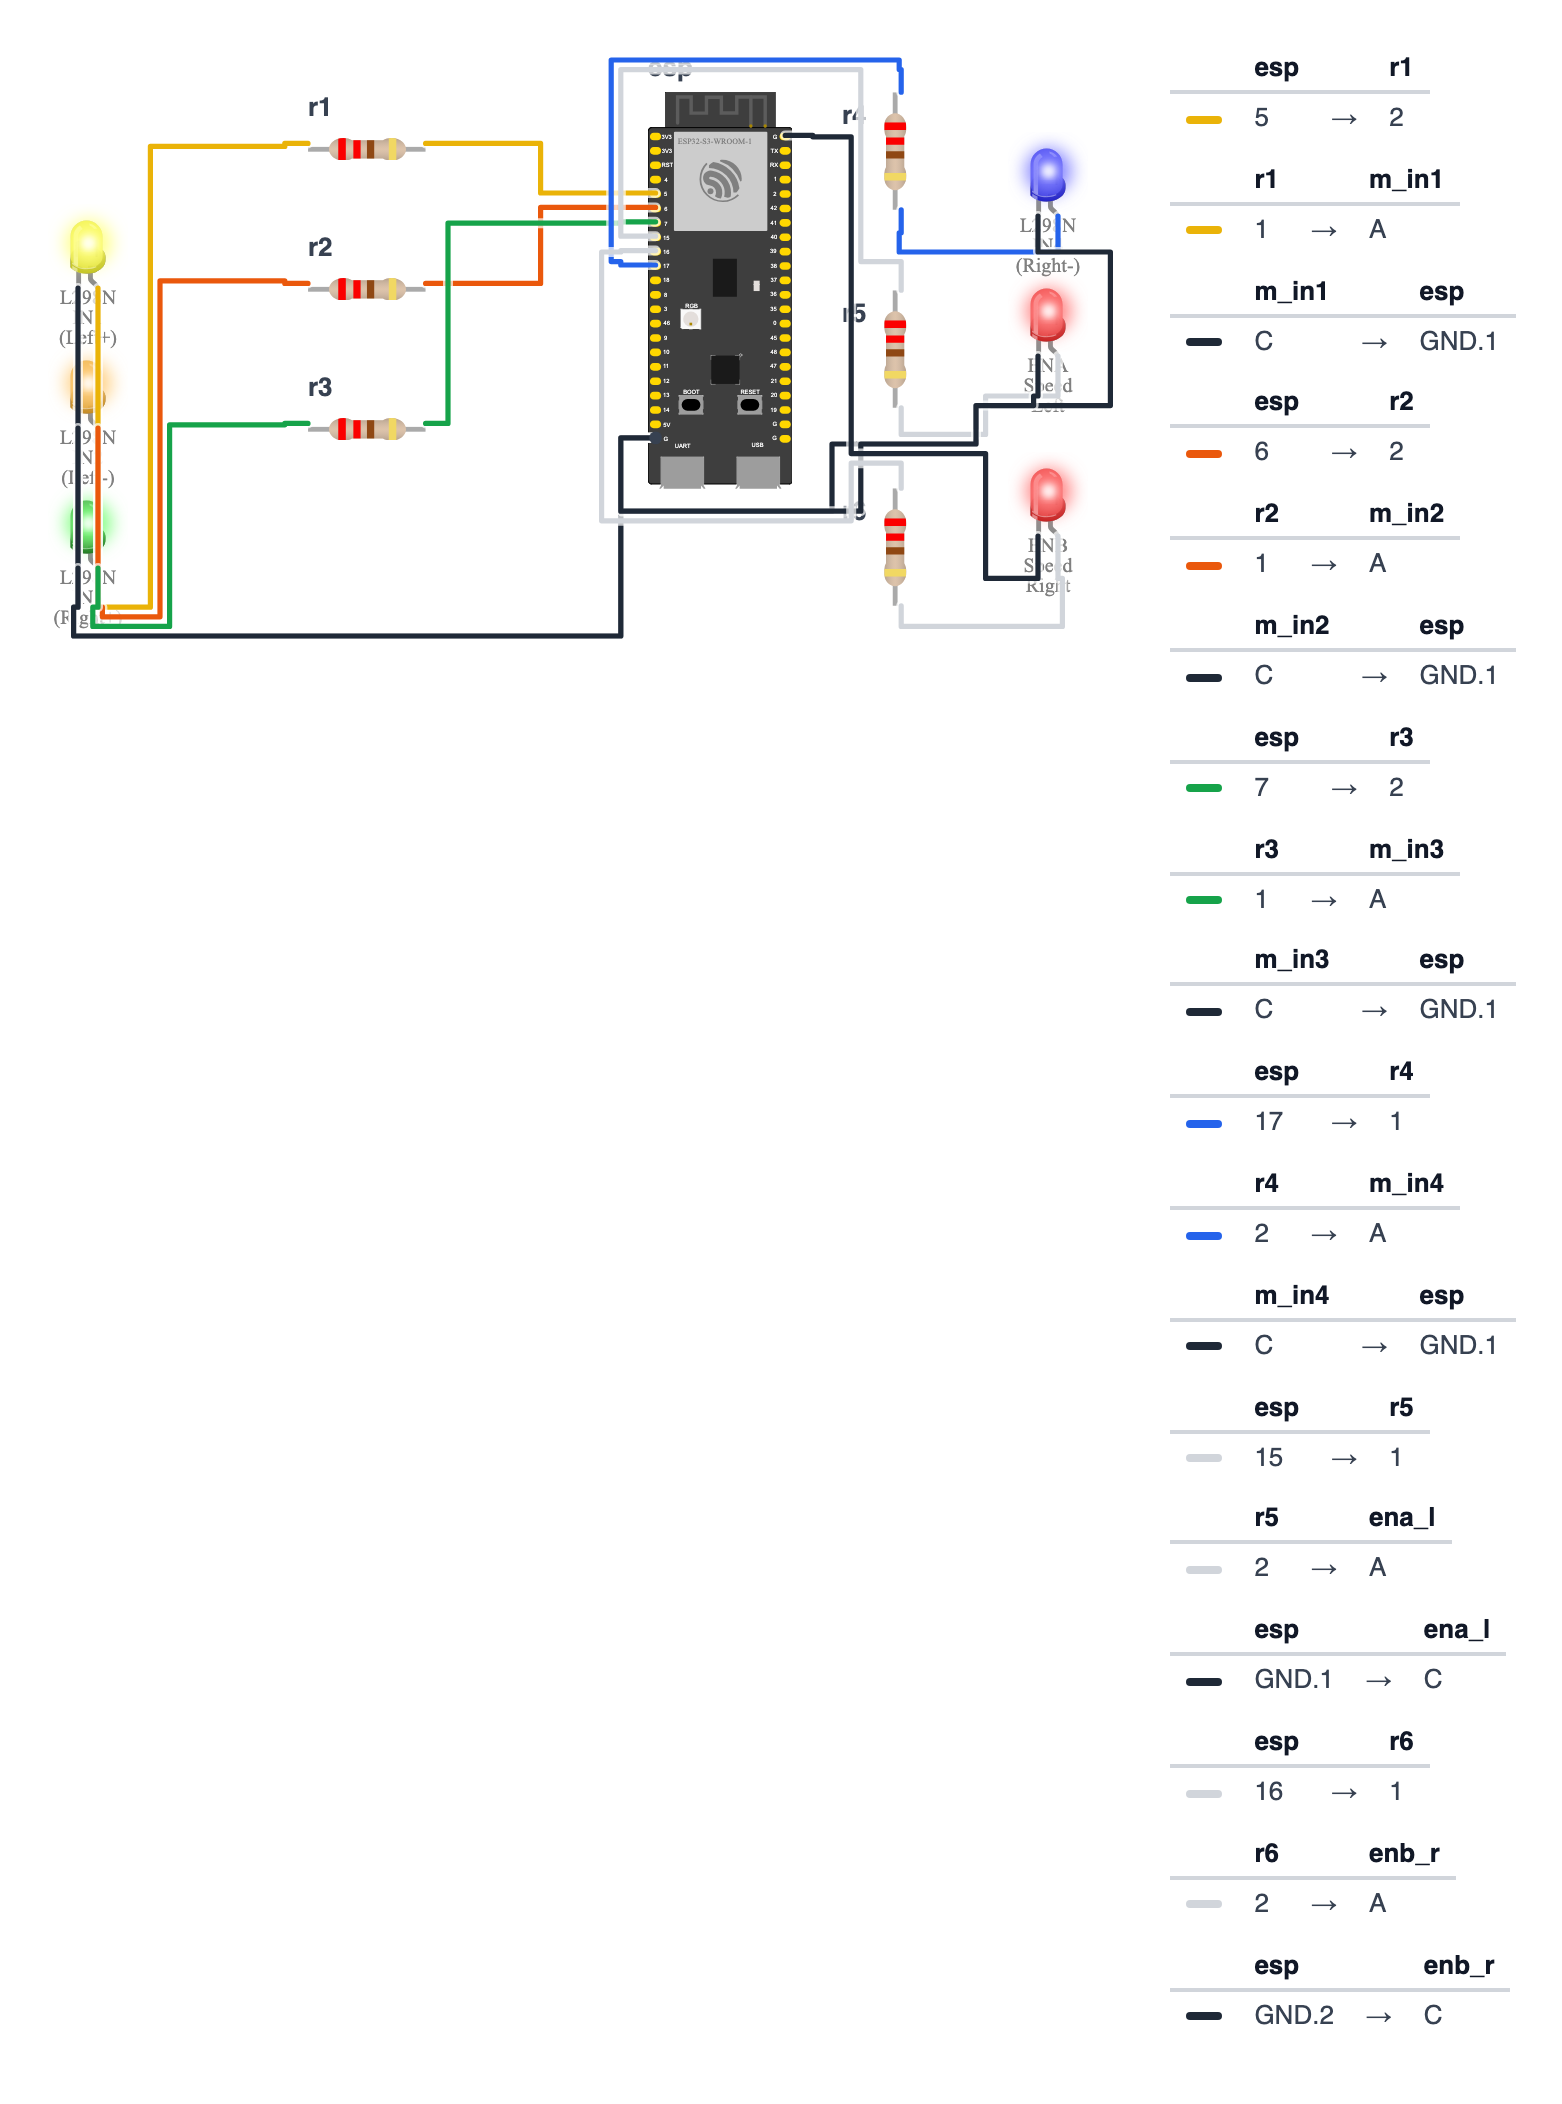
Connect ESP32 to L298N:
| ESP32-S3 | ESP32-C6 | L298N Pin | What it does |
|---|---|---|---|
| GPIO 5 | GPIO 19 | IN1 (Left track +) | Output |
| GPIO 6 | GPIO 20 | IN2 (Left track −) | Output |
| GPIO 7 | GPIO 22 | IN3 (Right track +) | Output |
| GPIO 17 | GPIO 23 | IN4 (Right track −) | Output |
| GPIO 15 | GPIO 3 | ENA (Left PWM speed) | Output |
| GPIO 16 | GPIO 4 | ENB (Right PWM speed) | Output |
| 5V | 5V | +5V | Logic power |
| GND | GND | GND | Shared ground |
LiPo battery to L298N:
- Battery (+) → L298N 12V terminal
- Battery (−) → L298N GND terminal
Check: Connections at L298N screw terminals: 2 wires per motor output (4 total motor wires), 1 battery pair (2 wires), logic pins from ESP32. Before powering on, verify battery polarity — reversed LiPo can damage the L298N.
Step 2: Mount the electronics in your LEGO set
Time: ~10 minutes
The cleanest approach: 3D-printed LEGO-compatible electronics tray. It has studs on the bottom that click into LEGO Technic beams and a flat platform for ESP32 and L298N.
Search Thingiverse for “LEGO Technic electronics mount” — dozens of free designs. Or print a flat 8×4 stud plate (64mm × 32mm base) in PLA.
3D print specs if you design your own:
Stud center-to-center spacing: 8.0mm
Stud height:                   1.8mm
Stud diameter:                 4.8mm
Plate base thickness:          3.2mm
Tray walls:                    12mm high
If you don’t have a 3D printer: zip-tie the ESP32 and L298N to a flat LEGO plate. Not as clean but works fine. No screws into LEGO bricks.
Check: The mount clicks into the LEGO set firmly and can be removed by pulling straight up with gentle force. If it won’t click in, sand the studs down slightly.
Step 3: Flash the code
Time: ~5 minutes
Install ESPAsyncWebServer library in Arduino IDE. Select ESP32S3 Dev Module. Upload.
The big picture first. This program has two parts running at the same time:
- A web page stored inside the ESP32 that your phone loads — it shows two vertical sliders, one for each track.
- A web server that listens for slider movement and sets motor speeds.
When you drag the left slider up, the browser sends /tank?L=200&R=0 to the ESP32. The ESP32 reads those numbers and spins the motors accordingly. Think of it like two independent volume knobs — one for the left track, one for the right.
// ========== CHOOSE YOUR BOARD ==========
// Uncomment the line for YOUR board:
#define BOARD_S3    // ESP32-S3-DevKitC-1
//#define BOARD_C6  // ESP32-C6-DevKitC-1
// ========================================

#ifdef BOARD_S3
  #define PIN_IN1              5
  #define PIN_IN2              6
  #define PIN_IN3              7
  #define PIN_IN4              17
  #define PIN_ENA              15
  #define PIN_ENB              16
#endif
#ifdef BOARD_C6
  #define PIN_IN1              19
  #define PIN_IN2              20
  #define PIN_IN3              22
  #define PIN_IN4              23
  #define PIN_ENA              3
  #define PIN_ENB              4
#endif

#include <WiFi.h>
#include <ESPAsyncWebServer.h>

const char* ssid = "LEGOTank";
const char* pass = "crushit!";

AsyncWebServer server(80);

const char tankHTML[] PROGMEM = R"rawliteral(
<!DOCTYPE html><html>
<head>
<meta name="viewport" content="width=device-width, initial-scale=1, user-scalable=no">
<title>LEGO Tank</title>
<style>
  body{background:#0d0d0d;color:#ffd700;font-family:monospace;
       display:flex;flex-direction:column;align-items:center;
       justify-content:center;height:100vh;gap:20px}
  h1{font-size:2em;letter-spacing:6px}
  .tracks{display:flex;gap:40px}
  .slider-wrap{display:flex;flex-direction:column;align-items:center;gap:10px}
  input[type=range]{
    -webkit-appearance:slider-vertical;
    width:50px;height:200px;
    accent-color:#ffd700;cursor:pointer}
  label{font-size:1.2em;font-weight:bold}
  #status{color:#888;font-size:0.85em}
</style></head>
<body>
<h1>LEGO TANK</h1>
<div class="tracks">
  <div class="slider-wrap">
    <label>LEFT</label>
    <input type="range" id="slL" min="-255" max="255" value="0"
      oninput="sendCmd()" onchange="center(this)">
    <span id="vL">0</span>
  </div>
  <div class="slider-wrap">
    <label>RIGHT</label>
    <input type="range" id="slR" min="-255" max="255" value="0"
      oninput="sendCmd()" onchange="center(this)">
    <span id="vR">0</span>
  </div>
</div>
<div id="status">Connect and slide!</div>
<script>
function sendCmd(){
  let L = document.getElementById('slL').value;
  let R = document.getElementById('slR').value;
  document.getElementById('vL').textContent = L;
  document.getElementById('vR').textContent = R;
  fetch(`/tank?L=${L}&R=${R}`);
  document.getElementById('status').textContent = `L:${L}  R:${R}`;
}
function center(el){
  el.value=0; sendCmd();
}
</script></body></html>
)rawliteral";

void setTrack(int L, int R) {
  if (L >= 0){ digitalWrite(PIN_IN1,HIGH); digitalWrite(PIN_IN2,LOW); }
  else        { digitalWrite(PIN_IN1,LOW);  digitalWrite(PIN_IN2,HIGH); L=-L; }
  ledcWrite(PIN_ENA, constrain(L,0,255));

  if (R >= 0){ digitalWrite(PIN_IN3,HIGH); digitalWrite(PIN_IN4,LOW); }
  else        { digitalWrite(PIN_IN3,LOW);  digitalWrite(PIN_IN4,HIGH); R=-R; }
  ledcWrite(PIN_ENB, constrain(R,0,255));
}

void setup() {
  Serial.begin(115200);
  for(int p:{PIN_IN1,PIN_IN2,PIN_IN3,PIN_IN4}) pinMode(p,OUTPUT);
  ledcAttach(PIN_ENA,5000,8);
  ledcAttach(PIN_ENB,5000,8);

  WiFi.softAP(ssid,pass);
  Serial.println(WiFi.softAPIP());

  server.on("/", HTTP_GET, [](AsyncWebServerRequest* r){
    r->send_P(200,"text/html",tankHTML);
  });
  server.on("/tank", HTTP_GET, [](AsyncWebServerRequest* r){
    int L = r->hasParam("L") ? r->getParam("L")->value().toInt() : 0;
    int R = r->hasParam("R") ? r->getParam("R")->value().toInt() : 0;
    setTrack(L, R);
    r->send(200,"text/plain","OK");
  });
  server.begin();
  Serial.println("LEGO Tank ready! SSID: LEGOTank / crushit!");
}

void loop() { delay(10); }
Line-by-line: what every line does and why
Lines 1–2: Borrowing the WiFi and web server instruction books
#include <WiFi.h>
#include <ESPAsyncWebServer.h>
#include means “grab this instruction book.” WiFi.h teaches the ESP32 how to create a wireless network. ESPAsyncWebServer.h teaches it how to be a web server — sending web pages and receiving button taps.
Lines 7–22: Naming the motor pins
#define PIN_IN1              5
#define PIN_IN2              6
...
#define PIN_ENB              16
#define gives a number a friendlier name. Pin 5 is now called PIN_IN1 (on the C6, the #ifdef BOARD_C6 block uses pin 19). IN1 and IN2 together control the left track — set IN1 HIGH and IN2 LOW for forward, flip them for backward. ENA and ENB control the speed of each track via PWM (a kind of rapid on/off switching that acts like a dimmer switch).
Lines 11–12: WiFi name and password
const char* ssid = "LEGOTank";
const char* pass = "crushit!";
const char* means “a piece of text that never changes.” When the ESP32 creates its WiFi hotspot, your phone sees “LEGOTank” in the network list. Type “crushit!” to join.
Line 14: Creating the web server
AsyncWebServer server(80);This creates a web server that listens on port 80 — the default port browsers use for web pages. Port numbers are like apartment numbers in a building: 80 = web pages, 81 = something else. Async means “doesn’t freeze the motors while waiting for the browser to respond.”
tankHTML: The web page stored inside the chip
const char tankHTML[] PROGMEM = R"rawliteral(...)rawliteral";PROGMEM stores the web page text in flash memory (like a hard drive) instead of RAM. The ESP32 only has 512 KB of RAM but 4 MB of flash — HTML pages live there. R"rawliteral(...)" is a way to write multi-line text without special characters causing problems.
Inside the HTML: two vertical sliders, each going from -255 to +255. The JavaScript sendCmd() function runs every time you drag a slider. It reads both slider values and sends them to the ESP32 as a web request: /tank?L=200&R=-150.
onchange="center(this)" runs when you release the slider — it snaps back to 0 and sends stop. This is the safety behaviour: let go = stop.
setTrack(int L, int R): Translating numbers to motor movement
void setTrack(int L, int R) {
  if (L >= 0){ digitalWrite(PIN_IN1,HIGH); digitalWrite(PIN_IN2,LOW); }
  else        { digitalWrite(PIN_IN1,LOW);  digitalWrite(PIN_IN2,HIGH); L=-L; }
  ledcWrite(PIN_ENA, constrain(L,0,255));
  ...
}
L is a number from -255 to +255. Positive = forward, negative = backward. The if/else sets the direction by flipping the two direction pins. When L is negative, we flip the pins AND convert L to positive (using -L) because PWM speed must always be a positive number — direction and speed are handled separately. ledcWrite(PIN_ENA, ...) sets the speed on the ENA pin (left track speed). constrain(L, 0, 255) makes sure the number never goes below 0 or above 255 — just like a speed limit.
setup(): One-time startup
for(int p:{PIN_IN1,PIN_IN2,PIN_IN3,PIN_IN4}) pinMode(p,OUTPUT);
ledcAttach(PIN_ENA,5000,8);
ledcAttach(PIN_ENB,5000,8);
WiFi.softAP(ssid,pass);
server.begin();
for(int p:{PIN_IN1,...}) is a compact loop that sets each motor pin to OUTPUT mode (they push voltage out, not read it in). ledcAttach(PIN_ENA, 5000, 8) sets up PWM on the ENA speed pin in one step: frequency 5000 Hz, 8-bit resolution (0–255 range). WiFi.softAP() creates the hotspot. server.begin() starts listening for browser connections.
loop(): Almost nothing
void loop() { delay(10); }The server handles everything in background callbacks — the main loop just waits. delay(10) pauses 10 milliseconds each cycle so the CPU doesn’t spin uselessly.
The whole thing in one sentence
When powered on, the tank creates a WiFi hotspot and serves a web page with two vertical sliders. When you drag a slider, the browser sends the value to the ESP32, which sets the matching track speed — positive number forward, negative backward.
First thing to try: Connect to LEGOTank WiFi, open 192.168.4.1, and push both sliders to the top. The tank should drive straight forward. Now pull one slider down while keeping the other up — the tank spins in place.
Check: Serial Monitor shows IP. Connect phone to LEGOTank WiFi (password: crushit!). Open
192.168.4.1. You see two gold vertical sliders — LEFT and RIGHT.
Step 4: Drive your LEGO tank!
Push both sliders up: tank drives forward. Pull both down: reverse. Push one up and pull one down: spin in place. That’s real tank steering.
Calibration: If one track moves in the wrong direction, swap the C1/C2 wires (OUT1/OUT2 or OUT3/OUT4) for that motor at the L298N terminal. No code change needed.
Speed note: LEGO PF motors are rated 9V nominal but work perfectly at 7.4V (2S LiPo). They’re slightly slower than stock but have excellent torque. If they feel too slow, your LiPo may be low — charge it.
What just happened (what you learned)
-
LEGO Power Functions are just DC motors — LEGO’s IR system just applies voltage to two wires. The L298N does the same. You bypassed LEGO’s entire IR system and replaced it with WiFi control. The motor doesn’t care — it just sees voltage.
-
Vertical sliders = real tank controls — Two vertical sliders map directly to two tracks. Push both forward: straight. Pull left back while pushing right forward: spin right. This is how real tracked vehicles work — a tank driver has two levers, one per track.
-
oninput vs onchange —
oninputfires continuously while dragging (real-time control).onchangefires only when released (reset to zero = stop). Both are needed:oninputfor real-time response,onchangefor the safety stop when you let go. -
Reversibility engineering — Using PF extension cables (not set cables), clip-on 3D-printed mounts (not glue), and zip ties (not screws) is systems design. Designing for reversibility keeps the original asset intact and lowers the barrier to experimentation. Engineers call this “non-destructive testing.”
Level Up
Add joystick mode: The sliders are great for precision; a single joystick is better for fast driving. Add a toggle button that swaps between sliders and a circular touch pad (tank mixing: L=Y+X, R=Y-X from Project 3). Same /tank endpoint, two frontend modes.
Add FPV camera: Mount an ESP32-CAM to the LEGO model. Embed the stream as <img src="http://[cam-ip]:81/stream"> in the tank web page. Now you’re driving a LEGO tank with live video.
Wire a third LEGO motor: Many Technic sets have a crane or bucket with its own PF motor. Connect it to a second L298N. Add a third slider and a /crane endpoint. Drive and operate the arm simultaneously.
★★ You completed: LEGO Technic Tank!
Troubleshooting
| Problem | Fix |
|---|---|
| Track doesn’t move | Check LiPo is connected to L298N (not just USB to ESP32). Check C1/C2 wires are in OUT1/OUT2 terminal. |
| Track moves in wrong direction | Swap C1 and C2 wires (OUT1/OUT2) for that motor at the L298N terminal. |
| Both tracks move in same direction when using opposing sliders | Left and right motor wires are connected to same L298N output. One should be on OUT1/OUT2, other on OUT3/OUT4. |
| Web page shows sliders but sliders don’t move the tracks | LiPo battery not connected. USB alone doesn’t power the motors. |
| Sliders don’t spring back to center | onchange="center(this)" may not fire on some browsers — test on Chrome. |
| 3D-printed mount won’t click onto LEGO beams | Sand or file the studs down 0.1mm. LEGO tolerances are tight. |
| LEGO motor whines but doesn’t turn | Mechanical resistance in the LEGO mechanism — check gears are properly meshed and not jammed. |