Parent info
Parts you need
Affiliate links — we may earn a small commission
Try this circuit in your browser!
Run the code, press the buttons and watch what happens — before you buy any parts. No account needed.
Open in Simulator →Your dog just became self-sufficient.
Imagine this: your dog drops a tennis ball into a funnel. An IR sensor detects it. Two spinning rubber wheels launch the ball across the room. Your dog sprints after it, brings it back, drops it in again. Repeat. You’re sitting on the couch. Your dog is getting a full workout. You’ve built a self-sustaining fetch machine.
Border Collies learn this sequence in two tries. Most dogs figure it out in five to fifteen repetitions. Once they do, the loop runs forever.
Build time: 3 hours. Cost: ~$44.
What you’ll need
| Part | What it does | Price |
|---|---|---|
| ESP32-S3 Dev Board | The brain. Detects the ball and controls the motors. | ~$12 |
| DC Gear Motor 12V 200RPM x2 | Counter-rotating wheels that grip and launch the ball. | ~$8 each |
| L298N Motor Driver | Lets the ESP32 control 12V motors safely. ESP32 can’t drive motors directly. | ~$4 |
| IR Sensor FC-51 | Detects when a ball is loaded in the funnel. | ~$2 |
| 12V Power Supply (2A+) | The motors need 12V. ESP32 gets its 5V from the L298N’s built-in regulator. | ~$10 |
| 3D printed chassis | Funnel, wheel housing, mounting plate. See below. | Free |
You also need: the free Arduino IDE, Printables.com access for the STL files, and a 3D printer (or a library/makerspace that has one).
Total: ~$44 | Time: ~3 hours | Difficulty: ●●●○○
Safety: Start at 30% motor power (PWM 76 out of 255). A tennis ball at full power across a small room damages things. Clear the launch path before every session. Do not leave it unattended with a dog that’s still learning — an excited dog can overwhelm the 3-second lockout.
How it works (60 seconds)
Think of a pitching machine at a baseball stadium — two spinning wheels facing each other with a small gap. The ball goes in, the wheels grip it from both sides, and momentum flings it out. That’s exactly this, scaled for tennis balls.
The two wheels spin in opposite directions (one forward, one backward) so they both push the ball the same way — toward the exit. If they spun the same direction, the ball would just go sideways.
The FC-51 IR sensor aims a beam across the inside of the funnel. When the ball blocks the beam, the sensor triggers the launch sequence: ramp up motor speed, hold, ramp down, wait 3 seconds for your dog to back up.
Step 0: Print and assemble the chassis
Time: ~30 minutes (not counting print time)
Search Printables.com for: “ESP32 ball launcher dog”
Look for a design with:
- A funnel to guide the ball into the wheel gap
- Housing for two motors with a 65mm wheel gap (standard tennis ball = 63.5mm diameter)
- A mounting plate for the ESP32 and L298N
Once printed:
- Mount the motors in the housing. The wheel surfaces should face each other with a ~65mm gap. Secure with M3 screws.
- Mount the IR sensor inside the funnel, pointing across the ball path. Adjust its sensitivity potentiometer until its indicator LED lights when a ball is held in position, and goes off when removed.
- Mount the ESP32 and L298N on the mounting plate.
Check: Drop a ball through the funnel by hand (motors off). It should roll smoothly to the wheel gap and stop there, pressing against both wheels. This is the detection position where the IR sensor fires.
Step 1: Wire it up
Time: ~20 minutes
Power connections first:
- 12V supply positive → L298N 12V input
- 12V supply negative → L298N GND
- L298N 5V output → ESP32 VIN (the L298N has a built-in 5V regulator — it powers the ESP32)
Motor connections:
- Motor 1 (left wheel) wires → L298N OUT1 and OUT2
- Motor 2 (right wheel) wires → L298N OUT3 and OUT4
ESP32 to L298N control:
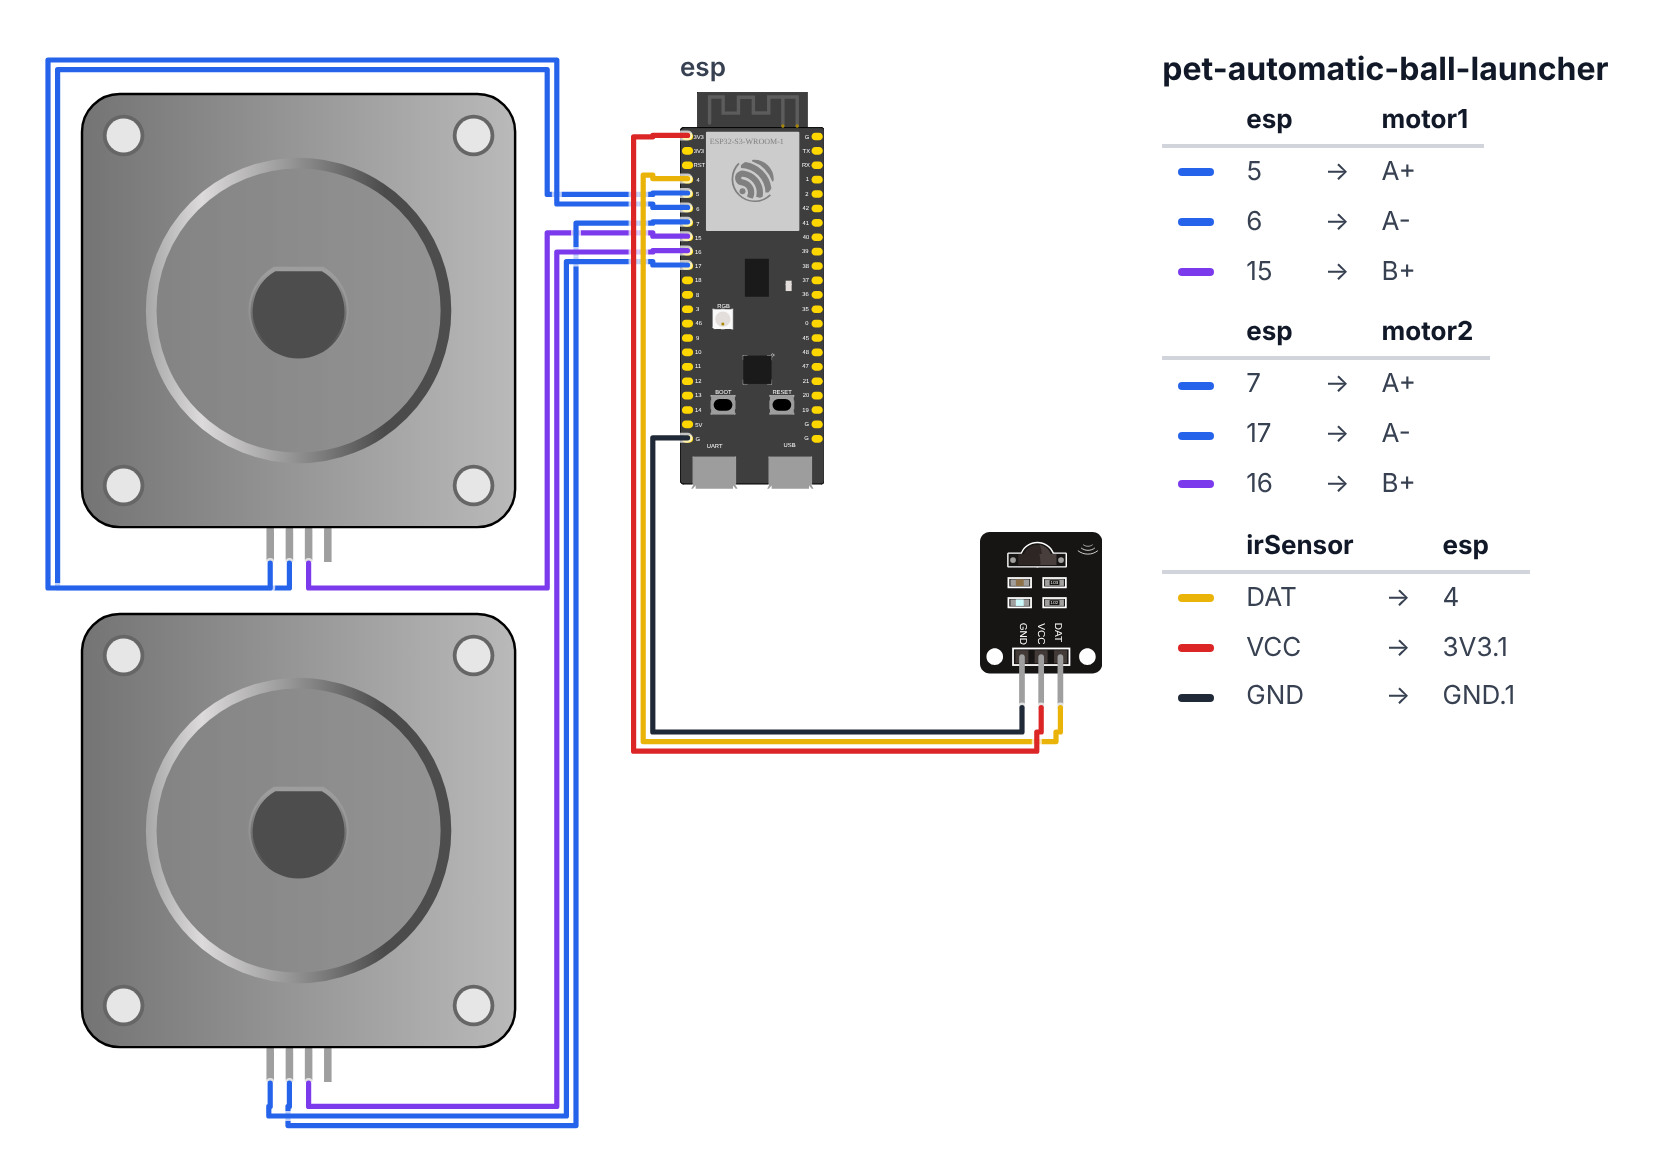
- ESP32 GPIO 5 (C6: GPIO 19) → L298N IN1 (Motor 1 direction A)
- ESP32 GPIO 6 (C6: GPIO 20) → L298N IN2 (Motor 1 direction B)
- ESP32 GPIO 7 (C6: GPIO 22) → L298N IN3 (Motor 2 direction A)
- ESP32 GPIO 17 (C6: GPIO 23) → L298N IN4 (Motor 2 direction B)
- ESP32 GPIO 15 (C6: GPIO 3) → L298N ENA (Motor 1 PWM speed)
- ESP32 GPIO 16 (C6: GPIO 4) → L298N ENB (Motor 2 PWM speed)
IR Sensor FC-51: 7. FC-51 OUT → ESP32 GPIO 4 (C6: GPIO 0) 8. FC-51 VCC → ESP32 3.3V 9. FC-51 GND → ESP32 GND
Check: 9 signal wires plus power connections. Board NOT powered yet. The L298N’s ENA and ENB jumpers should be removed before wiring GPIO 15/16 (C6: GPIO 3/4) to them — those jumpers short the enable pins to 5V (always-on), which you don’t want.
Step 2: Upload the code
Time: ~10 minutes
No additional libraries needed — ledcAttach, ledcWrite, and pinMode are all built into the ESP32 Arduino core.
The big picture first. This program watches one sensor and controls two motors.
- The IR sensor aims a beam across the inside of the funnel. When the ball blocks that beam, it fires the launch sequence.
- The two motors spin in opposite directions — like two hands squeezing and throwing a ball. Motor 1 spins forward, Motor 2 spins backward. Both push the ball the same way.
- The L298N motor driver is a middleman. The ESP32 can’t power 12V motors directly — it would break. The L298N takes small signals from the ESP32 and uses the 12V power supply to actually spin the motors.
- Speed control uses PWM — Pulse Width Modulation. Imagine flicking a light switch on and off very fast. The faster the switching, the more “on time” the motor gets, and the faster it spins. 0 = always off. 255 = always on.
// ========== CHOOSE YOUR BOARD ==========
// Uncomment the line for YOUR board:
#define BOARD_S3    // ESP32-S3-DevKitC-1
//#define BOARD_C6  // ESP32-C6-DevKitC-1
// ========================================

#ifdef BOARD_S3
  #define PIN_M1A              5
  #define PIN_M1B              6
  #define PIN_M2A              7
  #define PIN_M2B              17
  #define PIN_ENA              15
  #define PIN_ENB              16
  #define PIN_IR               4
#endif
#ifdef BOARD_C6
  #define PIN_M1A              19
  #define PIN_M1B              20
  #define PIN_M2A              22
  #define PIN_M2B              23
  #define PIN_ENA              3
  #define PIN_ENB              4
  #define PIN_IR               0
#endif

const int PWM_FREQ      = 1000;
const int PWM_RES       = 8;

int launchPower = 150;
bool launching  = false;
unsigned long launchStart = 0;

void setup() {
  Serial.begin(115200);

  pinMode(PIN_M1A, OUTPUT); pinMode(PIN_M1B, OUTPUT);
  pinMode(PIN_M2A, OUTPUT); pinMode(PIN_M2B, OUTPUT);

  ledcAttach(PIN_ENA, PWM_FREQ, PWM_RES);
  ledcAttach(PIN_ENB, PWM_FREQ, PWM_RES);

  pinMode(PIN_IR, INPUT);

  stopMotors();
  Serial.println("Ball launcher ready. Drop a ball into the funnel!");
}

void loop() {
  if (launching) {
    unsigned long elapsed = millis() - launchStart;

    if (elapsed < 200) {
      int rampPower = map(elapsed, 0, 200, 0, launchPower);
      setSpeed(rampPower);
    } else if (elapsed < 700) {
      setSpeed(launchPower);
    } else if (elapsed < 900) {
      int rampPower = map(elapsed, 700, 900, launchPower, 0);
      setSpeed(rampPower);
    } else {
      stopMotors();
      launching = false;
      Serial.println("Launched! Waiting 3 seconds...");
      delay(3000);
      Serial.println("Ready for next ball.");
    }
    return;
  }

  if (digitalRead(PIN_IR) == LOW) {
    Serial.println("Ball detected! Launching...");
    launching   = true;
    launchStart = millis();

    digitalWrite(PIN_M1A, HIGH); digitalWrite(PIN_M1B, LOW);
    digitalWrite(PIN_M2A, LOW);  digitalWrite(PIN_M2B, HIGH);
  }
}

void setSpeed(int power) {
  ledcWrite(PIN_ENA, power);
  ledcWrite(PIN_ENB, power);
}

void stopMotors() {
  ledcWrite(PIN_ENA, 0);
  ledcWrite(PIN_ENB, 0);
  digitalWrite(PIN_M1A, LOW); digitalWrite(PIN_M1B, LOW);
  digitalWrite(PIN_M2A, LOW); digitalWrite(PIN_M2B, LOW);
}
Line-by-line: what every line does and why
Lines 1–6: Pin names for direction control
#define PIN_M1A              5
#define PIN_M1B              6
#define PIN_M2A              7
#define PIN_M2B              17
Each motor has two direction pins on the L298N — call them A and B. When A is HIGH and B is LOW, the motor spins one way. Swap them (A LOW, B HIGH) and the motor reverses. Both LOW = stop. Think of it like the two contacts on a battery — which end is + and which is − decides the direction.
#define PIN_ENA              15
#define PIN_ENB              16
ENA and ENB are the speed pins on the L298N. PWM pulses sent here control how fast each motor spins. 0 = stopped, 255 = full speed, 128 = half speed.
#define PIN_IR 4These are the ESP32-S3 numbers from the #ifdef BOARD_S3 block. On the C6, the #ifdef BOARD_C6 block uses pins 19, 20, 22 and 23 for direction, 3 and 4 for speed, and 0 for the IR sensor.
The FC-51 IR sensor output wire connects to pin 4 (C6: pin 0). When a ball is in the funnel blocking the beam, this pin reads LOW (0V). When the funnel is empty, it reads HIGH (3.3V). This “active LOW” behavior is common in sensors.
Lines 8–12: Setting up PWM
const int PWM_FREQ      = 1000;
const int PWM_RES       = 8;
The ESP32 controls motor speed using PWM (Pulse Width Modulation). PWM_FREQ = 1000 means 1,000 pulses per second — fast enough that motors run smoothly. PWM_RES = 8 means values from 0 to 255 (2 to the power of 8 = 256 steps of speed).
Lines 14–16: Launch state tracking
int launchPower = 150;
bool launching  = false;
unsigned long launchStart = 0;
launchPower = 150 is 59% of max — a safe starting speed. launching is like a flag: false means “waiting for ball,” true means “launch sequence in progress.” launchStart remembers when the launch began — used to time the ramp-up, full power, and ramp-down phases.
setup(): preparing the launch machine
pinMode(PIN_M1A, OUTPUT); pinMode(PIN_M1B, OUTPUT);OUTPUT means “this pin sends signals out.” Direction pins need to push HIGH or LOW to tell the L298N which way to spin the motor.
ledcAttach(PIN_ENA, PWM_FREQ, PWM_RES);ledcAttach sets up PWM on the pin in one step — frequency and resolution included. After this, ledcWrite(PIN_ENA, 150) actually sends pulses down GPIO 15 (C6: GPIO 3).
stopMotors();Always stop the motors on startup. If the ESP32 resets while a motor is running, calling stopMotors() immediately prevents runaway behavior. Safety first, always.
loop(): the launch sequence
if (launching) {
  unsigned long elapsed = millis() - launchStart;
millis() is a stopwatch that started when you plugged in. elapsed is how many milliseconds have passed since the launch started.
  if (elapsed < 200) {
    int rampPower = map(elapsed, 0, 200, 0, launchPower);
    setSpeed(rampPower);
Ramp up phase (first 200ms): map(elapsed, 0, 200, 0, launchPower) converts “milliseconds 0 to 200” into “power 0 to 150.” As time goes from 0→200ms, speed goes from 0→150. Like a car gradually pressing the accelerator. Without a ramp, the wheels would slip on the ball instead of gripping it.
  } else if (elapsed < 700) {
    setSpeed(launchPower);
Full power phase (200–700ms): This is when the ball actually launches. The wheels are spinning at full launchPower and the ball is gripped and flung. This phase lasts 500ms — long enough to fire the ball, short enough not to waste energy.
  } else if (elapsed < 900) {
    int rampPower = map(elapsed, 700, 900, launchPower, 0);
    setSpeed(rampPower);
Ramp down phase (700–900ms): Mirrors the ramp up. Gradually reduces speed from launchPower to 0. Gentler on the motor bearings than a sudden hard stop.
  } else {
    stopMotors();
    launching = false;
delay(3000);Done: Stop everything and wait 3 seconds. Your dog needs time to back up before the machine rearms. launching = false flips the flag back — the code below now watches for the next ball.
if (digitalRead(PIN_IR) == LOW) {
  launching   = true;
  launchStart = millis();
  digitalWrite(PIN_M1A, HIGH); digitalWrite(PIN_M1B, LOW);
  digitalWrite(PIN_M2A, LOW);  digitalWrite(PIN_M2B, HIGH);
}
“If the IR sensor sees a ball (LOW = beam blocked) — start the launch.” M1A HIGH + M1B LOW = Motor 1 forward. M2A LOW + M2B HIGH = Motor 2 backward. These opposite directions create the “squeeze and throw” effect — like two palms pushing a ball the same direction from opposite sides.
setSpeed() and stopMotors()
void setSpeed(int power) {
  ledcWrite(PIN_ENA, power);
  ledcWrite(PIN_ENB, power);
}
ledcWrite sends the PWM value to the motor. Both motors get the same speed so the ball launches straight. If one motor is faster, the ball curves sideways.
void stopMotors() {
  ledcWrite(PIN_ENA, 0);
  ledcWrite(PIN_ENB, 0);
  digitalWrite(PIN_M1A, LOW); digitalWrite(PIN_M1B, LOW);
  ...
}
Stop means: speed to zero AND direction pins both LOW. Setting only speed to zero isn’t enough — the direction pins staying HIGH could keep a tiny current flowing. Belt and suspenders.
The whole thing in one sentence
When a ball blocks the IR sensor, the launcher ramps up to full speed, fires, ramps down, and waits 3 seconds — then watches for the next ball.
First thing to try: drop a ball into the funnel manually with the machine powered on. Watch Serial Monitor for “Ball detected! Launching…” — then tune launchPower up or down until the throw distance is right for your room.
Check: Open Serial Monitor. Drop a ball into the funnel by hand. You should see “Ball detected! Launching…” then “Launched! Waiting 3 seconds…” then “Ready for next ball.”
Step 3: Calibrate launch power
Time: ~10 minutes
Start conservative. With launchPower = 150 (59% of max):
- Drop a ball in. Note where it lands.
- If the throw is too short for your room, increase to 175, re-upload, test again.
- Repeat in steps of 25 until you get a satisfying throw distance.
- 200–220 is usually right for a normal room. 240+ is for long hallways.
Check: Clear all objects from the launch path before testing. Make sure people and pets are not in the line of fire during calibration.
Step 4: Introduce your dog!
Time: the fun part
Let your dog sniff the machine while it’s off. Then run a manual demo: drop a ball in yourself while your dog watches. The sound of the motors firing becomes the “launch is coming” signal — dogs learn from audio cues.
Most dogs make the connection in 5–15 repetitions. Border Collies: 2. A dog that’s figured it out will run to the funnel after every retrieve, drop the ball, and back up. You’ve created a self-sustaining fetch loop.
What just happened (what you learned)
- PWM for motor speed —
ledcWrite(pin, 0)= off,ledcWrite(pin, 255)= full speed,ledcWrite(pin, 128)= half speed. The ESP32’s hardware generates these pulses precisely without using CPU time. - Counter-rotating wheels — the key insight: both wheels must spin toward the gap. Motor 1 forward + Motor 2 backward creates a “conveyor” that grips the ball from both sides. Same principle as professional pitching machines and industrial conveyors.
- Active LOW sensors — the FC-51 outputs LOW (0V) when it detects an object. This is called “active LOW” and is common in sensors for electrical reliability reasons.
if (digitalRead(PIN_IR) == LOW)means “ball is present.” map(value, fromLow, fromHigh, toLow, toHigh)— rescales a number between ranges.map(elapsed, 0, 200, 0, launchPower)converts “milliseconds into ramp” to “PWM value to use.” As time goes 0→200ms, PWM goes 0→launchPower. One of the most useful Arduino functions.
Level Up
Launch power buttons: Wire three buttons to GPIO 39, GPIO 40, GPIO 41 (C6: GPIO 1, GPIO 2, GPIO 10), each to GND, with INPUT_PULLUP. Button 1 sets launchPower = 150 (small room), Button 2 = 200 (medium), Button 3 = 240 (long hallway). No code re-upload needed to adjust distance.
Built-in rest periods: Add a ballsInSession counter. After every 5 launches, disable the IR sensor for 60 seconds. This prevents over-excited dogs from running until they injure themselves. You look like a responsible engineer.
Web control: Add ESPAsyncWebServer. Serve a page with a power slider (100–255) and a session launch counter. Tune throw distance from your phone without touching the code.
★★ You completed: Automatic Ball Launcher!
Troubleshooting
| Problem | Fix |
|---|---|
| Motors don’t spin | Check ENA/ENB jumpers removed from L298N. Check GPIO 15/16 (C6: GPIO 3/4) wired to ENA/ENB. Check 12V power supply is on. |
| Ball doesn’t launch, motors spin | Wheel gap too wide. Adjust to ~65mm (just slightly narrower than the 63.5mm ball). Ball needs a small squeeze to get gripped. |
| IR sensor never triggers | FC-51 is active LOW — check digitalRead(PIN_IR) == LOW not HIGH. Adjust FC-51 sensitivity knob until LED lights when ball is in position. |
| Ball launches sideways | Motor 2 direction is wrong. Both wheels must push toward the exit. Swap Motor 2’s wires on L298N OUT3/OUT4, or swap HIGH/LOW on PIN_M2A/PIN_M2B. |
| Motors spin immediately at startup | stopMotors() must be called in setup() before anything else. Check it’s in your sketch. |
| Double-launch (fires twice) | Increase the delay(3000) cooldown. Check launching = false is set correctly. |