Parent info
Parts you need
Affiliate links — we may earn a small commission
Try this circuit in your browser!
Run the code, press the buttons and watch what happens — before you buy any parts. No account needed.
Open in Simulator →Your cat is hiding a secret life. Let’s uncover it.
Imagine this: you’ve always assumed your cat spends the day sleeping on the couch. Then you check the activity monitor. Living room: 14 motion events. Kitchen: 31. Bedroom: 8. Between 2am and 4am: 22 events total. Your cat is basically a tiny security guard doing rounds every 40 minutes — and you had no idea.
That’s what this build reveals. PIR sensors in multiple rooms talk to a central ESP32 hub over WiFi. The hub logs every motion event and shows you a chart of where your cat was, and when.
Build time: 2 hours. Cost: ~$40 for a 2-room setup.
What you’ll need
| Part | What it does | Price |
|---|---|---|
| ESP32-S3 Dev Board x2 | One hub (runs dashboard), one per room sensor. | ~$12 each |
| PIR Sensor HC-SR501 x2 | One per room — detects your cat’s body heat. | ~$2 each |
| BLE Beacon tag (optional) | Clip to collar for named tracking (“Whiskers is in the kitchen”). | ~$5 |
| USB phone chargers x2 | One per ESP32 — standard 5V chargers work perfectly. | ~$5 each |
You also need: home WiFi with the same network in all rooms, and the free Arduino IDE.
Total (2-room setup): ~$40 | Time: ~2 hours | Difficulty: ●●●○○
What MQTT is (you’ll need to know this): MQTT is a messaging system for small devices. Room sensors “publish” messages to a shared topic (like posting to a group chat). The hub “subscribes” to that topic and receives every message. Add more sensors? They just start publishing — no changes needed to the hub.
How it works (60 seconds)
Think of it like a smart home network in miniature. Each room has an ESP32 connected to a PIR sensor. When the PIR detects motion, the room ESP32 sends a message over WiFi: {"room":"kitchen","time":12345}.
The hub ESP32 — any ESP32 on the same WiFi — receives all messages, saves them to its internal flash storage (SPIFFS), and serves a web page with a bar chart showing how many events happened in each room. Open the hub’s IP in any browser and you see your cat’s day.
Step 0: Plan your room layout
Time: ~5 minutes
Decide which rooms to monitor. You need one ESP32 + one PIR sensor per room, plus one ESP32 as the hub (can share a room).
Good placement for PIR sensors:
- Doorways (catches movement entering/leaving the room)
- Cat height on a shelf (3–4 feet off the floor)
- Avoid windows — sunlight moving through triggers false events
Write down a name for each room: “kitchen”, “bedroom”, “lounge”. You’ll put these names in the code.
Step 1: Wire each room sensor
Time: ~5 minutes per room
Each room unit has the same simple wiring. Repeat for every sensor ESP32.
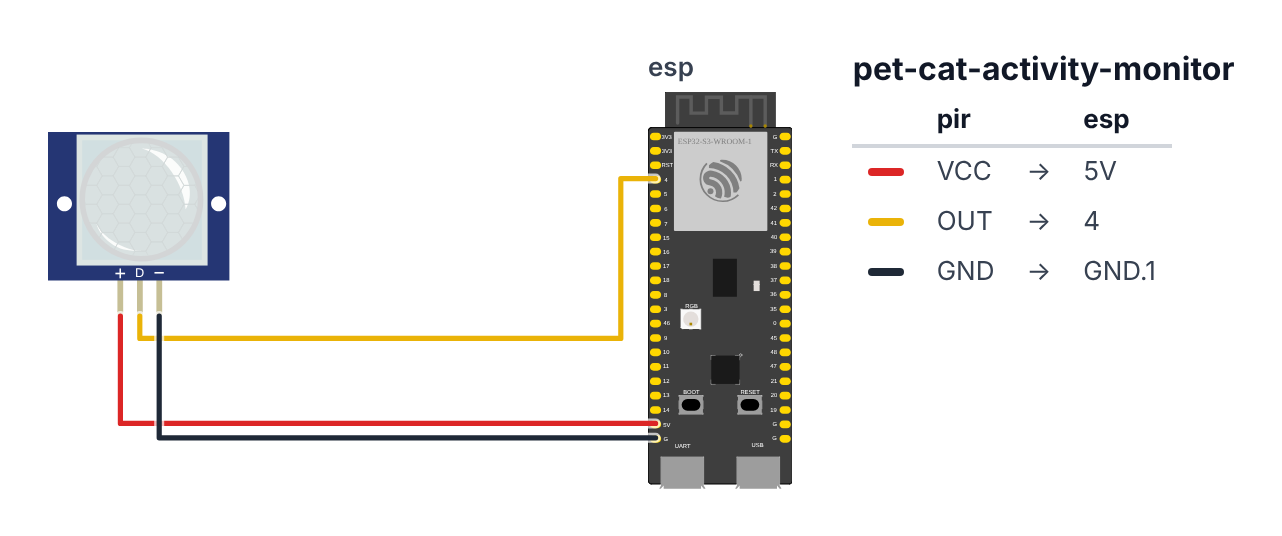
PIR Sensor HC-SR501:
- PIR VCC → board VIN (5V) — red wire
- PIR OUT → board GPIO 4 (C6: GPIO 0) — yellow wire
- PIR GND → board GND — black wire
  +--[ESP32-S3]--+
  |              |
  | GPIO 4       |---> PIR OUT
  | VIN (5V)     |---> PIR VCC
  | GND          |---> PIR GND
  +--------------+
         |
      WiFi/MQTT
         |
  +--[Hub ESP32]--+   (any room — serves web dashboard)
Check: The HC-SR501 has 3 pins. Facing the dome side: left = VCC, middle = OUT, right = GND. Connect VCC to 5V (not 3.3V — it needs the higher voltage).
The hub ESP32 needs no additional wiring — just power from a USB charger.
Step 2: Upload the room sensor sketch
Time: ~10 minutes
Install PubSubClient by Nick O’Leary in Arduino IDE (Sketch > Manage Libraries).
Upload this to each room ESP32. Change roomName to the actual room name before each upload.
The big picture first for the room sensor sketch (upload this to each room ESP32).
This sketch does one thing: watch for cat motion and shout about it over the network.
- The PIR sensor detects your cat’s body heat. When motion is detected, the pin goes HIGH.
- MQTT is a messaging system made for small devices. Think of it like a group chat: each room ESP32 “posts” a message when it sees motion, and the hub ESP32 “reads” all posts. Adding a third room just means another ESP32 posting to the same chat — no changes needed anywhere else.
- The payload is a tiny JSON message like
{"room":"kitchen","time":12345}— it tells the hub which room reported motion and when.
// ========== CHOOSE YOUR BOARD ==========
// Uncomment the line for YOUR board:
#define BOARD_S3    // ESP32-S3-DevKitC-1
//#define BOARD_C6  // ESP32-C6-DevKitC-1
// ========================================

#ifdef BOARD_S3
  #define PIN_PIR              4
#endif
#ifdef BOARD_C6
  #define PIN_PIR              0
#endif

#include <WiFi.h>
#include <PubSubClient.h>

const char* ssid       = "YourWiFiName";
const char* password   = "YourWiFiPassword";
const char* mqttServer = "192.168.1.100";
const char* roomName   = "kitchen";

WiFiClient espClient;
PubSubClient mqtt(espClient);

void setup() {
  Serial.begin(115200);
  pinMode(PIN_PIR, INPUT);

  WiFi.begin(ssid, password);
  while (WiFi.status() != WL_CONNECTED) delay(500);
  Serial.println("Room sensor online: " + String(roomName));

  mqtt.setServer(mqttServer, 1883);
  while (!mqtt.connected()) {
    mqtt.connect(("cat-sensor-" + String(roomName)).c_str());
    delay(500);
  }
}

void loop() {
  mqtt.loop();

  if (digitalRead(PIN_PIR) == HIGH) {
    String payload = "{\"room\":\"" + String(roomName) + "\",\"time\":" + String(millis()) + "}";
    mqtt.publish("cat/motion", payload.c_str());
    Serial.println("Published: " + payload);
    delay(5000);
  }
}
Line-by-line: what every line does and why (room sensor sketch)
Lines 1–2: Two instruction books
#include <WiFi.h>
#include <PubSubClient.h>
WiFi connects to your home network. PubSubClient is the MQTT library — “PubSub” stands for publish/subscribe, the two actions in a messaging system.
Lines 4–7: Network settings
const char* mqttServer = "192.168.1.100";
const char* roomName   = "kitchen";
mqttServer is the IP address of your hub ESP32. Think of it as the hub’s “phone number” on your home network. roomName is what this room ESP32 calls itself — change it to “bedroom” or “lounge” before uploading to each different room. This name appears in the dashboard chart.
Lines 9–11: Setting up the connection
WiFiClient espClient;
PubSubClient mqtt(espClient);
WiFiClient is like a phone. PubSubClient wraps that phone and adds MQTT protocol — the language the hub and sensors speak to each other. You hand the phone to PubSubClient so it can make MQTT calls over WiFi.
setup(): connect to WiFi then connect to hub
mqtt.setServer(mqttServer, 1883);
while (!mqtt.connected()) {
  mqtt.connect(("cat-sensor-" + String(roomName)).c_str());
  delay(500);
}
1883 is the standard port for MQTT — like port 80 for websites. mqtt.connect(...) gives this sensor a unique name on the MQTT network — “cat-sensor-kitchen” for the kitchen ESP32. The while loop keeps trying every half second until the connection succeeds.
loop(): the heartbeat
mqtt.loop();This must be called every single loop. It handles the “keepalive” — a tiny message sent periodically to tell the hub “I’m still connected.” Without this, the hub drops the connection after a timeout.
if (digitalRead(PIN_PIR) == HIGH) {
  String payload = "{\"room\":\"" + String(roomName) + "\",\"time\":" + String(millis()) + "}";
  mqtt.publish("cat/motion", payload.c_str());
  delay(5000);
}
When the PIR sees motion, build a JSON message and publish it to the topic "cat/motion". Every ESP32 subscribed to that topic receives it — including the hub. The \" characters are escaped quotation marks — in code, \" inside a string means a literal " character. delay(5000) prevents one cat walk-past from sending dozens of messages.
Check: After uploading, open Serial Monitor. You should see “Room sensor online: kitchen” (or your room name). Walk in front of the PIR — you should see “Published: …” printed.
Step 3: Upload the hub sketch
Time: ~10 minutes
Install ESPAsyncWebServer by Me-No-Dev in Arduino IDE. Upload this to your hub ESP32:
The big picture for the hub sketch (upload this to one central ESP32).
The hub has two jobs: receive motion events from every room, and show a bar chart of where the cat went. It never connects to room sensors directly — it just listens to the MQTT topic and receives whatever any room posts.
#include <WiFi.h>
#include <PubSubClient.h>
#include <SPIFFS.h>
#include <ESPAsyncWebServer.h>

const char* ssid     = "YourWiFiName";
const char* password = "YourWiFiPassword";

WiFiClient espClient;
PubSubClient mqtt(espClient);
AsyncWebServer server(80);

void mqttCallback(char* topic, byte* payload, unsigned int len) {
  String msg = "";
  for (unsigned int i = 0; i < len; i++) msg += (char)payload[i];

  File f = SPIFFS.open("/log.json", FILE_APPEND);
  if (f) { f.println(msg); f.close(); }
  Serial.println("Logged: " + msg);
}

void setup() {
  Serial.begin(115200);
  SPIFFS.begin(true);

  WiFi.begin(ssid, password);
  while (WiFi.status() != WL_CONNECTED) delay(500);
  Serial.println("Hub IP: " + WiFi.localIP().toString());

  mqtt.setServer(WiFi.localIP().toString().c_str(), 1883);
  mqtt.setCallback(mqttCallback);
  mqtt.connect("cat-hub");
  mqtt.subscribe("cat/motion");

  server.on("/", HTTP_GET, [](AsyncWebServerRequest *req){
    File f = SPIFFS.open("/log.json", FILE_READ);
    String data = "";
    while (f.available()) data += (char)f.read();
    f.close();

    String html = "<!DOCTYPE html><html><head><title>Cat Tracker</title>"
      "<script src='https://cdn.jsdelivr.net/npm/chart.js'></script></head>"
      "<body style='background:#1a1a2e;color:#eee;font-family:Arial;padding:20px'>"
      "<h1 style='color:#e94560'>Cat Activity Monitor</h1>"
      "<canvas id='chart' width='800' height='400'></canvas>"
      "<br><a href='/clear' style='color:#888'>Clear log</a>"
      "<script>"
      "const raw = [" + data + "];"
      "const rooms = {};"
      "raw.forEach(e => { rooms[e.room] = (rooms[e.room]||0)+1; });"
      "new Chart(document.getElementById('chart'),{"
      "type:'bar',"
      "data:{labels:Object.keys(rooms),datasets:[{label:'Motion events',"
      "data:Object.values(rooms),backgroundColor:'#e94560'}]}});"
      "</script></body></html>";

    req->send(200, "text/html", html);
  });

  server.on("/clear", HTTP_GET, [](AsyncWebServerRequest *req){
    SPIFFS.remove("/log.json");
    req->send(200, "text/plain", "Log cleared. <a href='/'>Back</a>");
  });

  server.begin();
}

void loop() {
  mqtt.loop();
}
Line-by-line: what every line does and why (hub sketch)
mqttCallback(): what happens when a message arrives
void mqttCallback(char* topic, byte* payload, unsigned int len) {
  String msg = "";
  for (unsigned int i = 0; i < len; i++) msg += (char)payload[i];
This function is called automatically every time a room sensor posts something. payload is a raw byte array — not yet a readable string. The for loop converts it: start at byte 0, cast each byte to a character, add it to msg. When the loop ends, msg holds the JSON text like {"room":"kitchen","time":12345}.
  File f = SPIFFS.open("/log.json", FILE_APPEND);
  if (f) { f.println(msg); f.close(); }
Append the message to the log file as a new line. FILE_APPEND means never overwrite — every new event adds to the end, like pages in a journal. f.close() saves and releases the file.
setup(): connecting and subscribing
mqtt.setServer(WiFi.localIP().toString().c_str(), 1883);
mqtt.setCallback(mqttCallback);
mqtt.connect("cat-hub");
mqtt.subscribe("cat/motion");
Four lines that set up the hub’s MQTT role:
setServertells the library where the MQTT broker is — the hub IS the broker, so it uses its own IP address.setCallbackregistersmqttCallbackas the function to run when messages arrive.connect("cat-hub")gives the hub its unique name on the MQTT network.subscribe("cat/motion")tells the broker: “deliver all messages on this topic to me.” Every room publishes to"cat/motion", and the hub receives all of them here.
The dashboard JavaScript
"const raw = [" + data + "];"
"raw.forEach(e => { rooms[e.room] = (rooms[e.room]||0)+1; });"
data contains all the JSON lines from the log file. The JavaScript puts them into an array called raw, then loops through each event: for each room name found, add 1 to that room’s counter. The ||0 means “if this room hasn’t been seen before, start at 0.” After the loop, rooms looks like {kitchen: 31, bedroom: 8} — the bar chart data.
loop(): just one line
mqtt.loop();The hub’s main loop is just keepalive. All the real work happens inside mqttCallback, which runs automatically whenever a message arrives. The web server also runs in the background on its own task.
The whole system in one sentence
Room sensors detect motion and shout to a shared topic over WiFi. The hub listens to that topic, saves every shout to a file, and shows a bar chart of where your cat went — forever building, one room at a time.
First thing to try: write down the hub’s IP from Serial Monitor, walk past each room sensor, and refresh the dashboard. Watch the bar chart grow in real time. Leave it running for a week — your cat’s 3am patrol routes will surprise you.
Check: Open Serial Monitor on the hub. It prints the hub’s IP address. Write this down — you need it in the room sensor sketches (
mqttServervariable). Open that IP in a browser. You should see “Cat Activity Monitor” with an empty chart.
Step 4: Connect everything and let it run
Time: ~5 minutes
- Update the
mqttServervalue in all room sensor sketches to the hub’s IP address. - Re-upload the room sensor sketches.
- Place sensors in their rooms. Aim them away from windows.
- Power everything from USB chargers.
Check: Walk past each PIR sensor. Within seconds, the dashboard chart should update with an event for that room. Open the hub IP in your browser and refresh the page to see the chart.
Leave it running for at least a week. Cat patterns emerge over days, not hours.
What just happened (what you learned)
- MQTT publish/subscribe — room sensors publish, hub subscribes. It’s like a group chat: any sensor can post, and the hub receives everything. Adding a third room just means another publishing sensor — hub code unchanged.
- SPIFFS is a mini filesystem in the ESP32’s flash memory. It works like a tiny hard drive — files survive reboots and power cuts. Your cat log persists even if the power goes out at 3am.
- JSON data format —
{"room":"kitchen","time":12345}lets the JavaScript dashboard parse both room name and timestamp independently. One small choice now makes adding hourly timeline charts easy later. - Distributed IoT systems — you just built a real sensor network. Multiple devices, a hub, a dashboard. This is how smart homes, factory monitoring systems, and environmental tracking all work at their core.
Level Up
Add a third room: Buy one more ESP32 and PIR sensor (~$14). Upload the room sensor sketch with roomName = "office". The hub dashboard automatically shows the new room — no hub code changes needed.
Hourly timeline chart: Add "hour": t.tm_hour to the JSON payload (requires NTP time — see the Fish Feeder project for how to set that up). Update the Chart.js code to group by hour instead of by room. See exactly when your cat is active throughout the day.
Collar BLE tracking: Attach a cheap BLE beacon (iTag) to your cat’s collar. Add BLE scanning to each room ESP32 — it can detect the beacon’s signal strength (RSSI) and estimate distance. With 3+ room sensors, you can triangulate your cat’s exact position: “Whiskers is definitely in the kitchen, near the window.”
★★ You completed: Cat Activity Monitor!
Troubleshooting
| Problem | Fix |
|---|---|
| Room sensor shows “Published” but nothing appears on dashboard | mqttServer IP in room sketch is wrong. Check hub’s Serial Monitor for the correct IP. |
| Dashboard chart is empty | MQTT messages aren’t reaching the hub. Verify hub and room sensors are on the same WiFi network. Check mqtt.subscribe("cat/motion") is in hub setup. |
| PIR triggers constantly | Sensor is pointed at a window with sunlight. Move it or block the sunlight path. |
| Hub IP changes after reboot | Set a static IP in your router for the hub ESP32’s MAC address. Most routers have “DHCP reservation” in settings. |
| Log file gets huge | Add a file size check: if (SPIFFS.usedBytes() > 50000) SPIFFS.remove("/log.json"). Or visit /clear to reset manually each week. |
| MQTT connection drops | Add reconnect logic in loop(): if (!mqtt.connected()) { mqtt.connect("cat-hub"); mqtt.subscribe("cat/motion"); } |