Parent info
Parts you need
Affiliate links — we may earn a small commission
Try this circuit in your browser!
Run the code, press the buttons and watch what happens — before you buy any parts. No account needed.
Open in Simulator →Your dog is about to learn how to work the vending machine.
Imagine this: you put a big colorful button on the floor. Your dog watches you press it. A treat falls out. Tail wagging. Five presses later, your dog is hitting that button with their paw every fifteen minutes.
Dogs learn to associate pressing a button with getting a treat in under ten repetitions. After that, they’ll use it independently. The daily treat counter in this code is not optional — it is a health feature.
Build time: 90 minutes. Cost: ~$23.
What you’ll need
| Part | What it does | Price |
|---|---|---|
| ESP32-S3 Dev Board | The brain. Controls the servo and hosts the web interface. | ~$12 |
| SG90 Servo Motor | Opens and closes the treat gate. 400ms open = exactly one treat falls. | ~$3 |
| 60mm Arcade Button | Big enough for a dog paw. Connect to GND — no resistor needed. | ~$3 |
| Small food-safe container | A Tupperware box works perfectly. The servo mounts over a hole in the bottom. | ~$5 |
| Breadboard + jumper wires | Connects everything. No soldering. | ~$5 |
You also need: home WiFi and the free Arduino IDE.
Total: ~$23 | Time: ~90 minutes | Difficulty: ●●○○○
How it works (60 seconds)
Think of it like a gumball machine — but instead of turning a knob, a servo motor opens a small gate for exactly 400 milliseconds. One treat falls. The gate closes. The servo gate sits at 0° (closed) normally. When triggered — by the button OR the web page — it rotates to 45°, waits 400ms, and returns to 0°. The daily treat counter (stored in the ESP32’s flash memory) enforces the limit. Even if your dog presses the button 50 times, it stops at 10.
Step 0: Prepare the treat container
Time: ~10 minutes
- Find a food-safe container — a small Tupperware box, a plastic container with a tight lid. It needs to hold enough treats for a day.
- Cut a small hole in the bottom — just big enough for one treat to fall through. Diameter: about the width of one treat.
- Mount the servo so its horn covers the hole when at 0 degrees. The servo body attaches to the outside of the container with hot glue or strong tape. The servo horn rotates over the hole.
- Test the gate angle: Move the servo horn by hand to 45°. A treat should fall through. Return to 0°. Hole blocked. Adjust the hole size if multiple treats fall — make it narrower.
Check: Hold the container over a bowl. Manually rotate the servo horn to 45°. Exactly one treat should fall. If two fall, make the hole smaller. If none fall, enlarge it slightly or increase the angle in the code.
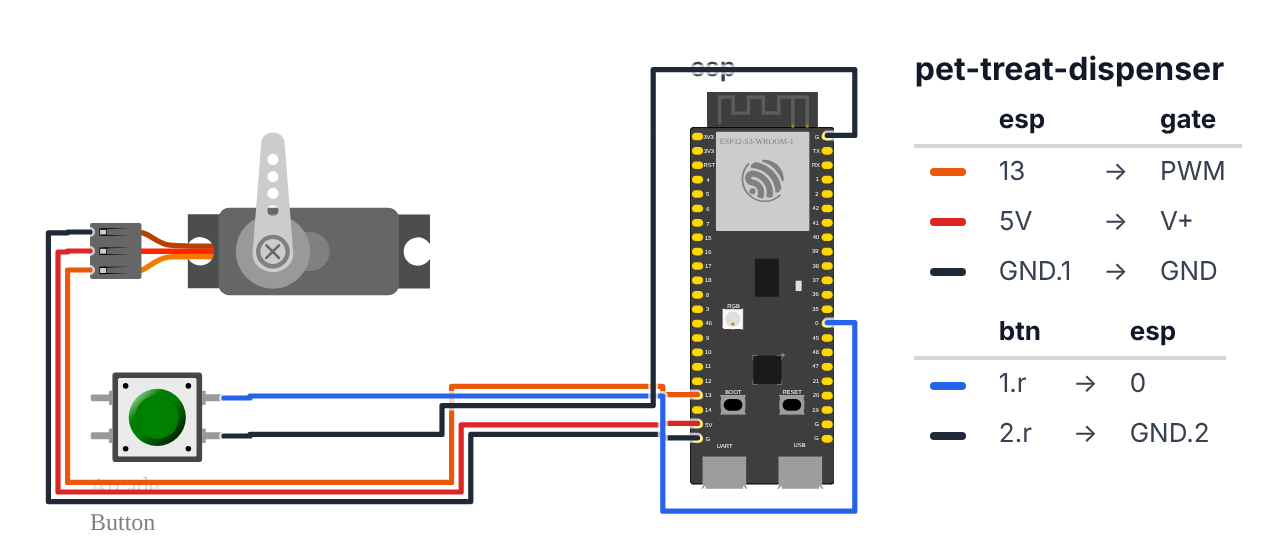
Step 1: Wire it up
Time: ~5 minutes
SG90 Servo (3 wires):
- Servo Signal (orange wire) → board GPIO 13 (C6: GPIO 5) — orange wire
- Servo VCC (red wire) → board VIN (5V) — red wire
- Servo GND (brown wire) → board GND — black wire
60mm Arcade Button (2 wires): 4. Button Terminal 1 → board GPIO 0 (C6: GPIO 3) — any color wire 5. Button Terminal 2 → board GND — black wire
(No resistor needed — the code uses INPUT_PULLUP which provides the resistor internally.)
Check: 5 wires total: 2 red/power, 2 black/ground, 1 orange servo signal. Board NOT plugged in yet.
Arcade button tip: 60mm buttons have two terminals on the back. It doesn’t matter which terminal goes to GPIO 0 (C6: GPIO 3) and which to GND — the button is symmetric.
GPIO 0 is the BOOT button’s pin on the ESP32-S3 board. Handy: pressing the little BOOT button on the board also drops a treat, so you can test before the arcade button is wired. Just don’t hold either button while you plug the board in — it would start in upload mode instead of running your code (unplug and plug in again).
Step 2: Upload the code
Time: ~10 minutes
Install these libraries in Arduino IDE (Sketch > Manage Libraries):
ESP32Servoby Kevin HarringtonESPAsyncWebServerby Me-No-Dev
Fill in your WiFi credentials before uploading:
The big picture first. This program is a vending machine with a daily health limit.
- The servo motor controls a gate over a hole in the bottom of a container. At 0 degrees, the gate is closed. At 45 degrees, the gate opens for exactly 400 milliseconds — one treat falls, then the gate closes.
- The arcade button is a big floor button your dog presses. The ESP32 detects the moment the button is pressed (not how long it’s held).
- The daily limit is enforced by a counter. After 10 treats (or however many you set), the dispenser stops responding until midnight. This is a health feature — dogs have no idea when to stop.
- A web page lets you give a treat remotely from your phone — useful when you’re in another room and want to reward good behavior.
// ========== CHOOSE YOUR BOARD ==========
// Uncomment the line for YOUR board:
#define BOARD_S3    // ESP32-S3-DevKitC-1
//#define BOARD_C6  // ESP32-C6-DevKitC-1
// ========================================

#ifdef BOARD_S3
  #define PIN_SERVO            13
  #define PIN_BUTTON           0
#endif
#ifdef BOARD_C6
  #define PIN_SERVO            5
  #define PIN_BUTTON           3
#endif

#include <ESP32Servo.h>
#include <WiFi.h>
#include <ESPAsyncWebServer.h>
#include <SPIFFS.h>
#include <time.h>

const char* ssid     = "YourWiFiName";
const char* password = "YourWiFiPassword";

const int DAILY_LIMIT = 10;
int todayCount = 0;
int lastDay    = -1;

Servo gate;
AsyncWebServer server(80);

bool buttonWasPressed = false;

void dispenseTreat() {
  struct tm t;
  getLocalTime(&t);
  if (t.tm_mday != lastDay) {
    todayCount = 0;
    lastDay    = t.tm_mday;
  }

  if (todayCount >= DAILY_LIMIT) {
    Serial.println("Daily limit reached! No more treats today.");
    return;
  }

  Serial.println("Dispensing treat #" + String(todayCount + 1));
  gate.write(45);
  delay(400);
  gate.write(0);

  todayCount++;

  File f = SPIFFS.open("/treats.txt", FILE_APPEND);
  if (f) {
    f.println("Treat #" + String(todayCount) + " at " +
              String(t.tm_hour) + ":" +
              (t.tm_min < 10 ? "0" : "") + String(t.tm_min));
    f.close();
  }
}

void setup() {
  Serial.begin(115200);
  SPIFFS.begin(true);

  gate.attach(PIN_SERVO);
  gate.write(0);

  pinMode(PIN_BUTTON, INPUT_PULLUP);

  WiFi.begin(ssid, password);
  while (WiFi.status() != WL_CONNECTED) delay(500);

  configTime(0, 0, "pool.ntp.org");

  Serial.println("Treat dispenser ready at: " + WiFi.localIP().toString());

  server.on("/", HTTP_GET, [](AsyncWebServerRequest *req){
    File f = SPIFFS.open("/treats.txt", FILE_READ);
    String log = "";
    while (f.available()) log += (char)f.read();
    f.close();

    String html = "<!DOCTYPE html><html><body style='font-family:Arial;"
      "background:#fef9f0;padding:30px'>"
      "<h1>Treat Dispenser</h1>"
      "<p>Today: <b>" + String(todayCount) + " / " + String(DAILY_LIMIT) + " treats</b></p>"
      "<form action='/dispense'><button type='submit' style='padding:15px 30px;"
      "font-size:18px;background:#ff6b35;color:white;border:none;"
      "border-radius:8px;cursor:pointer'>Give Treat</button></form>"
      "<h3>Treat History</h3><pre style='background:#fff;padding:15px;border-radius:8px'>"
      + log + "</pre>"
      "</body></html>";
    req->send(200, "text/html", html);
  });

  server.on("/dispense", HTTP_GET, [](AsyncWebServerRequest *req){
    dispenseTreat();
    req->redirect("/");
  });

  server.begin();
}

void loop() {
  bool pressed = (digitalRead(PIN_BUTTON) == LOW);

  if (pressed && !buttonWasPressed) {
    buttonWasPressed = true;
    dispenseTreat();
  }

  if (!pressed) buttonWasPressed = false;

  delay(50);
}
Line-by-line: what every line does and why
Lines 1–5: Five instruction books
#include <SPIFFS.h>
#include <time.h>
SPIFFS stores the treat log in the ESP32’s own flash memory — it survives power cuts and reboots. time.h provides tools to sync the clock from the internet and check the current date for the daily reset.
Lines 11–14: The health limit variables
const int DAILY_LIMIT = 10;
int todayCount = 0;
int lastDay    = -1;
DAILY_LIMIT = 10 is the daily cap. Change this to match your vet’s recommendation. todayCount starts at 0 and counts up each time a treat is dispensed. lastDay = -1 is a value that can never match a real calendar day, so the reset logic runs correctly on the very first boot.
Line 18: Edge detection flag
bool buttonWasPressed = false;This remembers whether the button was pressed last time through the loop. Comparing “was it pressed before?” with “is it pressed now?” lets the code detect the exact moment of press — not the entire duration of holding. This prevents continuous dispensing if your dog sits on the button.
dispenseTreat(): the gate sequence
if (t.tm_mday != lastDay) {
  todayCount = 0;
  lastDay    = t.tm_mday;
}
t.tm_mday is the day of the month (1–31). If today’s number is different from lastDay, a new day has started — reset the counter to 0. lastDay then gets updated to today, so this reset only fires once per day.
if (todayCount >= DAILY_LIMIT) {
  return;
}
>= means “greater than or equal to.” If the daily count is already at the limit, return exits the function immediately — no servo movement. The limit is strict: the 11th press in a day simply does nothing.
gate.write(45);
delay(400);
gate.write(0);
todayCount++;
Open the gate to 45 degrees, wait 400ms (one treat falls through), close the gate. Then increment todayCount with ++. These four lines are the core of the whole project.
setup(): the critical wiring detail
pinMode(PIN_BUTTON, INPUT_PULLUP);INPUT_PULLUP means: the ESP32 internally connects GPIO 0 (C6: GPIO 3) to 3.3V through a resistor. So when the button is not pressed, the pin reads HIGH (3.3V). When your dog presses the button, it connects that pin directly to GND, pulling it LOW. This pattern — pull-up resistor, button to GND — is the standard way to wire any button to a microcontroller, and it requires zero external components.
loop(): detecting the press moment
bool pressed = (digitalRead(PIN_BUTTON) == LOW);digitalRead returns HIGH or LOW. Because of INPUT_PULLUP, LOW means the button IS pressed. pressed is true when the button is down, false when it’s up.
if (pressed && !buttonWasPressed) {
  buttonWasPressed = true;
  dispenseTreat();
}
if (!pressed) buttonWasPressed = false;
The first if fires only when the button is currently pressed (pressed = true) AND it wasn’t pressed last time (!buttonWasPressed = true). That’s the rising edge — the exact moment of press. Once triggered, buttonWasPressed = true prevents it from firing again until the button is released. The second if resets buttonWasPressed when the button comes up — ready for the next press.
delay(50);50 milliseconds between checks. Fast enough to feel responsive, slow enough to debounce — mechanical buttons bounce (rapidly close and open) for about 10–20ms when pressed. 50ms delay skips over that noise.
The whole thing in one sentence
When your dog presses the button (or you press “Give Treat” on the web page), the gate opens for 400ms, one treat falls, the gate closes, and the counter increases — stopping at the daily limit until midnight resets it.
First thing to try: press the button manually 3 times and watch Serial Monitor — each press should print “Dispensing treat #1”, “#2”, “#3”. Then check the web dashboard — it should show “Today: 3 / 10 treats.”
Check: Open Serial Monitor at 115200. The IP address prints after WiFi connects. Open that IP in a browser — you should see “Treat Dispenser” with a “Give Treat” button. Click it — you should see the servo open and close and “Dispensing treat #1” in Serial Monitor.
Step 3: Place the button and calibrate
Time: ~10 minutes
Place the button somewhere accessible to your dog:
- A low shelf or step they use
- A mat on the floor near their usual spot
- Taped to the floor next to their water bowl
The button should be at nose or paw height. Dogs use both.
Calibrate the gate angle: If multiple treats fall on each dispense, reduce gate.write(45) to gate.write(35). If no treats fall, increase it. Test a few times before introducing your dog.
Check: Press the button manually 3 times. Exactly 1 treat per press. Counter on web page updates correctly. After 10 presses, the servo no longer responds to the button (daily limit reached).
Step 4: Train your dog!
Time: the fun part — usually one session
- Press the button yourself while your dog watches. A treat falls. Let them eat it.
- Repeat 3–4 times. Watch their eyes track from the button to the treat container.
- Let them sniff the button.
- Most dogs paw or nose it within 1–2 minutes of sniffing. When they do — big celebration. Even if it was accidental.
- After 3–5 successful presses, leave them with the machine unsupervised.
Also bookmark the web interface on your phone. You can give a treat remotely — useful for rewarding good behavior while you’re in another room.
What just happened (what you learned)
- Edge detection vs. state reading — checking
pressed && !buttonWasPresseddetects the moment of press. If it just checkedpressed, the dispenser would fire continuously while the dog held the button down, emptying the container. Edge detection fires exactly once per press no matter how long they hold it. INPUT_PULLUP— the ESP32 has built-in resistors that pull a pin to 3.3V. Wire the button between that pin and GND. Not pressed = HIGH (3.3V via resistor). Pressed = LOW (directly to GND). No external resistor needed. This is the standard way to wire any button to a microcontroller.- NTP time (
configTime) — the ESP32 has no battery-backed clock. Every boot it fetches the current time from a time server on the internet.getLocalTime(&t)then fills a struct with year, month, day, hour, minute — used for timestamps and the daily reset. - Why log to SPIFFS? — SPIFFS stores data in flash memory, which survives reboots and power cuts. Your dog’s treat history persists even if the power goes out. RAM doesn’t survive reboots — variables reset to zero. Flash does.
Level Up
Scheduled dispensing: Add a check in loop(): if (t.tm_hour == 15 && t.tm_min == 0 && !dispensedAt3pm) { dispenseTreat(); dispensedAt3pm = true; }. One treat automatically at 3pm every day. Dogs love predictable routines — it reduces anxiety.
Training buzzer: Add a passive buzzer to GPIO 16 (C6: GPIO 10) — add it as PIN_BUZZER to both board blocks. Before every dispense: tone(PIN_BUZZER, 880, 100); delay(150); tone(PIN_BUZZER, 1320, 200). The buzzer becomes a “treat is coming” signal. Use it for recall training — your dog will come running when they hear the sound.
Change the daily limit: Set DAILY_LIMIT to whatever your vet recommends. Small dogs or dogs on a diet: 5. Active large dogs: 15. This is literally a health decision — make it intentionally.
★★ You completed: Treat Dispenser!
Troubleshooting
| Problem | Fix |
|---|---|
| Button press triggers nothing | Check INPUT_PULLUP in the code. Verify button Terminal 1 on GPIO 0 (C6: GPIO 3), Terminal 2 on GND. Open Serial Monitor — do you see any output when pressed? |
| Multiple treats fall per press | Make the container hole smaller, or reduce gate.write(45) to gate.write(35) and re-upload. |
| No treats fall | Increase gate.write(45) to gate.write(60). Check the container hole isn’t blocked by a treat wedged in it. |
| Web page doesn’t load | Verify WiFi credentials. Check IP from Serial Monitor. Phone must be on the same WiFi network. |
| Daily limit resets at wrong time | NTP time needs WiFi to sync. configTime(0, 0, "pool.ntp.org") is UTC. Adjust first number for your timezone (seconds offset from UTC). |
| Servo makes noise but doesn’t move | Power issue. Servos draw a current spike at startup. Try a powered USB hub, or add a 100µF capacitor across servo VCC and GND. |