Parent info
Parts you need
Affiliate links — we may earn a small commission
Try this circuit in your browser!
Run the code, press the buttons and watch what happens — before you buy any parts. No account needed.
Open in Simulator →A camera that photographs the evidence automatically.
Imagine this: you come home, someone was at your desk. You can’t prove it. You reach for your SD card, plug it into your laptop, and open photo_3.jpg. There they are. Timestamp and everything.
That’s the ESP32-CAM — an $8 board with a full camera, SD card slot, and ESP32 processor built in. Mount it behind a book, point it at the door, and it silently captures photos every time the PIR sensor triggers.
In 1 hour. For about $18.
Ethics note: This is for your room only. A camera in a shared bathroom, hallway, or anyone else’s private space is not a spy project — it’s illegal in most places. Your room, your rules. Everyone else’s space, everyone else’s rules.
What you’ll need
| Part | What it does | Price |
|---|---|---|
| ESP32-CAM (AI-Thinker) | Camera + SD slot + ESP32 processor, all in one $8 board | ~$8 |
| HC-SR501 PIR Sensor | Triggers the camera when it detects body heat | ~$2 |
| MicroSD card (8GB+) | Stores the captured photos — format as FAT32 before use | ~$5 |
| FTDI USB-to-Serial adapter | Programs the ESP32-CAM (it has no built-in USB chip) | ~$3 |
| Breadboard + jumper wires | Connects everything | ~$3 |
Total: ~$18 | Time: ~1 hour | Difficulty: ●●●○○
Important: The ESP32-CAM has no USB chip. You must use an FTDI adapter to upload code. This is a one-time purchase — you’ll reuse it for other ESP32-CAM projects too.
How it works (60 seconds)
Think of it like a doorbell camera, but hidden and for $8.
The PIR sensor detects body heat and sends a HIGH signal to the camera board. The ESP32 wakes up, fires the OV2640 camera sensor, captures a JPEG image, and saves it to the SD card. Then it goes back to waiting. The whole capture-and-save cycle takes about 1 second.
Optional upgrade: if WiFi is connected, it also sends a text alert to Telegram saying “Intruder detected — Photo #3 saved.”
Step 0: Format your SD card
Time: ~2 minutes
Before anything else — format your MicroSD card as FAT32.
On a Mac: open Disk Utility, select the card, click Erase, choose “MS-DOS (FAT)” format. On Windows: right-click the drive in File Explorer, click Format, choose FAT32.
Check: When you insert the card and open it on your computer, it should be empty and show 0 bytes used.
Step 1: Wire it up
Time: ~10 minutes
The ESP32-CAM has two phases of wiring: programming mode (upload code) and run mode (normal operation). Start with programming mode.
Programming mode (FTDI adapter → ESP32-CAM):
| FTDI Adapter | ESP32-CAM Pin |
|---|---|
| TX | U0R (RX) |
| RX | U0T (TX) |
| GND | GND |
| 5V | 5V |
Also connect: IO0 pin → GND on the ESP32-CAM. This puts it in flash mode. You’ll disconnect this after uploading.
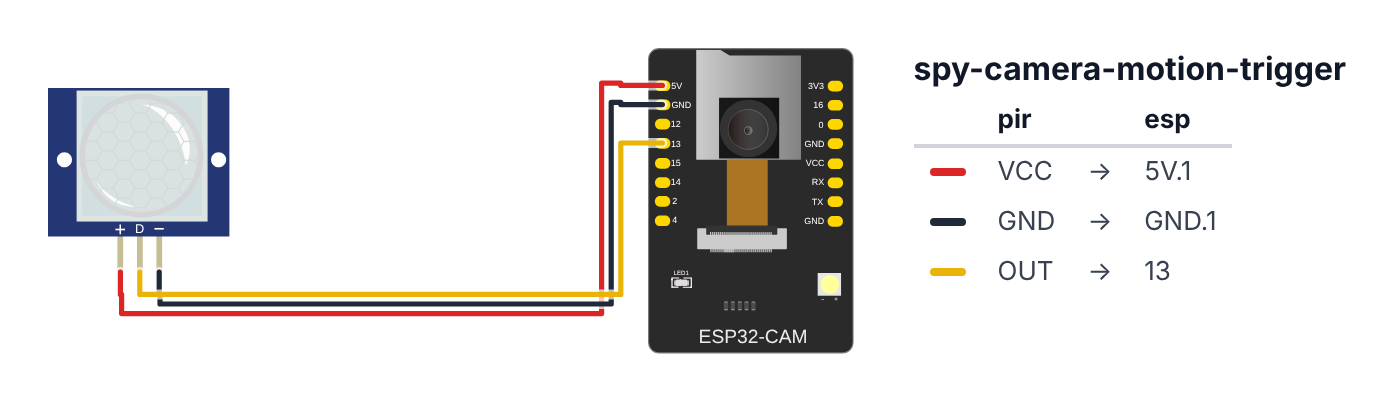
PIR Sensor (3 wires):
- PIR VCC → ESP32-CAM 5V — red wire
- PIR GND → ESP32-CAM GND — black wire
- PIR OUT → ESP32-CAM GPIO 13 — yellow wire
The HC-SR501 needs 5V — on 3.3V it gets confused and triggers by itself. Don’t worry about the ESP32-CAM: the PIR’s OUT pin only ever sends 3.3V, even when the PIR is powered from 5V.
Why GPIO 13? On the AI-Thinker ESP32-CAM the camera uses almost every pin, and the SD card slot uses GPIO 2, 14 and 15. The code starts the SD card in 1-bit mode (
SD_MMC.begin("/sdcard", true)), so GPIO 13 stays free for the PIR. Don’t use GPIO 12 for the PIR: it must be LOW when the board starts, and a PIR that sees you at power-on would stop it from booting.
Check: Count your connections: 4 FTDI wires + IO0 to GND jumper + 3 PIR wires. The IO0 to GND jumper is what tells the board “I want to upload code.” After uploading, remove it.
Step 2: Flash the code
Time: ~10 minutes
In Arduino IDE:
- Go to Tools → Board → ESP32 Arduino → AI Thinker ESP32-CAM
- Select the port your FTDI adapter shows up on
- Install UniversalTelegramBot library (Sketch → Manage Libraries)
Paste and upload this code (fill in your credentials):
The big picture first. This program turns the ESP32-CAM into a silent evidence camera:
- The PIR sensor is the eyes — it detects body heat and sends a HIGH signal.
- When the PIR fires, the code wakes up the OV2640 camera chip on the board, grabs one JPEG photo, and saves it to the SD card with a filename like
photo_3.jpg. - Optionally, it also sends a text alert to your Telegram bot so you know while you’re away.
- Then it goes back to watching, ready for the next intruder.
// Note: This project requires ESP32-S3 or ESP32-CAM (camera)

#include "esp_camera.h"
#include "SD_MMC.h"
#include "FS.h"
#include <WiFi.h>
#include <WiFiClientSecure.h>
#include <UniversalTelegramBot.h>

#define TELEGRAM_ENABLED true

const char* WIFI_SSID     = "YourWiFiName";
const char* WIFI_PASSWORD = "YourWiFiPassword";
const char* BOT_TOKEN     = "YOUR_TELEGRAM_BOT_TOKEN";
const char* CHAT_ID       = "YOUR_TELEGRAM_CHAT_ID";

#define PWDN_GPIO_NUM     32
#define RESET_GPIO_NUM    -1
#define XCLK_GPIO_NUM      0
#define SIOD_GPIO_NUM     26
#define SIOC_GPIO_NUM     27
#define Y9_GPIO_NUM       35
#define Y8_GPIO_NUM       34
#define Y7_GPIO_NUM       39
#define Y6_GPIO_NUM       36
#define Y5_GPIO_NUM       21
#define Y4_GPIO_NUM       19
#define Y3_GPIO_NUM       18
#define Y2_GPIO_NUM        5
#define VSYNC_GPIO_NUM    25
#define HREF_GPIO_NUM     23
#define PCLK_GPIO_NUM     22

const int PIR_PIN = 13;
int photoCounter = 0;

WiFiClientSecure client;
UniversalTelegramBot* bot = nullptr;

bool initCamera() {
  camera_config_t config;
  config.ledc_channel = LEDC_CHANNEL_0;
  config.ledc_timer   = LEDC_TIMER_0;
  config.pin_d0 = Y2_GPIO_NUM;  config.pin_d1 = Y3_GPIO_NUM;
  config.pin_d2 = Y4_GPIO_NUM;  config.pin_d3 = Y5_GPIO_NUM;
  config.pin_d4 = Y6_GPIO_NUM;  config.pin_d5 = Y7_GPIO_NUM;
  config.pin_d6 = Y8_GPIO_NUM;  config.pin_d7 = Y9_GPIO_NUM;
  config.pin_xclk     = XCLK_GPIO_NUM;
  config.pin_pclk     = PCLK_GPIO_NUM;
  config.pin_vsync    = VSYNC_GPIO_NUM;
  config.pin_href     = HREF_GPIO_NUM;
  config.pin_sscb_sda = SIOD_GPIO_NUM;
  config.pin_sscb_scl = SIOC_GPIO_NUM;
  config.pin_pwdn     = PWDN_GPIO_NUM;
  config.pin_reset    = RESET_GPIO_NUM;
  config.xclk_freq_hz = 20000000;
  config.pixel_format = PIXFORMAT_JPEG;
  config.frame_size   = FRAMESIZE_VGA;
  config.jpeg_quality = 12;
  config.fb_count     = 1;
  return esp_camera_init(&config) == ESP_OK;
}

void setup() {
  Serial.begin(115200);
  pinMode(PIR_PIN, INPUT);

  if (!initCamera()) {
    Serial.println("Camera init failed! Check wiring.");
    return;
  }
  Serial.println("Camera ready.");

  if (!SD_MMC.begin("/sdcard", true)) {
    Serial.println("SD card mount failed!");
    return;
  }
  Serial.println("SD card ready.");

  #if TELEGRAM_ENABLED
    WiFi.begin(WIFI_SSID, WIFI_PASSWORD);
    Serial.print("Connecting to WiFi");
    int timeout = 20;
    while (WiFi.status() != WL_CONNECTED && timeout-- > 0) {
      delay(500); Serial.print(".");
    }
    if (WiFi.status() == WL_CONNECTED) {
      client.setInsecure();
      bot = new UniversalTelegramBot(BOT_TOKEN, client);
      Serial.println("\nWiFi connected. Telegram enabled.");
    } else {
      Serial.println("\nWiFi failed — saving to SD only.");
    }
  #endif

  Serial.println("Operation Hidden Eye: ARMED.");
}

void captureAndSave() {
  camera_fb_t* fb = esp_camera_fb_get();
  if (!fb) {
    Serial.println("Camera capture failed.");
    return;
  }

  photoCounter++;
  String filename = "/photo_" + String(photoCounter) + ".jpg";

  File file = SD_MMC.open(filename.c_str(), FILE_WRITE);
  if (file) {
    file.write(fb->buf, fb->len);
    file.close();
    Serial.println("Saved: " + filename + " (" + String(fb->len) + " bytes)");
  }

  #if TELEGRAM_ENABLED
    if (bot != nullptr) {
      String caption = "Intruder detected! Photo #" + String(photoCounter) + " saved to SD.";
      bot->sendMessage(CHAT_ID, caption, "");
    }
  #endif

  esp_camera_fb_return(fb);
}

void loop() {
  if (digitalRead(PIR_PIN) == HIGH) {
    Serial.println("Motion detected! Capturing photo...");
    captureAndSave();
    delay(5000);
  }
  delay(100);
}
Line-by-line: what every line does and why
Lines 1–6: Borrowing ready-made tools
#include "esp_camera.h"
#include "SD_MMC.h"
#include "FS.h"
#include <WiFi.h>
#include <WiFiClientSecure.h>
#include <UniversalTelegramBot.h>
#include means “grab this instruction book.”
- esp_camera is the instruction book for the OV2640 camera chip on the board.
- SD_MMC is the instruction book for reading and writing the SD card.
- FS gives you
Fileobjects — like a handle for opening and writing files. - WiFi connects to your router.
- WiFiClientSecure is for encrypted (HTTPS) connections — Telegram requires this.
- UniversalTelegramBot gives you
bot.sendMessage()to text your phone.
Lines 8–14: Config settings
#define TELEGRAM_ENABLED true
const char* WIFI_SSID     = "YourWiFiName";
...
#define TELEGRAM_ENABLED true is a switch. Set it to false and the WiFi/Telegram code is completely skipped at compile time — the camera still saves to SD without needing any credentials. Think of it like a light switch on a whole section of the program.
const char* stores a word (a string). const means it never changes while the program runs.
Lines 16–31: Camera pin numbers
#define PWDN_GPIO_NUM     32
#define RESET_GPIO_NUM    -1
...
The ESP32-CAM has 16 wires connecting it to the OV2640 camera chip inside. Each #define gives the correct pin number a readable name. These numbers are the exact hardware wiring on the AI-Thinker board — do not change them. Changing any one of these would be like rewiring a camera’s internals.
RESET_GPIO_NUM = -1 means “there is no reset pin” — the camera resets itself internally.
Lines 33–34: Global counters
const int PIR_PIN = 13;
int photoCounter = 0;
PIR_PIN = 13 names the GPIO pin where the PIR sensor’s OUT wire connects.
photoCounter is a tally. Every time we capture a photo, we add 1. It generates filenames: photo_1.jpg, photo_2.jpg, and so on.
Lines 36–66: initCamera() — configuring the camera
bool initCamera() {
  camera_config_t config;
  ...
  config.pixel_format = PIXFORMAT_JPEG;
  config.frame_size   = FRAMESIZE_VGA;
  config.jpeg_quality = 12;
  config.fb_count     = 1;
  return esp_camera_init(&config) == ESP_OK;
}
bool initCamera() is a function that returns true (success) or false (failure). A bool is a yes/no box.
camera_config_t config is a settings form — a struct with many fields you fill in before handing it to the camera driver.
PIXFORMAT_JPEG— compress each image as a JPEG (smaller file, good quality).FRAMESIZE_VGA— capture at 640×480 pixels.jpeg_quality = 12— quality from 0 to 63; lower = better. 12 gives good quality photos around 30KB each.fb_count = 1— use one frame buffer (one “photo tray” in memory). Enough for still photos.
return esp_camera_init(&config) == ESP_OK — hand the settings form to the camera driver. If it returns ESP_OK (everything fine), the function returns true.
Lines 68–116: setup() — the morning routine
void setup() {
  Serial.begin(115200);
  pinMode(PIR_PIN, INPUT);
  if (!initCamera()) { ... return; }
  if (!SD_MMC.begin("/sdcard", true)) { ... return; }
  ...
}
setup() runs exactly once on power-on.
pinMode(PIR_PIN, INPUT) — tells the ESP32 that pin 13 is an input (it receives signals from the PIR, not the other way around).
if (!initCamera()) — ! means NOT. So: “if camera did NOT start successfully, print an error and stop.” The return exits setup() immediately.
SD_MMC.begin("/sdcard", true) — mounts the SD card. Like inserting a USB drive into a computer — must succeed before you can save files. The true switches on 1-bit mode: the card then talks over only GPIO 2, 14 and 15. In the default 4-bit mode it would also grab GPIO 4, 12 and 13 — and GPIO 13 is your PIR sensor (GPIO 4 is the white flash LED, which would flicker on every save). 1-bit mode is a little slower, but plenty fast for one photo at a time.
Inside the #if TELEGRAM_ENABLED block: connect to WiFi. timeout-- > 0 tries 20 times (each 500ms = 10 seconds total). If WiFi fails, the camera still works in SD-only mode.
client.setInsecure() — skips checking the SSL security certificate. Fine for a bedroom camera; for a bank you would not do this.
bot = new UniversalTelegramBot(BOT_TOKEN, client) — creates the Telegram bot object. new creates it in memory at this moment (only if WiFi worked).
Lines 118–143: captureAndSave() — takes one photo
void captureAndSave() {
  camera_fb_t* fb = esp_camera_fb_get();
  if (!fb) { ... return; }
  photoCounter++;
  String filename = "/photo_" + String(photoCounter) + ".jpg";
  File file = SD_MMC.open(filename.c_str(), FILE_WRITE);
  if (file) {
    file.write(fb->buf, fb->len);
    file.close();
  }
  ...
  esp_camera_fb_return(fb);
}
camera_fb_t* fb = esp_camera_fb_get() — asks the camera for one frame. Think of fb as a photo tray that the camera fills with pixel data. The * means it’s a pointer (an address in memory).
photoCounter++ — add 1 to the counter. ++ is a shorthand for “add 1.”
String filename = "/photo_" + String(photoCounter) + ".jpg" — build the filename by joining words together. The / at the start is required by the SD library (it’s like a folder path).
SD_MMC.open(filename.c_str(), FILE_WRITE) — open (create) the file. c_str() converts the Arduino String to a C-style string that the file system understands.
file.write(fb->buf, fb->len) — write the JPEG data to the file. fb->buf is the image data, fb->len is how many bytes it is.
esp_camera_fb_return(fb) — the most important line after capturing. It gives the photo tray back to the camera system. Without this, the camera runs out of trays and stops working after 1–2 photos. Always return the buffer.
Lines 145–151: loop() — watches forever
void loop() {
  if (digitalRead(PIR_PIN) == HIGH) {
    Serial.println("Motion detected! Capturing photo...");
    captureAndSave();
    delay(5000);
  }
  delay(100);
}
loop() beats like a heartbeat.
digitalRead(PIR_PIN) == HIGH — read the PIR pin. HIGH means “the PIR detected body heat.” == asks “is it equal to HIGH?”
When motion is detected: call captureAndSave(), then delay(5000) — wait 5 seconds before looking again. Without this pause, one person walking past could trigger 50 photos in a row.
delay(100) in the outer loop — check the PIR 10 times per second. Fast enough to catch anyone entering.
The whole thing in one sentence
When the PIR sensor detects heat, the program wakes the camera, captures one JPEG, saves it to the SD card with a numbered filename, optionally texts your Telegram, then waits 5 seconds before watching again.
First thing to try: set TELEGRAM_ENABLED to false and upload. Walk in front of the sensor. Check your SD card on a laptop — you should see photo_1.jpg, photo_2.jpg. Now you know the camera works before dealing with WiFi credentials.
Check: Open Serial Monitor at 115200 baud. You should see “Camera ready.” then “SD card ready.” If you see “Camera init failed!” — double-check the FTDI wiring and that you selected “AI Thinker ESP32-CAM” as the board.
Step 3: Switch to run mode
Time: ~2 minutes
After uploading:
- Disconnect the IO0 → GND jumper wire
- Press the Reset button on the ESP32-CAM
- You can now disconnect the FTDI adapter (the code is saved in flash memory)
- Power the ESP32-CAM from any USB port or USB charger
Check: Open Serial Monitor again. You should see “Operation Hidden Eye: ARMED.” without re-uploading anything.
Step 4: Hide it and test!
Time: ~5 minutes
The ESP32-CAM is tiny — about the size of a matchbox. Hiding spots:
- Behind books: Push books together but leave a 5mm gap at camera height. Thread the USB cable down behind the shelf.
- Inside a tissue box: Cut a small hole. Looks completely innocent.
- On top of a shelf: The camera faces forward, disguised against a book spine.
Test: Walk in front of the sensor. You should hear nothing (no buzzer on this one). Check the SD card on your laptop — you should see photo_1.jpg, photo_2.jpg, etc. If Telegram is enabled, your phone buzzes with “Intruder detected! Photo #1 saved.”
What just happened (what you learned)
This one is more advanced — you’re dealing with real hardware concepts:
-
Frame buffer (
camera_fb_t) is a chunk of RAM the camera fills with pixel data — like a tray holding one photograph. You must return it after use (esp_camera_fb_return(fb)) or the tray pile runs out and the camera stops working. -
JPEG compression happens inside the camera chip before the data reaches the ESP32. A raw 640×480 image would be 900KB. JPEG compresses it to about 30KB — that’s what fits on the SD card quickly.
-
FTDI adapter is needed because the ESP32-CAM has no USB chip. The FTDI converts USB signals to serial protocol the ESP32 understands — it’s a translator.
-
Conditional compilation (
#if TELEGRAM_ENABLED) lets you switch features on and off without deleting code. Set it tofalsefor offline-only mode. The#if falseblock disappears completely during compiling.
Level Up
Real timestamps: Add the NTPClient library to get real time over WiFi. Name your files photo_2026-10-05_23-47-12.jpg instead of photo_3.jpg. Now your evidence has actual timestamps that match real events.
Photo quality filter: Very dark photos compress to small files (under 15KB) because there’s not much detail to encode. Add a check: if (fb->len > 15000) — only save if the photo is big enough to be useful. This eliminates blank frames from the middle of the night.
Telegram photo delivery: The bot->sendPhoto() method can send the actual JPEG image to Telegram — not just a text message. Encode the JPEG buffer to base64 and send it. Now your phone receives the actual photo, not just a notification that one was taken.
★★ You completed: Spy Camera with Motion Trigger!
Troubleshooting
| Problem | Fix |
|---|---|
| Camera init failed | FTDI wiring issue — TX↔RX must be crossed (FTDI TX → ESP32 U0R, FTDI RX → ESP32 U0T). Check 5V power, not 3.3V. |
| SD card mount failed | Card not formatted as FAT32. Re-format. Try a different SD card — some brands don’t work with SD_MMC. |
| Upload fails or times out | IO0 must be connected to GND before you click upload. Hold the button while clicking upload if your board has one. |
| Photos aren’t saving | Check: Is the SD card inserted fully? Is it FAT32? Check that the code says SD_MMC.begin("/sdcard", true) (1-bit mode) and watch Serial Monitor for “SD card ready.” |
| PIR never triggers | Check GPIO 13 wiring. The OUT pin is the middle pin of the HC-SR501. Give the PIR 30 seconds to calibrate after power-on. If you changed SD_MMC.begin back to SD_MMC.begin(), the SD card takes over GPIO 13 — put the "/sdcard", true back. |
| Telegram alert but no photo on SD | SD card write is failing silently. Add Serial.println(SD_MMC.cardSize()) in setup to confirm card is readable. |