Parent info
Parts you need
Affiliate links — we may earn a small commission
Try this circuit in your browser!
Open Wokwi Simulator, paste the diagram.json, and test the wiring before buying any parts.
“Hey Siri, turn off the workshop lights.” It works. You built it.
Imagine scanning a QR code in the Apple Home app. Your phone asks you to name it and pick a room. You choose “Workshop Light.” You tap done. Now you say “Hey Siri, turn off the workshop lights” — and a relay clicks. A lamp goes dark.
Your ESP32-C6 is speaking Matter — the exact same protocol as a $200 Philips Hue hub. Apple Home doesn’t know it’s a $10 dev board you programmed yourself. It just works.
3–4 hours. About $18. Requires ESP-IDF (not Arduino).
This is the most advanced project in this series. It uses the ESP-IDF framework (not Arduino IDE) and requires a one-time environment setup of ~30 minutes. The result is worth it: a fully certified smart home device you built from scratch.
What you’ll need
| Part | What it does | Price |
|---|---|---|
| ESP32-C6 DevKitC-1 | The board this project is built on — the C6 supports Matter over WiFi AND Matter over Thread | ~$10 |
| 5V Single-Channel Relay Module | Switches a real lamp — the physical load output | ~$4 |
| LED + 220Ω resistor | Safe testing before connecting mains power | ~$0.30 |
| Breadboard + jumper wires | Connects everything | ~$3 |
Total: ~$18 | Time: ~3–4 hours | Difficulty: ●●●●○
Why an ESP32-C6? Previous ESP32 variants (classic, S3, C3) only support Matter over WiFi. The ESP32-C6 is the only affordable chip that supports both Matter over WiFi AND Matter over Thread. Thread is the preferred protocol — lower power, mesh networking, longer range. If you want Matter over Thread too, C6 is the only option under $15. (Only have an ESP32-S3? The code has a
BOARD_S3block, so it still works — over WiFi only.)
Safety: The relay can switch 110V/220V mains power. Test with an LED first (safe at 3.3V). For lamp wiring, follow the same rules as the Smart Light Controller project: use a detachable lamp cord, have an adult do the mains wiring, enclose all mains connections.
How it works (60 seconds)
Matter is a universal standard that Apple, Google, Amazon, and Samsung all agreed on. It’s like a shared language that all smart home platforms understand. A Matter device works everywhere — no proprietary apps, no cloud bridges, no ecosystem lock-in.
Your ESP32-C6 runs Espressif’s ESP-Matter SDK, which implements the full Matter protocol stack. During setup (commissioning), you scan a QR code in Apple Home. Your phone connects to the ESP32-C6 over Bluetooth, sends it your WiFi credentials, and registers it as a certified device. After that, Siri can control it directly over WiFi.
When Siri says “turn off the workshop lights,” Apple’s servers send a Matter command to your ESP32-C6. The ESP32-C6 receives the OnOff command, sets GPIO11 to LOW, the relay opens, the lamp turns off. That’s the complete chain.
Step 0: Set up ESP-IDF (one-time setup)
Time: ~30 minutes
This project requires ESP-IDF, not Arduino IDE. ESP-IDF is Espressif’s professional development framework — it’s what commercial ESP32 products use in production.
Mac/Linux setup:
# Install prerequisites (Mac with Homebrew)
brew install cmake ninja dfu-util python3 git

# Clone ESP-IDF v5.x
git clone --recursive https://github.com/espressif/esp-idf.git ~/esp-idf
cd ~/esp-idf && git checkout v5.2.1
git submodule update --init --recursive
./install.sh esp32c6

# Set up environment (run this in every new terminal session)
. ~/esp-idf/export.sh

# Clone ESP-Matter SDK
git clone --recursive https://github.com/espressif/esp-matter.git ~/esp-matter
cd ~/esp-matter && ./install.sh

# Set up Matter environment
. ~/esp-matter/export.sh
Check: Run
idf.py --version— you should see a version number. If you get “command not found,” the environment variables aren’t set. Run. ~/esp-idf/export.shagain in your current terminal.
Step 1: Wire it up
Time: ~5 minutes
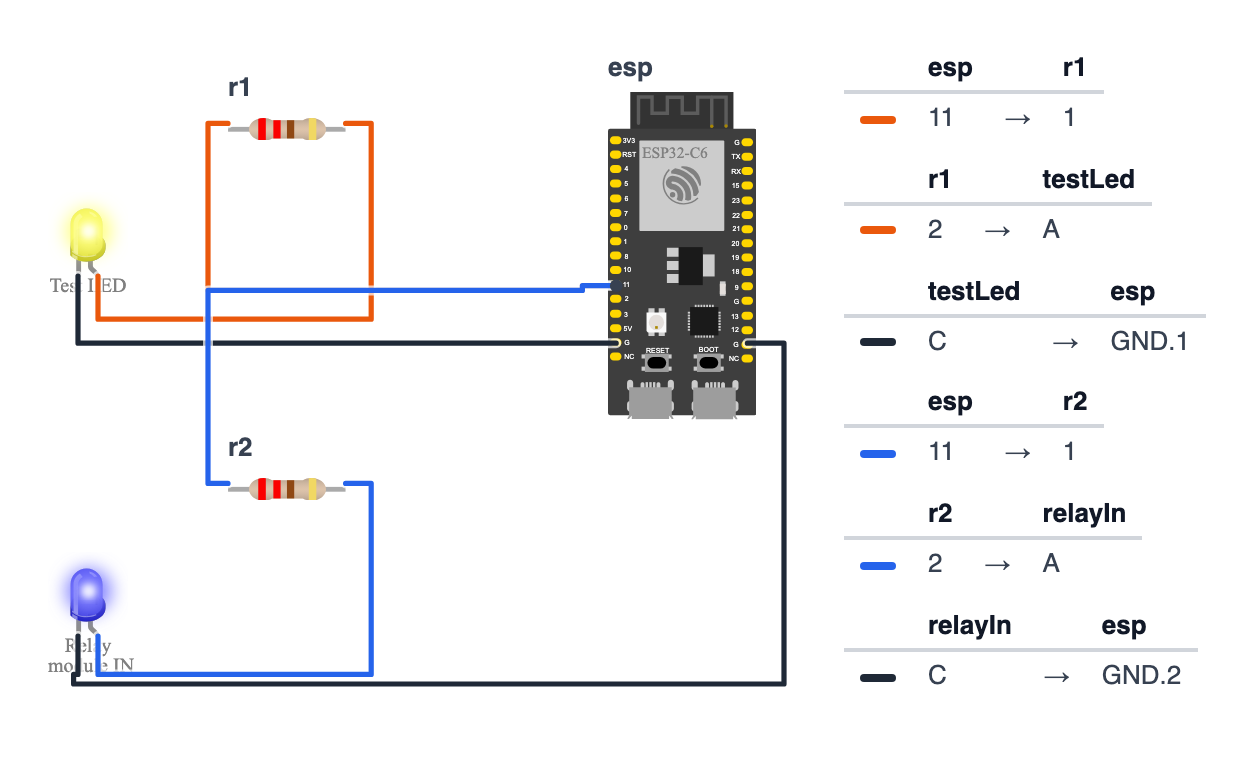
Board: this project is built on the ESP32-C6-DevKitC-1, and the code already has
#define BOARD_C6switched on. The light uses GPIO11, not GPIO8: on this board GPIO8 is wired to the built-in RGB LED, so it isn’t free. Using an ESP32-S3-DevKitC-1 instead? Switch the code to#define BOARD_S3, use the S3 pin in brackets below (GPIO18), and runidf.py set-target esp32s3in Step 2 instead ofesp32c6.
Start with the LED for safe testing (no mains power):
- LED Anode (+, longer leg) → 220Ω resistor → board GPIO11 (S3: GPIO18) — orange wire
- LED Cathode (-, shorter leg) → board GND — black wire
For relay (after LED test works):
- Relay VCC → board 5V — red wire
- Relay GND → board GND — black wire
- Relay IN (signal) → board GPIO11 (S3: GPIO18) — blue wire
The relay and LED both connect to GPIO11 (S3: GPIO18). Use whichever output you’re testing with first.
Good to know: The wiring picture can’t draw a relay module, so the blue LED + 220Ω resistor labelled Relay module IN stands in for it, on the pin where the module’s IN goes. Your real module has three pins — VCC → 5V, GND → GND, IN → GPIO11 (S3: GPIO18) — and its own transistor and diode on board. Never wire a bare relay coil straight to a GPIO pin.
Check: LED polarity: longer leg (anode) goes to GPIO11 (S3: GPIO18) through the resistor. If the LED doesn’t light when you write HIGH to that pin, flip it around. The LED lets you verify the Matter on/off commands work before connecting any real lamp.
Step 2: Build and flash the firmware
Time: ~20 minutes
Use the official ESP-Matter light example as your starting point, then customize it:
# Navigate to the official light example
cd ~/esp-matter/examples/light

# Set the target to ESP32-C6
idf.py set-target esp32c6

# Open the configuration menu and set your WiFi credentials
idf.py menuconfig
# Navigate to: Example Configuration → WiFi SSID and Password
# Also check: Component config → CHIP Device Layer → Device Identification Options
# Note the Setup Discriminator and Setup Passcode — you'll need these for commissioning
Then customize main/app_main.cpp to use GPIO11 (S3: GPIO18) for your relay/LED:
The big picture first. This program turns the ESP32-C6 into a real Matter smart home device:
- Matter is a universal smart home standard — Apple, Google, Amazon, and Samsung all agreed on it. A Matter device works with all of them.
- During first setup (commissioning), your phone connects over Bluetooth, sends WiFi credentials, and registers the device.
- After that, when Siri says “turn off the workshop light,” Apple’s servers send a Matter OnOff command to the ESP32-C6. The code receives it, sets GPIO11 HIGH or LOW, and the relay clicks.
- This uses ESP-IDF (professional framework), not Arduino. The syntax looks different but the ideas are the same.
// ========== CHOOSE YOUR BOARD ==========
// Uncomment the line for YOUR board:
#define BOARD_C6    // ESP32-C6-DevKitC-1
//#define BOARD_S3  // ESP32-S3-DevKitC-1
// ========================================

#ifdef BOARD_S3
  #define LIGHT_GPIO GPIO_NUM_18
#endif
#ifdef BOARD_C6
  #define LIGHT_GPIO GPIO_NUM_11
#endif

#include "esp_log.h"
#include "esp_matter.h"
#include "driver/gpio.h"

static const char *TAG = "buildcool_light";
static uint16_t light_endpoint_id = 0;

esp_err_t app_attribute_update_cb(
    esp_matter::callback_type_t type,
    uint16_t endpoint_id,
    uint32_t cluster_id,
    uint32_t attribute_id,
    esp_matter_attr_val_t *val,
    void *priv_data)
{
    if (type == esp_matter::PRE_UPDATE && endpoint_id == light_endpoint_id) {
        if (cluster_id == chip::app::Clusters::OnOff::Id &&
            attribute_id == chip::app::Clusters::OnOff::Attributes::OnOff::Id) {
            bool new_state = val->val.b;
            gpio_set_level(LIGHT_GPIO, new_state ? 1 : 0);
            ESP_LOGI(TAG, "Light %s", new_state ? "ON" : "OFF");
        }
    }
    return ESP_OK;
}

extern "C" void app_main() {
    gpio_config_t io_conf = {};
    io_conf.pin_bit_mask = (1ULL << LIGHT_GPIO);
    io_conf.mode         = GPIO_MODE_OUTPUT;
    io_conf.pull_up_en   = GPIO_PULLUP_DISABLE;
    io_conf.pull_down_en = GPIO_PULLDOWN_DISABLE;
    gpio_config(&io_conf);
    gpio_set_level(LIGHT_GPIO, 0);

    esp_matter::node::config_t node_config;
    snprintf(node_config.root_node.basic_information.node_label,
             sizeof(node_config.root_node.basic_information.node_label),
             "BuildCool Light");

    esp_matter::node_t *node = esp_matter::node::create(
        &node_config, app_attribute_update_cb, nullptr);

    esp_matter::endpoint::on_off_light::config_t light_config;
    light_config.on_off.on_off = false;

    esp_matter::endpoint_t *endpoint = esp_matter::endpoint::on_off_light::create(
        node, &light_config, ENDPOINT_FLAG_NONE, nullptr);

    light_endpoint_id = esp_matter::endpoint::get_id(endpoint);
    ESP_LOGI(TAG, "Light endpoint id: %d", light_endpoint_id);

    esp_matter::start(nullptr);
    ESP_LOGI(TAG, "Matter started. Commission via QR code.");
}
Line-by-line: what every line does and why
Lines 7–12: Which pin switches the light
#ifdef BOARD_S3
  #define LIGHT_GPIO GPIO_NUM_18
#endif
#ifdef BOARD_C6
  #define LIGHT_GPIO GPIO_NUM_11
#endif
Only one of these two blocks counts: the one whose board is switched on at the very top (#define BOARD_C6). So LIGHT_GPIO means GPIO11 on the ESP32-C6, or GPIO18 if you switch to #define BOARD_S3.
GPIO_NUM_11 — in ESP-IDF, GPIOs are named constants like GPIO_NUM_11 instead of just 11. This prevents typos.
Why not GPIO8? On the ESP32-C6-DevKitC-1, GPIO8 is wired to the board’s own RGB LED. Switching a relay on that pin would confuse the LED, so the light gets a free pin of its own.
Lines 14–16: Borrowing ready-made tools (ESP-IDF style)
#include "esp_log.h"
#include "esp_matter.h"
#include "driver/gpio.h"
#include grabs instruction books — same as Arduino. The difference: in ESP-IDF, you use esp_log.h for printing messages (instead of Serial.println()), esp_matter.h is the entire Matter protocol stack, and driver/gpio.h is the GPIO control library.
Lines 18–19: Identifying information
static const char *TAG = "buildcool_light";
static uint16_t light_endpoint_id = 0;
static const char *TAG is a label for log messages. Every time you call ESP_LOGI(TAG, "Light ON"), it prints [buildcool_light] Light ON in the console — making it easy to find your messages among hundreds of system messages.
uint16_t light_endpoint_id = 0 — a 16-bit whole number (0 to 65535). After creating the Matter light endpoint, we save its ID here. The callback uses it to confirm which device is being controlled.
Lines 21–38: The callback — receives commands from Siri/Google
esp_err_t app_attribute_update_cb(
    esp_matter::callback_type_t type,
    uint16_t endpoint_id,
    uint32_t cluster_id,
    uint32_t attribute_id,
    esp_matter_attr_val_t *val,
    void *priv_data)
{
    if (type == esp_matter::PRE_UPDATE && endpoint_id == light_endpoint_id) {
        if (cluster_id == chip::app::Clusters::OnOff::Id &&
            attribute_id == chip::app::Clusters::OnOff::Attributes::OnOff::Id) {
            bool new_state = val->val.b;
            gpio_set_level(LIGHT_GPIO, new_state ? 1 : 0);
            ESP_LOGI(TAG, "Light %s", new_state ? "ON" : "OFF");
        }
    }
    return ESP_OK;
}
This is a callback function — you never call it yourself. The Matter stack calls it automatically whenever a smart home controller (Siri, Google Home, the Apple Home app) sends a command.
esp_err_t — the return type. In ESP-IDF, functions return error codes instead of void. ESP_OK means “no error.”
The function receives 6 pieces of information. The important ones:
endpoint_id— which device the command is for (your light has a specific ID).cluster_id— which group of commands. Matter organizes commands into “clusters.”OnOff::Idis the cluster for on/off lights.attribute_id— which specific attribute changed.OnOff::Attributes::OnOff::Idis the “is it on?” attribute.val->val.b— the new value as abool.val->val.breads the boolean field from the value union.true= ON,false= OFF.
chip::app::Clusters::OnOff::Id — the :: is C++’s way of saying “inside.” Read it as: “inside chip, inside app, inside Clusters, find OnOff, find Id.” These IDs are standardized numbers in the Matter specification — a Philips Hue bulb uses the same cluster ID as your $10 ESP32-C6. That’s why they’re interoperable.
gpio_set_level(LIGHT_GPIO, new_state ? 1 : 0) — ESP-IDF’s version of digitalWrite(). Set GPIO11 to 1 (HIGH, relay ON) or 0 (LOW, relay OFF).
ESP_LOGI(TAG, "Light %s", new_state ? "ON" : "OFF") — prints Light ON or Light OFF in the console, so you can watch every command arrive.
Lines 40–68: app_main() — ESP-IDF’s version of setup()
In ESP-IDF, the entry point is app_main() instead of setup(). The extern "C" tells the C++ compiler that this function has a C-style name (required for the ESP-IDF runtime to find it).
gpio_config_t io_conf = {};
io_conf.pin_bit_mask = (1ULL << LIGHT_GPIO);
io_conf.mode         = GPIO_MODE_OUTPUT;
gpio_config(&io_conf);
gpio_set_level(LIGHT_GPIO, 0);
gpio_config_t io_conf = {} — a settings form for GPIO. The = {} fills it with zeros (all defaults).
pin_bit_mask = (1ULL << LIGHT_GPIO) — a bitmask that selects which GPIO pins to configure. 1ULL << 11 means “take the number 1 and shift it left 11 positions in binary” — this produces a number with only bit 11 set, identifying GPIO11. ULL means “unsigned long long” — a 64-bit number, because some ESP32 chips have more than 32 GPIO pins (the ESP32-S3 has 45 of them).
GPIO_MODE_OUTPUT — configure the pin as an output (send power out).
gpio_config(&io_conf) — apply all settings. &io_conf passes the address of our settings form to the function.
gpio_set_level(LIGHT_GPIO, 0) — start with the relay OFF.
Lines 49–66: Creating the Matter device
esp_matter::node::config_t node_config;
snprintf(node_config.root_node.basic_information.node_label, ..., "BuildCool Light");
esp_matter::node_t *node = esp_matter::node::create(&node_config, app_attribute_update_cb, nullptr);
A node is the root object representing this physical device in the Matter data model.
snprintf(...) — fills a text field with a maximum length. Like Serial.println() but it writes into a character array. "BuildCool Light" is the name that appears in Home app after commissioning.
node::create(...) — create the node and register our callback. From this point, the Matter stack knows which function to call when a command arrives.
esp_matter::endpoint::on_off_light::config_t light_config;
light_config.on_off.on_off = false;
esp_matter::endpoint_t *endpoint = esp_matter::endpoint::on_off_light::create(node, ...);
light_endpoint_id = esp_matter::endpoint::get_id(endpoint);
An endpoint is a specific device function. on_off_light is a standard Matter device type that automatically adds all the required Matter clusters (groups of commands) for a light. This is what makes Apple Home see it as a light — not a sensor, not a switch.
light_config.on_off.on_off = false — set initial state to OFF.
get_id(endpoint) — save the endpoint’s numeric ID so our callback can identify which endpoint received a command.
esp_matter::start(nullptr);Start the Matter stack — this one call:
- Starts commissioning mode over Bluetooth (phone finds the device).
- Generates the QR code data for pairing.
- Listens for WiFi credentials from your phone.
- After commissioning, switches to WiFi for ongoing commands.
The whole thing in one sentence
app_main() configures GPIO11, creates a Matter “on_off_light” device, registers the callback, and starts the Matter stack; when Apple Home sends an ON/OFF command, app_attribute_update_cb fires and sets GPIO11 HIGH or LOW.
First thing to try: after flashing, open Serial Monitor. Look for the line containing MT: — that’s the QR code URL. Open it in a browser, scan the QR code in Apple Home. Tap the new light icon. You should hear a click from the relay (or see the LED turn on if testing with LED first).
Build and flash:
idf.py build
idf.py -p /dev/cu.usbmodem* flash monitor
# Replace /dev/cu.usbmodem* with your actual port
# On Linux: /dev/ttyUSB0 or /dev/ttyACM0
# On Windows: COM3, COM4, etc.
Check: The serial output should show “Matter started. Commission via QR code.” and then print a QR code URL and an 11-digit setup code. If you see build errors, make sure you ran both
. ~/esp-idf/export.shand. ~/esp-matter/export.shin the same terminal session.
Step 3: Commission to Apple Home (or Google Home)
Time: ~5 minutes
Commissioning is the one-time pairing process. The serial output prints a URL like:
https://project-chip.github.io/connectedhomeip/qrcode.html?data=MT:Y3.13OTB010...
- Open that URL in your browser — it shows a QR code
- Open Apple Home app → tap “+” → “Add Accessory” → “More Options”
- Point your phone camera at the QR code
- Home app shows “BuildCool Light” — tap Add to Home
- Choose a room name (e.g., “Workshop”)
- Done — the light appears in Apple Home
Test it: Tap the light icon in Home app — the LED (or relay) should toggle. Say “Hey Siri, turn on the workshop light” — it responds.
For Google Home: Open Google Home app → “+” → “Set up device” → “New device” → scan the same QR code.
Check: LED toggles from both the Home app tap and the Siri voice command. If commissioning fails, make sure the ESP32-C6 is powered on and within 10 meters of your phone during pairing.
Step 4: Connect the relay and lamp
Time: ~10 minutes (requires adult for mains wiring)
Once the LED test confirms everything works:
- Replace the LED with the relay module (same GPIO11 connection — S3: GPIO18)
- Test relay click with the Home app (tap on/off — you should hear the relay)
- With the lamp unplugged: do the mains wiring (same as Smart Light Controller project: cut the hot wire, route through relay COM → NO)
- Plug in the lamp, power the ESP32 from USB
- “Hey Siri, turn on the workshop light” → lamp turns on
What just happened
-
Matter is a universal smart home standard backed by Apple, Google, Amazon, and Samsung. The spec defines clusters, endpoints, and a commissioning process. Every certified Matter device uses the same cluster IDs —
chip::app::Clusters::OnOff::Idis the same number whether the device is a $200 Philips Hue bulb or your $10 ESP32-C6. This shared vocabulary is why they all interoperate. -
ESP-IDF vs Arduino: Arduino abstracts hardware with
digitalWrite(). ESP-IDF is lower-level — you configure GPIO withgpio_config_tstructs, useESP_LOGI()for logging, andesp_err_treturn types. Matter requires ESP-IDF because it needs precise control over FreeRTOS task priorities, flash partitioning, and NVS (Non-Volatile Storage) for storing commissioning data. This is genuinely professional-grade embedded development. -
Matter commissioning is the one-time pairing process. The device advertises over Bluetooth and proves its identity using a device attestation certificate embedded in the firmware. Your phone sends WiFi credentials encrypted with PAKE (Password Authenticated Key Exchange — a cryptographic protocol that doesn’t transmit the password in the clear). After commissioning, Bluetooth is no longer used. The device communicates directly via WiFi.
-
Thread vs WiFi for Matter: ESP32-C6 supports both. Matter over WiFi works immediately with no extra hardware. Matter over Thread requires a Thread Border Router (Apple HomePod mini, Google Nest Hub 2nd gen, Amazon Echo 4th gen). Thread is a mesh protocol — devices relay messages for each other, extending range. For a wall-mounted relay, WiFi is fine. For battery sensors, Thread’s lower power consumption matters enormously.
Level Up
Add dimming with PWM. Change endpoint::on_off_light to endpoint::dimmable_light. In the callback, also handle the LevelControl cluster’s CurrentLevel attribute (value 0–254). Map it to PWM: ledcWrite(LIGHT_GPIO, level) after setting up ledcAttach(LIGHT_GPIO, 5000, 8). Now Apple Home’s brightness slider controls your light smoothly. Dimming is the single biggest quality-of-life upgrade over basic on/off.
Add a second light endpoint. Create endpoint2 for a second relay on GPIO3 (S3: GPIO39) with another on_off_light::create(). In the callback, check endpoint_id to route the command to the correct GPIO. Apple Home shows two separate, independently controllable lights from one ESP32-C6.
Change the passcode for security. In idf.py menuconfig, navigate to Component config → CHIP Device Layer → Device Identification Options. Change the Setup Discriminator and Setup Passcode. The default values are public knowledge — anyone who reads the ESP-Matter source code knows them. Change them before deploying anywhere real.
Troubleshooting
| Problem | Fix |
|---|---|
| Build fails with “idf.py not found” | You need to run . ~/esp-idf/export.sh AND . ~/esp-matter/export.sh in the same terminal session. These set environment variables that only last for that terminal window. |
| “Matter started” but no QR code URL | Check the serial output more carefully — the QR code URL is sometimes buried in log output. Search for MT: in the output. |
| Commissioning fails — “accessory not found” | Make sure ESP32-C6 is powered on and nearby during pairing. Reset commissioning: erase flash with idf.py erase-flash and re-flash, then try again fresh. |
| Siri can control it but Google Home can’t | Each platform needs to commission separately. Add to Google Home the same way as Apple Home — scan the QR code again in Google Home app. |
| Relay clicks but lamp doesn’t turn on | Check COM → NO wiring on the relay’s mains side. Make sure you’re using NO (Normally Open) not NC (Normally Closed). |
| Device disappears from Home app after restart | This means commissioning data wasn’t saved to NVS. Make sure nvs_flash_init() is called in app_main. The official example handles this correctly — use it as your base. |