Parent info
Parts you need
Affiliate links — we may earn a small commission
Try this circuit in your browser!
Run the code, press the buttons and watch what happens — before you buy any parts. No account needed.
Open in Simulator →Your classmates built a cardboard castle. Yours has a working drawbridge.
Every 7th grade history project includes at least one medieval castle model. Cardboard towers, aluminum foil moat, cotton ball clouds. They all look great. They all sit completely still on the table.
Yours has a drawbridge that actually opens and closes, torches that flicker with realistic fire animation, and a motion sensor alarm that triggers if someone gets too close to the castle walls — complete with sound. When your teacher asks “what does the drawbridge represent?” you raise it live to show how it worked.
That’s not just a model. That’s a demonstration.
What you’ll need
| Part | What it does | Price |
|---|---|---|
| ESP32-S3-DevKitC-1 | The brain — controls all castle systems | ~$12 |
| SG90 servo motor | Raises and lowers the drawbridge | ~$3 |
| WS2812 LED strip (30 LED/m, 0.5m) | 15 LEDs for flickering torches and building glow | ~$6 |
| PIR motion sensor | Detects approaching enemies (or classmates) | ~$3 |
| Passive buzzer | Plays the castle alarm sound | ~$2 |
| Breadboard + jumper wires | Connects everything | ~$5 |
Total: ~$31 | Time: ~2.5 hours | Difficulty: ●●●○○
How it works (60 seconds)
Think of the ESP32 as the castle’s brain — like the lord who commands the garrison. It controls three systems at once: the LED strip running flicker animations in the torches, the servo holding the drawbridge, and the PIR sensor watching the moat. When the PIR detects motion, the ESP32 changes the torch LEDs to red (alarm!), sounds the buzzer in a short alarm pattern, and can optionally close the drawbridge. When the threat passes, everything returns to normal.
Step 0: Build your medieval castle
Time: ~45 minutes
Build the cardboard model first, leaving space for electronics inside.
Essential features to include (with electronics positions):
- Keep tower (main tall tower): LED strip inside for glowing windows
- Gatehouse (castle entrance): Servo-controlled drawbridge here
- Battlements (the bumpy top wall): PIR sensor hidden in a gap
- Great hall (main building): LEDs inside shining through tissue paper windows
Drawbridge construction:
- Cut your drawbridge gate from thick cardboard — make it slightly wider than the gate opening
- Attach it to the bottom of the gate arch with a small strip of tape or a real hinge (tape folded back on itself works)
- Hot-glue the servo INSIDE the gatehouse, above and behind the drawbridge
- Connect the servo arm to the top of the drawbridge with thin wire (a paper clip bent straight works)
- When servo is at 0° → drawbridge flat (down). At 90° → drawbridge raised.
Torch positions:
- Cut 4–6 small arched windows in the walls
- Place individual LEDs from the strip behind thin orange tissue paper
- The LED light shines through the tissue paper like flickering torch light
Step 1: Wire it up
Time: ~15 minutes
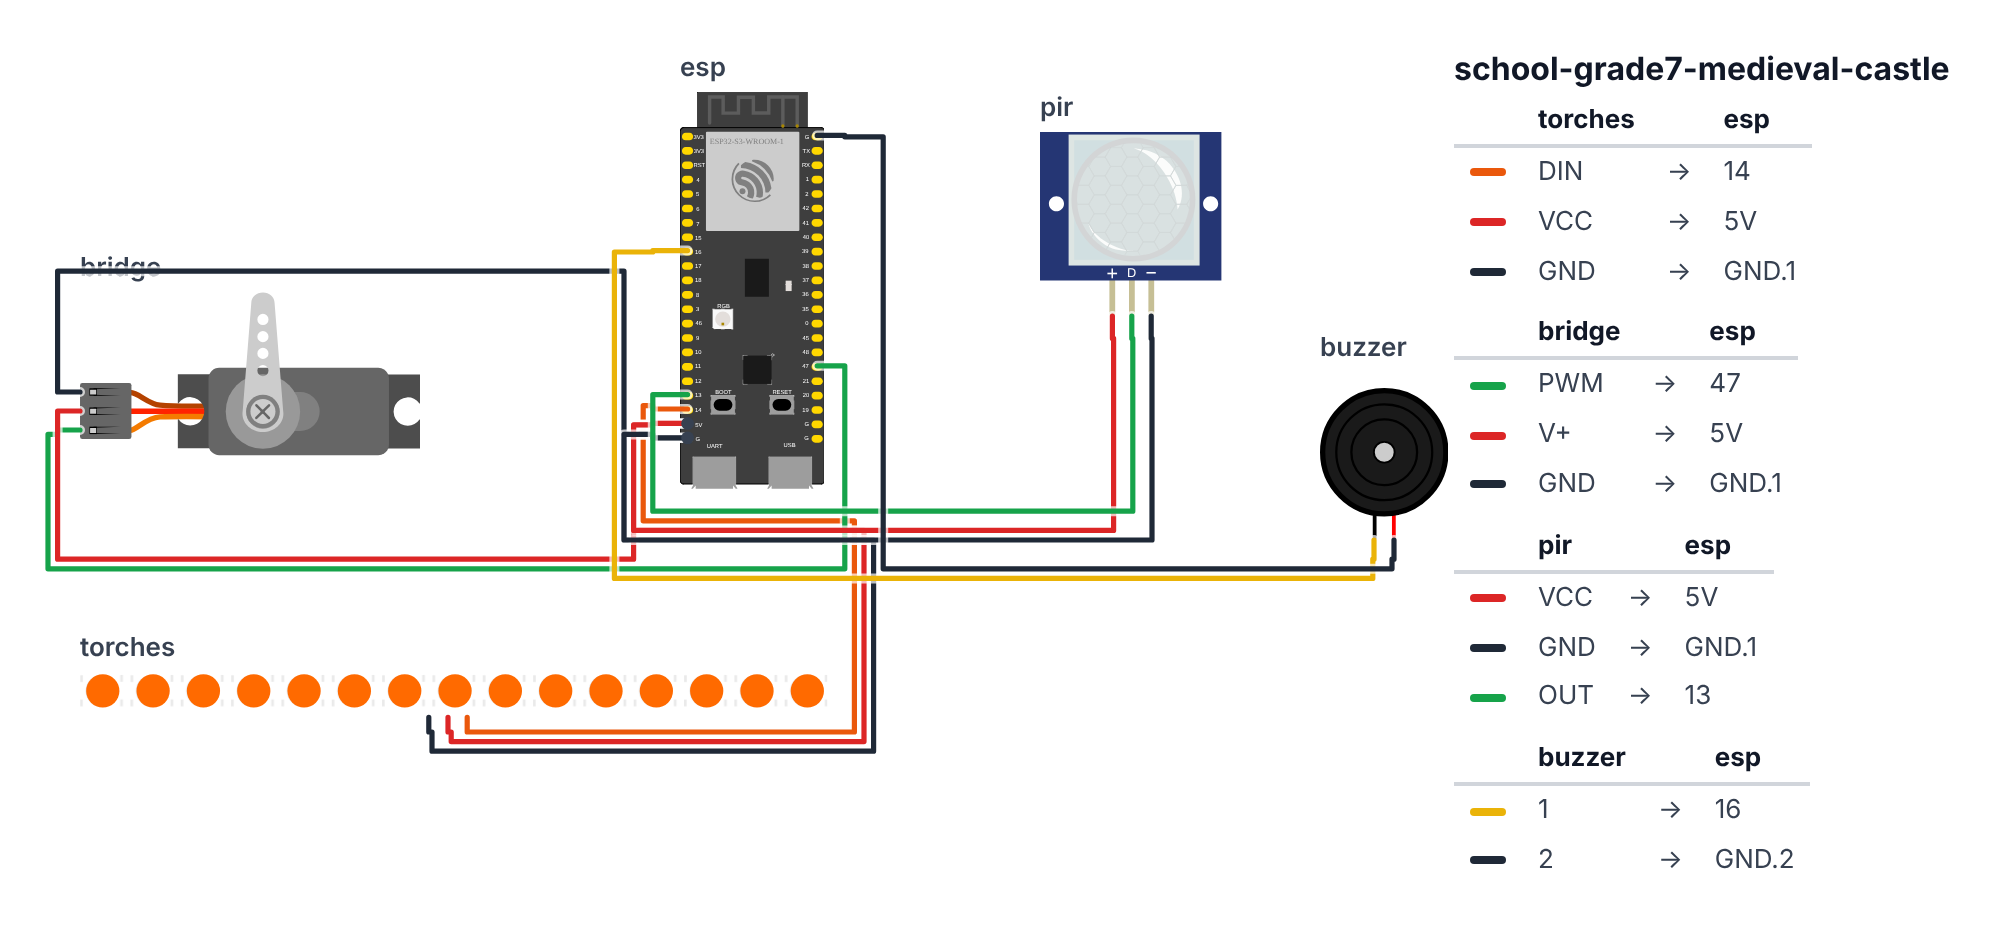
WS2812 LED Strip (3 wires):
- Strip DIN → board GPIO 14 (C6: GPIO 8) — orange wire
- Strip 5V → board 5V — red wire
- Strip GND → board GND — black wire
SG90 Servo (3 wires): 4. Servo signal (orange) → board GPIO 47 (C6: GPIO 7) — green wire 5. Servo VCC (red) → board 5V — red wire 6. Servo GND (brown) → board GND — black wire
PIR Sensor (3 wires): 7. PIR VCC → board 5V — red wire 8. PIR GND → board GND — black wire 9. PIR OUT → board GPIO 13 (C6: GPIO 0) — green wire
Passive Buzzer (2 wires): 10. Buzzer positive (+) → board GPIO 16 (C6: GPIO 10) — yellow wire 11. Buzzer negative (-) → board GND — black wire
Check: Passive buzzer (not active). Active buzzer beeps when powered. Passive buzzer needs a frequency signal to make sound — the ESP32 controls the pitch. Look for “passive” on the package, or test with a multimeter (passive = ~8–16Ω).
Step 2: Flash the code
Time: ~25 minutes
Install Adafruit NeoPixel and ESP32Servo libraries.
Here is the big picture. This program runs three castle systems at the same time, using a state machine with three modes:
- PEACETIME — torches flicker warmly (amber/orange), bridge is down, PIR watches for intruders.
- ALERT — intruder detected! LEDs flash red, bridge raises, buzzer sounds the alarm.
- LOCKDOWN — threat passed but bridge stays up for 10 seconds, LEDs glow dim red (watchful).
The PIR sensor is the castle’s “ears” — it detects body heat. The state machine is the “garrison commander” — it decides which mode the castle should be in and switches between them.
// ========== CHOOSE YOUR BOARD ==========
// Uncomment the line for YOUR board:
#define BOARD_S3    // ESP32-S3-DevKitC-1
//#define BOARD_C6  // ESP32-C6-DevKitC-1
// ========================================

#ifdef BOARD_S3
  #define PIN_NEOPIXEL  14
  #define PIN_SERVO     47
  #define PIN_PIR       13
  #define PIN_BUZZER    16
#endif
#ifdef BOARD_C6
  #define PIN_NEOPIXEL  8
  #define PIN_SERVO     7
  #define PIN_PIR       0
  #define PIN_BUZZER    10
#endif

#include <Adafruit_NeoPixel.h>
#include <ESP32Servo.h>

#define LED_PIN PIN_NEOPIXEL
#define LED_COUNT 15
Adafruit_NeoPixel strip(LED_COUNT, LED_PIN, NEO_GRB + NEO_KHZ800);

#define SERVO_PIN PIN_SERVO
Servo drawbridge;

#define PIR_PIN PIN_PIR
#define BUZZER_PIN PIN_BUZZER

enum CastleMode {
  PEACETIME,
  ALERT,
  LOCKDOWN
};

CastleMode castleMode = PEACETIME;
unsigned long alertStartTime = 0;
unsigned long lockdownDuration = 10000;

#define BRIDGE_DOWN 0
#define BRIDGE_UP   90

float torchBrightness[15];
float torchTarget[15];
unsigned long lastFlicker[15];

void tone(int pin, int freq, int duration) {
  int halfPeriod = 1000000 / (freq * 2);
  long cycles = (long)freq * duration / 1000;
  for (long i = 0; i < cycles; i++) {
    digitalWrite(pin, HIGH);
    delayMicroseconds(halfPeriod);
    digitalWrite(pin, LOW);
    delayMicroseconds(halfPeriod);
  }
}

void playAlarmSound() {
  for (int i = 0; i < 3; i++) {
    tone(BUZZER_PIN, 1000, 150);
    delay(100);
  }
}

void playAllClearSound() {
  for (int freq = 800; freq <= 1200; freq += 50) {
    tone(BUZZER_PIN, freq, 30);
  }
}

void setDrawbridge(int angle) {
  drawbridge.write(angle);
}

void initTorches() {
  for (int i = 0; i < LED_COUNT; i++) {
    torchBrightness[i] = random(50, 100);
    torchTarget[i] = random(50, 100);
    lastFlicker[i] = millis();
  }
}

void updateTorches() {
  unsigned long now = millis();
  bool changed = false;

  for (int i = 0; i < LED_COUNT; i++) {
    int flickerRate = 50 + (i * 17) % 100;

    if (now - lastFlicker[i] > flickerRate) {
      if (torchBrightness[i] < torchTarget[i]) {
        torchBrightness[i] = min(torchBrightness[i] + 10.0f, torchTarget[i]);
      } else {
        torchBrightness[i] = max(torchBrightness[i] - 10.0f, torchTarget[i]);
      }

      if (abs(torchBrightness[i] - torchTarget[i]) < 5) {
        torchTarget[i] = random(30, 100);
      }

      lastFlicker[i] = now;
      changed = true;
    }

    if (changed) {
      int b = (int)torchBrightness[i];
      strip.setPixelColor(i, strip.Color(b, b * 6 / 10, 0));
    }
  }

  if (changed) strip.show();
}

void setAlertMode() {
  for (int i = 0; i < LED_COUNT; i++) {
    strip.setPixelColor(i, strip.Color(200, 0, 0));
  }
  strip.show();

  setDrawbridge(BRIDGE_UP);

  playAlarmSound();
}

void setPeacetimeMode() {
  setDrawbridge(BRIDGE_DOWN);

  playAllClearSound();
}

void setup() {
  Serial.begin(115200);

  strip.begin();
  strip.setBrightness(100);
  strip.clear();
  strip.show();

  drawbridge.attach(SERVO_PIN);
  setDrawbridge(BRIDGE_DOWN);

  pinMode(PIR_PIN, INPUT);
  pinMode(BUZZER_PIN, OUTPUT);

  initTorches();

  Serial.println("Castle Systems Online");
  Serial.println("Peacetime mode — all clear");

  delay(1000);
  setDrawbridge(BRIDGE_UP);
  delay(1000);
  setDrawbridge(BRIDGE_DOWN);
  Serial.println("Drawbridge test complete");
}

void loop() {
  int pirValue = digitalRead(PIR_PIN);
  unsigned long now = millis();

  switch (castleMode) {
    case PEACETIME:
      updateTorches();

      if (pirValue == HIGH) {
        Serial.println("!!! INTRUDER DETECTED — GOING TO ALERT !!!");
        castleMode = ALERT;
        alertStartTime = now;
        setAlertMode();
      }
      break;

    case ALERT:
      for (int i = 0; i < LED_COUNT; i++) {
        int pulse = (int)(128 + 127 * sin(now * 0.008));
        strip.setPixelColor(i, strip.Color(pulse, 0, 0));
      }
      strip.show();

      if (pirValue == LOW && now - alertStartTime > 5000) {
        Serial.println("Threat passed — entering lockdown mode");
        castleMode = LOCKDOWN;
        alertStartTime = now;

        for (int i = 0; i < LED_COUNT; i++) {
          strip.setPixelColor(i, strip.Color(60, 10, 0));
        }
        strip.show();
      }

      if (pirValue == HIGH && now - alertStartTime > 3000) {
        playAlarmSound();
        alertStartTime = now;
      }
      break;

    case LOCKDOWN:
      if (now - alertStartTime > lockdownDuration) {
        Serial.println("Lockdown lifted — returning to peacetime");
        castleMode = PEACETIME;
        setPeacetimeMode();
        initTorches();
      }
      break;
  }

  delay(20);
}
Line-by-line: what every line does and why
Lines 7–9: The LED strip
#define LED_COUNT 15
Adafruit_NeoPixel strip(LED_COUNT, LED_PIN, NEO_GRB + NEO_KHZ800);
15 LEDs in the strip, connected to pin 14 (C6: pin 8). The strip is named strip. Each LED can be any color independently — that’s what makes the torch flicker possible (each torch can be a different brightness).
Lines 15–24: The castle’s three modes
enum CastleMode {
  PEACETIME,
  ALERT,
  LOCKDOWN
};
CastleMode castleMode = PEACETIME;
enum creates a named list of options. The castle is always in exactly one of these three modes. castleMode is the variable that remembers which one. Starting in PEACETIME — torches on, bridge down, all calm.
Lines 26–33: Position names and torch data
#define BRIDGE_DOWN 0
#define BRIDGE_UP   90
float torchBrightness[15];
float torchTarget[15];
unsigned long lastFlicker[15];
BRIDGE_DOWN and BRIDGE_UP give the servo angles readable names (0° = flat/open, 90° = raised/closed). Three shelves of 15 values each track the torch animation: current brightness, target brightness, and when each torch last updated. Each torch is independent — they flicker at slightly different rates to look realistic.
Lines 35–50: tone() — making the buzzer sing
void tone(int pin, int freq, int duration) {
  int halfPeriod = 1000000 / (freq * 2);
  long cycles = (long)freq * duration / 1000;
  for (long i = 0; i < cycles; i++) {
    digitalWrite(pin, HIGH);
    delayMicroseconds(halfPeriod);
    digitalWrite(pin, LOW);
    delayMicroseconds(halfPeriod);
  }
}
A passive buzzer needs the ESP32 to flap a pin HIGH-LOW-HIGH-LOW at a specific speed to make sound. Faster flapping = higher pitch. halfPeriod is how long to hold each HIGH and LOW state. At 1000Hz: 1,000,000 / (1000 × 2) = 500 microseconds each. cycles is how many complete HIGH-LOW pairs fit in the duration.
Lines 52–64: Alarm and all-clear sounds
void playAlarmSound() {
  for (int i = 0; i < 3; i++) {
    tone(BUZZER_PIN, 1000, 150);
    delay(100);
  }
}
void playAllClearSound() {
  for (int freq = 800; freq <= 1200; freq += 50) {
    tone(BUZZER_PIN, freq, 30);
  }
}
playAlarmSound() beeps three times at 1000Hz (a sharp, urgent tone). playAllClearSound() sweeps up from 800Hz to 1200Hz in steps — a rising “all clear” sound. The for loop in all-clear increments frequency by 50 each step: 800, 850, 900… 1200.
Lines 70–90: initTorches() and updateTorches()
torchBrightness[i] = random(50, 100);
torchTarget[i] = random(50, 100);
random(50, 100) picks a random number between 50 and 100. Each torch starts at a random brightness and has a random target it’s moving toward. This creates the natural variation — real fires don’t all flicker in sync.
int flickerRate = 50 + (i * 17) % 100;Each torch updates at a slightly different speed. (i * 17) % 100 gives a different offset for each torch index i. Torch 0 flickers every 50ms, torch 1 every 67ms, torch 2 every 84ms, etc. The % 100 keeps the value in the 0–99 range, so the total rate stays in 50–149ms.
strip.setPixelColor(i, strip.Color(b, b * 6 / 10, 0));Torch color: full red, 60% green, no blue. This gives warm amber/orange — exactly the color of a real torch flame. b * 6 / 10 is integer math for “multiply by 0.6.”
Lines 106–150: loop() — the state machine
switch (castleMode) {
  case PEACETIME: ...
  case ALERT: ...
  case LOCKDOWN: ...
}
Every 20ms, the castle checks which mode it’s in and takes the appropriate action. In PEACETIME, it flickers torches and watches for PIR. In ALERT, it pulses red LEDs using sin(now * 0.008) (a sine wave based on actual clock time — so it pulses at a fixed rate) and re-sounds the alarm every 3 seconds. In LOCKDOWN, it just waits for the timer to expire.
The whole thing in one sentence
At startup, the bridge does a test sweep. Then the castle runs in a loop: flickering torches in peacetime, switching to red alert when the PIR fires, and going into lockdown after the threat passes — automatically returning to peace when the coast is clear.
First thing to try: After uploading, let the bridge test finish. Then wave your hand in front of the PIR — watch the torches snap to red, the bridge raise, and the buzzer sound. Step away and wait 5 seconds — lockdown begins. Wait 10 more seconds — the all-clear plays and torches return.
Check: After uploading, the bridge should test itself (up, then down). The LEDs should show warm flickering amber/orange light. Wave your hand in front of the PIR — all lights should turn red, the buzzer should alarm, and the bridge should raise. Step away and wait 5–10 seconds — the system returns to normal.
What just happened
Concepts you demonstrated:
- Castle defensive systems — drawbridges weren’t decorative. They were critical security infrastructure. When raised, attackers couldn’t cross the moat. Your servo demonstrates this function exactly.
- Torch light — medieval castles used oil lamps and rush torches for lighting. The warm amber flicker you programmed matches the actual color temperature of fire (1800–2000 Kelvin).
- Castle garrison — a real medieval castle had multiple overlapping defense systems: moat, drawbridge, portcullis, battlements, archers, boiling oil. Your model demonstrates the layered security concept.
- State machines in history — peacetime → alert → lockdown is exactly how medieval garrisons operated. Different events triggered different castle-wide responses.
Curriculum alignment: Common Core History/Social Studies Grade 7 — Medieval and Early Modern Times. Specifically: understand the structure of feudal society and the role of castles in medieval defense and power.
Presentation tip: Start with the bridge down and torches flickering. Ask your class: “What was the purpose of a drawbridge?” Then send the alert signal manually (cover the PIR sensor and uncover it) and let the castle defend itself. While it’s in alarm mode, explain: “In a real siege, this is what happened — the garrison had seconds to respond. The drawbridge was their most important tool.” Much more memorable than a poster.
Level Up
Catapult sound effect: Add a second buzzer effect triggered by a button — the sound of a catapult launching (low thud). Present it as “the sound of siege warfare.”
Day/night mode: Add a light sensor (LDR). When ambient light is low, dim the torches and put the castle in “night watch” mode with slower, dimmer flicker and the bridge raised.
Historical timeline labels: Add an OLED display showing text about the castle’s history — the year it was built, key events, who owned it. Press a button to advance through history.
★★ You completed: Grade 7 Medieval Castle!
Troubleshooting
| Problem | Fix |
|---|---|
| Bridge doesn’t move | Check servo wiring — signal on GPIO 47 (C6: GPIO 7), not GPIO 14 (C6: GPIO 8) (common confusion with LED pin). |
| PIR triggers constantly without motion | Wait 60 seconds for PIR to warm up after power on. Adjust sensitivity potentiometer counterclockwise. |
| Buzzer makes no sound | Confirm it’s a PASSIVE buzzer (not active). Active buzzers beep on DC voltage alone — passive need a frequency signal. |
| LEDs flicker wrong colors | Check that you’re using WS2812 (NEO_GRB) not APA106 (NEO_RGB). If colors look swapped, change NEO_GRB to NEO_RGB in the strip initialization. |
| Bridge slams rather than moves smoothly | The servo moves immediately. For smoother motion, add a slow sweep: for(int i=0; i<=90; i++) { drawbridge.write(i); delay(15); } |