Parent info
Parts you need
Affiliate links — we may earn a small commission
Try this circuit in your browser!
Run the code, press the buttons and watch what happens — before you buy any parts. No account needed.
Open in Simulator →Your classmates made a sculpture that sits there. Yours notices you.
Art class project: make a sculpture that represents something meaningful to you. Everyone else makes a clay pot or a wire shape. Nice. Very art.
Yours does something theirs can’t: it notices when someone is nearby. Walk up to it — it blazes with color. Stand still for 10 seconds — it slowly breathes in and out with soft blue light. Walk away — it fades to black and waits.
Your sculpture is alive. That’s not just art. That’s interactive art — the kind you see in museums charging $20 admission.
What you’ll need
| Part | What it does | Price |
|---|---|---|
| ESP32-S3-DevKitC-1 | The brain — detects motion signals and controls lights | ~$12 |
| PIR motion sensor (HC-SR501) | Detects body heat motion up to 7 meters away | ~$3 |
| WS2812 LED ring (16 LEDs) | 16 individually colorable LEDs in a ring shape | ~$5 |
| Breadboard + jumper wires | Connects everything. No soldering. | ~$5 |
| USB-C data cable | Connects board to computer for setup | ~$5 |
Total: ~$30 | Time: ~90 minutes | Difficulty: ●●○○○
What is PIR? PIR stands for “Passive Infrared.” All warm objects (including humans) emit infrared light — a type of light we can’t see. The PIR sensor detects changes in this infrared pattern. When a human walks by, their body heat sweeps across the sensor and it triggers. The same technology is used in automatic doors, security alarms, and outdoor motion-activated lights.
How it works (60 seconds)
The PIR sensor sits inside your sculpture and waits. When it detects a warm body nearby, it sends a HIGH signal to the ESP32. The ESP32 responds by running a light animation on the 16-LED ring. When the PIR goes back to LOW (no motion), the ESP32 slowly fades the lights and enters a calm “breathing” pattern. You choose the colors, speeds, and patterns. The sculpture reacts to people, but the people don’t control it — the sculpture decides how to respond. That’s interactive art.
Step 0: Build your sculpture
Time: ~30 minutes (the creative part)
Build your sculpture first. Then add the electronics inside.
The key design rule: hide the technology. The viewer shouldn’t see wires or circuit boards. They should just experience the effect. Here are ideas:
Abstract structure:
- Build a geometric shape from cardboard (cube, pyramid, spiral tower)
- Cut small slits or holes in the sides — light shines through these gaps
- Place the LED ring inside, facing up or toward the holes
- Mount the PIR sensor through a small hole at the top or side (it needs a clear view of the room)
Nature theme (tree/plant):
- Twist wire around a stick or dowel to make a tree shape
- Wrap translucent tissue paper around the branches
- The LED ring at the base shines up through the translucent paper
- The PIR sensor peers out from between branches
Human figure:
- Make a simple human shape from wire or cardboard
- The LED ring forms a glowing “heart” inside the chest
- The PIR sensor is the “eyes” — it watches the room
Materials you likely have at home: cardboard, tissue paper, aluminum foil, wire, hot glue, paint, dried sticks, string.
Important: Leave enough space inside for the ESP32 on its breadboard, plus a small power bank if you want it to be fully wireless.
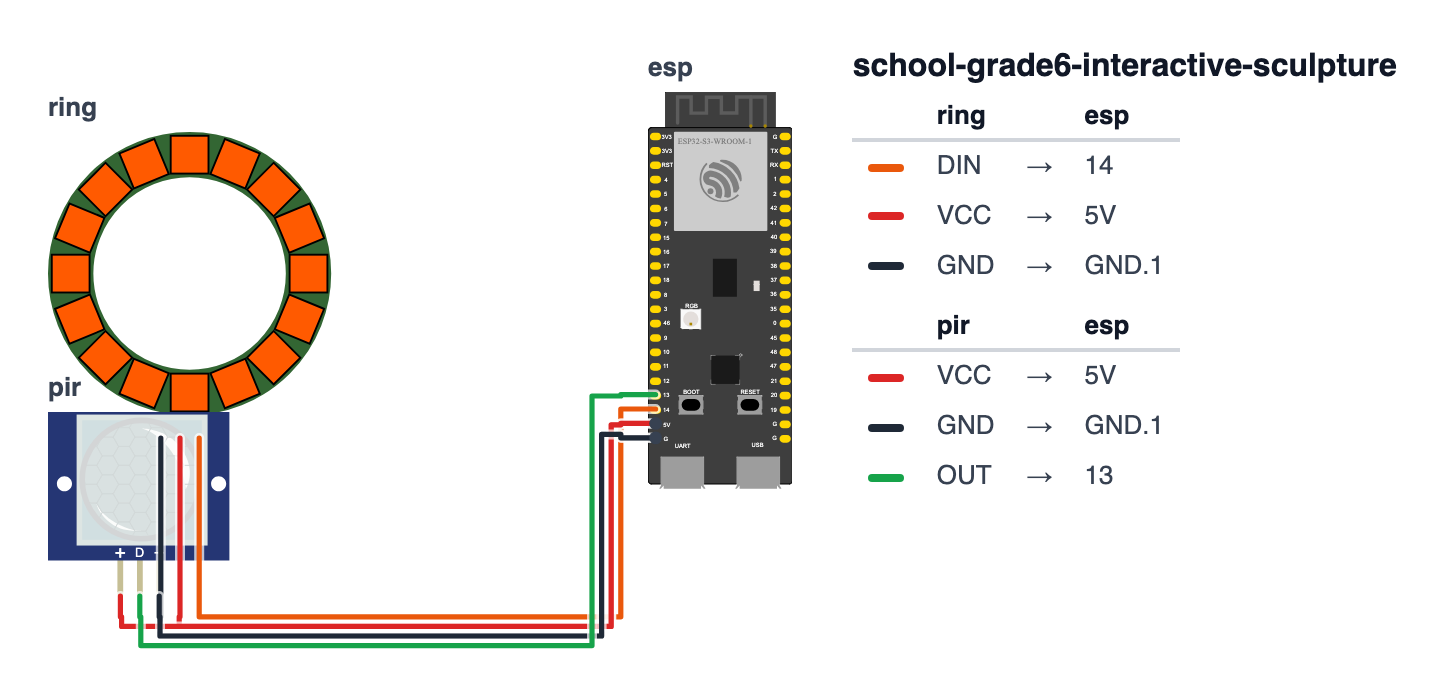
Step 1: Wire it up
Time: ~10 minutes
WS2812 LED Ring (3 wires):
- Ring DIN → board GPIO14 — orange wire
- Ring VCC → board 5V — red wire
- Ring GND → board GND — black wire
PIR Sensor HC-SR501 (3 wires): 4. PIR VCC (or +) → board 5V — red wire 5. PIR GND → board GND — black wire 6. PIR OUT (or signal) → board GPIO13 — green wire
Check: The PIR sensor has a small orange potentiometer on its back. The left one adjusts sensitivity (how easily it triggers). The right one adjusts how long it stays triggered (2 seconds to 5 minutes). Start with both turned to the middle.
Step 2: Flash the code
Time: ~20 minutes
Install Adafruit NeoPixel library in Arduino IDE (Tools → Manage Libraries → search “Adafruit NeoPixel”).
Here is the big picture. This program gives your sculpture three moods, like a pet:
- IDLE — nobody nearby. The ring pulses softly in and out with calm blue light, like slow breathing.
- ACTIVE — someone detected! The ring bursts into spinning rainbow colors.
- FADING — person left. The sculpture slowly dims from purple to black, then returns to breathing.
The PIR sensor is the “nose” — it smells body heat. The ESP32 is the brain that decides which mood to be in. The LED ring is the face — it shows the mood in color.
// ========== CHOOSE YOUR BOARD ==========
// Uncomment the line for YOUR board:
#define BOARD_S3    // ESP32-S3-DevKitC-1
//#define BOARD_C6  // ESP32-C6-DevKitC-1
// ========================================

#ifdef BOARD_S3
  #define PIN_NEOPIXEL 14
  #define PIN_PIR      13
#endif
#ifdef BOARD_C6
  #define PIN_NEOPIXEL 8
  #define PIN_PIR      0
#endif

#include <Adafruit_NeoPixel.h>

#define LED_PIN PIN_NEOPIXEL
#define LED_COUNT 16
Adafruit_NeoPixel ring(LED_COUNT, LED_PIN, NEO_GRB + NEO_KHZ800);

#define PIR_PIN PIN_PIR

enum SculptureState {
  STATE_IDLE,
  STATE_ACTIVE,
  STATE_FADING
};

SculptureState currentState = STATE_IDLE;

unsigned long lastMotionTime = 0;

#define FADE_DELAY 5000

unsigned long lastAnimFrame = 0;
float breathPhase = 0.0;
int activeFrame = 0;

void setup() {
  Serial.begin(115200);

  pinMode(PIR_PIN, INPUT);

  ring.begin();
  ring.setBrightness(80);
  ring.clear();
  ring.show();

  Serial.println("Interactive Sculpture Ready");
  Serial.println("Waiting for motion...");

  for (int i = 0; i < LED_COUNT; i++) {
    ring.clear();
    ring.setPixelColor(i, ring.Color(100, 100, 100));
    ring.show();
    delay(60);
  }
  ring.clear();
  ring.show();
}

void drawBreathing() {
  float brightness = (sin(breathPhase) + 1.0) / 2.0;
  int b = (int)(brightness * 60);

  for (int i = 0; i < LED_COUNT; i++) {
    ring.setPixelColor(i, ring.Color(0, 0, b));
  }
  ring.show();

  breathPhase += 0.05;
  if (breathPhase > 6.28) breathPhase = 0;
}

void drawActiveReaction() {
  for (int i = 0; i < LED_COUNT; i++) {
    int hue = (i * (65536 / LED_COUNT) + activeFrame * 200) % 65536;
    uint32_t color = ring.gamma32(ring.ColorHSV(hue, 255, 200));
    ring.setPixelColor(i, color);
  }
  ring.show();
  activeFrame++;
}

void drawFading(float progress) {
  int brightness = (int)((1.0 - progress) * 200);

  for (int i = 0; i < LED_COUNT; i++) {
    ring.setPixelColor(i, ring.Color(brightness/2, 0, brightness));
  }
  ring.show();
}

void loop() {
  int pirValue = digitalRead(PIR_PIN);
  unsigned long now = millis();

  if (pirValue == HIGH) {
    lastMotionTime = now;

    if (currentState != STATE_ACTIVE) {
      Serial.println("Motion detected! Sculpture activating.");
      currentState = STATE_ACTIVE;
      activeFrame = 0;
    }
  }

  switch (currentState) {
    case STATE_IDLE:
      if (now - lastAnimFrame > 20) {
        drawBreathing();
        lastAnimFrame = now;
      }
      break;

    case STATE_ACTIVE:
      if (now - lastAnimFrame > 30) {
        drawActiveReaction();
        lastAnimFrame = now;
      }

      if (now - lastMotionTime > FADE_DELAY) {
        Serial.println("Motion gone — fading out...");
        currentState = STATE_FADING;
      }
      break;

    case STATE_FADING:
      if (now - lastAnimFrame > 50) {
        unsigned long timeSinceMotion = now - lastMotionTime;
        float progress = (float)(timeSinceMotion - FADE_DELAY) / 3000.0;

        if (progress >= 1.0) {
          ring.clear();
          ring.show();
          Serial.println("Faded out — returning to idle breathing.");
          currentState = STATE_IDLE;
          breathPhase = 0;
        } else {
          drawFading(progress);
        }
        lastAnimFrame = now;
      }
      break;
  }
}
Line-by-line: what every line does and why
Lines 1–6: Borrowing the LED tool and setting up the ring
#include <Adafruit_NeoPixel.h>

#define LED_PIN 14
#define LED_COUNT 16
Adafruit_NeoPixel ring(LED_COUNT, LED_PIN, NEO_GRB + NEO_KHZ800);
#include grabs the instruction book for NeoPixel LEDs. #define gives numbers names — the data wire is pin 14, and there are 16 LEDs. Then ring is created: a named LED ring with 16 LEDs on pin 14. NEO_GRB means the LEDs expect colors in the order Green-Red-Blue (not RGB — this trips people up). NEO_KHZ800 is the communication speed.
Lines 8–9: The PIR sensor pin
#define PIR_PIN 13The PIR sensor’s signal wire connects to pin 13. When it detects warmth, pin 13 goes HIGH (like flipping a switch from off to on).
Lines 11–18: Three moods — the state machine
enum SculptureState {
  STATE_IDLE,
  STATE_ACTIVE,
  STATE_FADING
};
SculptureState currentState = STATE_IDLE;
enum is like making a menu of options with names instead of numbers. STATE_IDLE, STATE_ACTIVE, and STATE_FADING are the three moods. The sculpture always knows which mood it’s in — currentState remembers. It starts in STATE_IDLE. Think of it like a traffic light: it’s always either red, yellow, or green, never two at once.
Lines 20–27: Timing variables
unsigned long lastMotionTime = 0;
#define FADE_DELAY 5000
unsigned long lastAnimFrame = 0;
float breathPhase = 0.0;
int activeFrame = 0;lastMotionTime— a timestamp: “when did the PIR last see someone?” Used to decide when to start fading.FADE_DELAY 5000— wait 5 seconds (5,000 ms) after the last motion before fading.lastAnimFrame— timestamp of the last animation update. Used to control animation speed without usingdelay.breathPhase— a position (0 to 6.28, which is 0 to 2π) on a sine wave. Think of it as the position of a clock hand going around in circles — it controls how bright the breathing animation is.activeFrame— a counter that increases every animation frame, making the rainbow spin.
Lines 29–50: setup() — startup
ring.begin();
ring.setBrightness(80);
ring.clear();
ring.show();ring.begin()wakes up the LED ring.ring.setBrightness(80)sets the maximum brightness (0–255). 80 is medium — not blinding.ring.clear()turns all LEDs off.ring.show()sends the instructions to the actual LEDs. This is like pressing “send” — nothing happens until you callshow(). Very important rule for NeoPixel code.
The startup animation sweeps one white dot around the ring using a for loop — it’s just showing off that everything is working.
Lines 52–64: drawBreathing() — the calm mood
float brightness = (sin(breathPhase) + 1.0) / 2.0;
int b = (int)(brightness * 60);
sin() is a math function that returns a number smoothly cycling between -1 and +1, like a wave. Adding 1 and dividing by 2 shifts it to cycle between 0 and 1 (always positive). Multiplying by 60 gives brightness between 0 and 60.
ring.setPixelColor(i, ring.Color(0, 0, b));Sets every LED to pure blue (0 red, 0 green, b blue). The brightness changes smoothly over time because breathPhase slowly increases each frame.
breathPhase += 0.05;
if (breathPhase > 6.28) breathPhase = 0;
6.28 is approximately 2π. When we exceed one full cycle of the sine wave, we reset. It’s like a clock that resets to 12 after reaching 12.
Lines 66–76: drawActiveReaction() — the excited mood
int hue = (i * (65536 / LED_COUNT) + activeFrame * 200) % 65536;This creates a spinning rainbow. hue is a color position on a wheel from 0 to 65535 (like degrees on a full-color circle). Each LED (i) gets a different starting hue based on its position in the ring. activeFrame * 200 makes the whole pattern rotate — every frame, every LED shifts color, creating the spinning effect. % 65536 wraps around just like the clock does.
Lines 78–85: drawFading() — the leaving mood
int brightness = (int)((1.0 - progress) * 200);
ring.setPixelColor(i, ring.Color(brightness/2, 0, brightness));
progress goes from 0.0 to 1.0 as time passes after the person left. When progress = 0, brightness = 200 (bright). When progress = 1.0, brightness = 0 (dark). The color is purple (brightness/2 red, 0 green, brightness blue) — it fades from purple to black.
Lines 87–130: loop() — the decision engine
int pirValue = digitalRead(PIR_PIN);
unsigned long now = millis();

if (pirValue == HIGH) {
  lastMotionTime = now;
  currentState = STATE_ACTIVE;
}
Every loop, we ask the PIR: “Do you see someone?” If yes, update lastMotionTime (so we know the person was just seen) and switch to STATE_ACTIVE.
switch (currentState) {
  case STATE_IDLE: ...
  case STATE_ACTIVE: ...
  case STATE_FADING: ...
}
switch is like a fork in the road with three paths. The sculpture takes one path based on which mood it’s in. Each case runs a different animation. The if (now - lastAnimFrame > 20) pattern controls speed without freezing: instead of sleeping, it just checks “has 20ms passed?” If not, it skips the frame and checks again next loop.
The whole thing in one sentence
The sculpture wakes up idle (breathing blue), jumps to active (rainbow spinning) when the PIR detects warmth, and slowly fades to black (purple fade) when the person leaves — then breathes again and waits.
First thing to try: Cover the PIR sensor with your hand for 10 seconds (to let it stabilize after power-on), then slowly wave your hand in front of it. Watch the sculpture snap from calm blue to spinning rainbow. Step away and count 5 seconds — the fade begins.
Check: After uploading, wave your hand in front of the PIR sensor. The ring should burst into rainbow colors. Step away and wait — after 5 seconds it starts fading to purple, then returns to slow blue breathing. If nothing happens, check the PIR signal wire on GPIO13.
Step 3: Tune the behavior
Time: ~10 minutes
Adjust these values at the top of the code to match your artistic vision:
ring.setBrightness(80)— increase for brighter display, decrease for dimmerFADE_DELAY 5000— change to 2000 (2 seconds) or 10000 (10 seconds) based on how long you want the active state to last- The
0, 0, bindrawBreathing()is blue. Change tob, b/2, 0for warm amber breathing, or0, b, 0for green. - The
0.05inbreathPhase += 0.05controls breathing speed. Smaller = slower.
Adjust the PIR sensitivity potentiometer: turn clockwise for more sensitive (triggers from farther away), counterclockwise for less sensitive.
What just happened
Concepts you used:
- Passive infrared detection — you harnessed invisible heat radiation to detect human presence. The same physics is used in all motion-activated devices.
- State machines — your sculpture has three states (idle, active, fading). Real software in cars, elevators, and vending machines uses state machines to track what mode they’re in.
- Sinusoidal animation — the breathing effect uses a math function called sine. Sine goes smoothly between -1 and +1 in a wave pattern. Using it for brightness creates natural-feeling “organic” motion instead of harsh on/off switching.
- HSV color space — instead of mixing red/green/blue directly, you used Hue/Saturation/Value to spin through the color wheel. This is how designers choose colors in Photoshop and Figma.
Curriculum alignment: Visual Arts Standards (grades 6–8): VA:Cr2.1.6a (Demonstrate openness in trying new ideas, materials, methods, and approaches in making works of art). Also connects to Physical Science light standards.
Presentation tip: Place your sculpture in the middle of the room before your presentation. When people enter, they’ll immediately notice it reacting to them — before you say a word. Then explain: “It detected each of you when you walked in. It doesn’t know who you are — it just knows something warm is nearby.” That contrast (technology sensing without knowing) is a great starting point for a conversation about art and technology.
Level Up
Sound reaction: Add a MAX4466 microphone sensor ($3). Make the sculpture react to loud sounds (clapping, music) in addition to motion. A loud clap could trigger a different color burst.
Multiple sensors: Add a second PIR sensor pointing a different direction. Use both signals to determine if someone is approaching or leaving, and animate accordingly.
Custom colors per song: Connect a small Bluetooth speaker and use the sound level to drive the LED intensity — a homemade music visualizer sculpture.
★★ You completed: Grade 6 Interactive Sculpture!
Troubleshooting
| Problem | Fix |
|---|---|
| PIR never triggers | Check 5V on PIR VCC (not 3.3V). Check signal wire on GPIO13. Wave your hand slowly — fast motion sometimes misses. |
| PIR triggers constantly with no motion | PIR needs 30–60 seconds to warm up after power-on. Wait a minute before testing. Turn the sensitivity potentiometer counterclockwise. |
| LED ring shows wrong colors or only white | Check DIN vs DOUT end of ring. Check 5V on ring VCC. |
| Breathing animation too fast/slow | Change 0.05 in breathPhase += 0.05. Smaller number = slower. |
| Active state never ends | FADE_DELAY is 5000ms (5 seconds after last motion). If the PIR keeps re-triggering, adjust sensitivity potentiometer. |