Parent info
Parts you need
Affiliate links — we may earn a small commission
Try this circuit in your browser!
Run the code, press the buttons and watch what happens — before you buy any parts. No account needed.
Open in Simulator →It drives around your house. By itself.
Imagine this: you set the robot on the floor, switch it to AUTO, and walk away. It explores the room, smoothly steering away from chair legs, walls, and your dog. Your phone shows a live radar in the browser — three distance bars updating every 300ms — and you can switch between AUTO and STOP without touching the robot.
No remote. No app. Just a robot making decisions on its own.
That’s what we’re building. In about 2.5 hours. For around $38.
What you’ll need
| Part | What it does | Price |
|---|---|---|
| ESP32-S3 Dev Board | The brain. Hosts the web server AND controls the robot. | ~$12 |
| L298N Motor Driver | Controls left and right motors independently. | ~$6 |
| 2x DC geared motors + wheels | Move the robot. Same motors as the Line Follower. | ~$8 |
| HC-SR04 ultrasonic sensor | Measures distance by bouncing sound off obstacles (like a bat). | ~$3 |
| SG90 servo motor | Rotates the sensor left–center–right like a radar dish. | ~$2 |
| Robot chassis | The rolling body. Wood, acrylic, or 3D-printed. | ~$4 |
| 9V battery + snap connector | Powers the motors. | ~$2 |
| Resistors: 1kΩ × 1, 2kΩ × 1 | Turn the sensor’s 5V echo into a safe 3.3V for the ESP32. | ~$1 |
Total: ~$38 | Time: ~2.5 hours | Difficulty: ●●○○○
Already built the Line Follower? You only need to add the HC-SR04 ($3), the SG90 servo ($2) and two resistors ($1) — you have everything else already.
How it works (60 seconds)
Think of it like this: the sensor is a spinning lighthouse.
A lighthouse rotates its beam — 0°, 90°, 180° — and the robot checks what’s in each direction. Every 200ms the servo sweeps left, measures distance. Center, measures. Right, measures. That’s your radar.
When the center reading drops below 20 cm — something is there — the robot stops, looks at which side has more space, and turns toward it. Then drives forward again. It never bumps into anything.
Meanwhile, the ESP32 also runs a tiny web server. Your phone connects to it (like connecting to a hotel WiFi) and opens a live dashboard showing the three distance readings as animated bars. You can switch between AUTO and STOP from your phone — the robot keeps rolling while you watch.
Step 0: Mount the servo and sensor
Time: ~10 minutes
Before wiring, physically set up the servo-sensor assembly.
- Attach the SG90 servo to the front center of your chassis. Hot glue or a zip tie works fine.
- Press the default servo horn (the plus-shaped piece) onto the servo shaft.
- Mount the HC-SR04 to a small bracket and attach that bracket to the servo horn. The sensor should face forward when the servo is at 90°.
- Run the sensor wires along the chassis edge toward the ESP32 — leave enough slack so the servo can rotate freely.
The goal: Servo at 0° = sensor looks left. Servo at 90° = sensor looks straight ahead. Servo at 180° = sensor looks right.
Check: Move the servo horn by hand through its full range. The sensor should sweep smoothly without the wire snagging. If the wire catches, reroute it with a small cable tie.
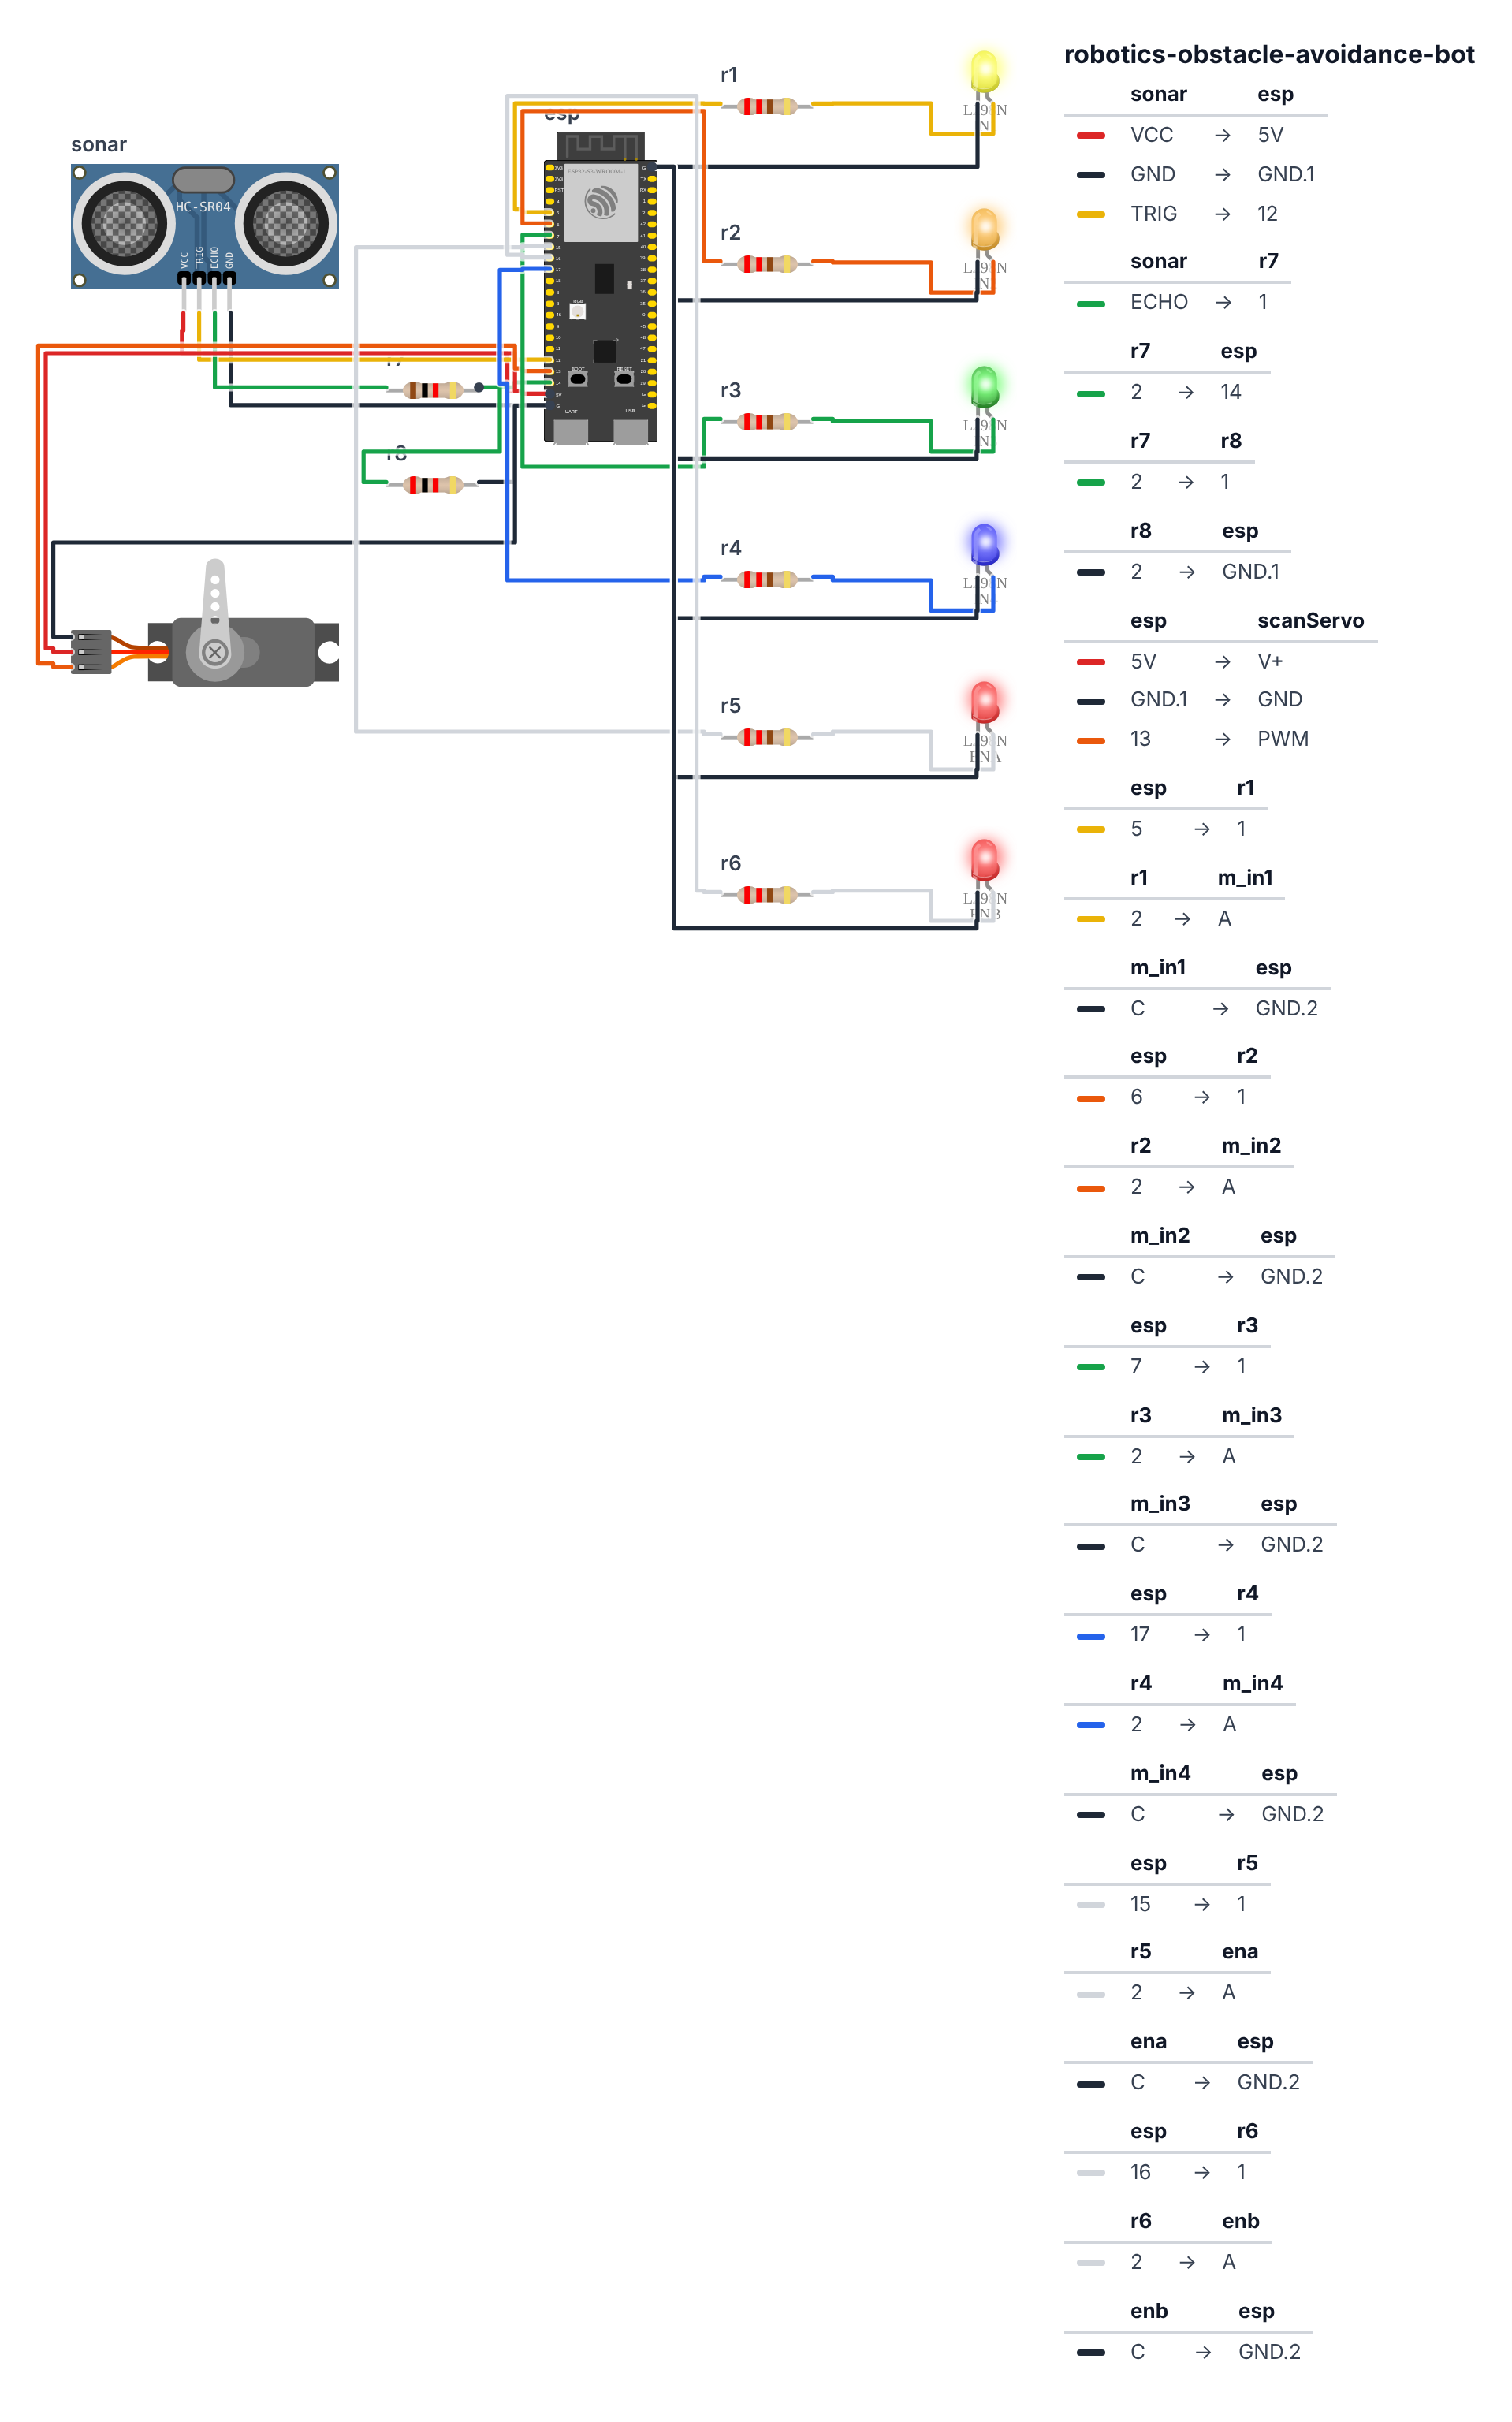
Step 1: Wire it up
Time: ~15 minutes
L298N Motor Driver (same as Line Follower):
| ESP32-S3 | ESP32-C6 | L298N Pin | Direction |
|---|---|---|---|
| GPIO 5 | GPIO 19 | IN1 (Left motor +) | Output |
| GPIO 6 | GPIO 20 | IN2 (Left motor −) | Output |
| GPIO 7 | GPIO 22 | IN3 (Right motor +) | Output |
| GPIO 17 | GPIO 23 | IN4 (Right motor −) | Output |
| GPIO 15 | GPIO 3 | ENA (Left PWM speed) | Output |
| GPIO 16 | GPIO 4 | ENB (Right PWM speed) | Output |
HC-SR04 Ultrasonic Sensor (4 wires + 2 resistors):
- HC-SR04 VCC → L298N +5V output — red wire
- HC-SR04 GND → ESP32 GND — black wire
- HC-SR04 TRIG → ESP32 GPIO 12 (C6: GPIO 10) — yellow wire
- HC-SR04 ECHO → 1kΩ resistor → ESP32 GPIO 14 (C6: GPIO 11) — green wire. Then connect that GPIO side of the 1kΩ to GND through a 2kΩ resistor, so the 5V echo signal becomes a safe 3.3V.
SG90 Servo (3 wires from servo): 5. Servo red wire → ESP32 5V — red wire 6. Servo brown wire → ESP32 GND — black wire 7. Servo orange/yellow signal wire → ESP32 GPIO 13 (C6: GPIO 5) — orange wire
Battery to L298N: 9V (+) → 12V terminal, 9V (−) → GND terminal.
Check: You should have: 6 wires to L298N control pins, 4 wires to HC-SR04 (ECHO through the 1kΩ + 2kΩ divider), 3 wires to SG90 servo, 2 wires to 9V battery, 2 wires from battery to motors. Total: ~17 connections. Count them before powering on.
Important: The HC-SR04 needs 5V, not 3.3V. Power it from the L298N’s +5V output terminal — the L298N has a built-in 5V regulator you can tap.
Step 2: Flash the code
Time: ~5 minutes
- In Arduino IDE, install the ESPAsyncWebServer and ESP32Servo libraries (Tools → Manage Libraries, search each name).
- Select ESP32S3 Dev Module as your board.
- Copy the full code below, paste into Arduino IDE, click Upload.
The big picture first. This robot does two things at the same time: it drives autonomously using a radar sweep, and it serves a live dashboard to your phone. Think of it like a submarine with sonar — the servo rotates the sensor left, center, right (like turning your head) and measures distance at each position. If something is close ahead, it picks the clearer side and turns. Meanwhile the web server is always running in the background so you can watch the radar from your phone.
// ========== CHOOSE YOUR BOARD ==========
// Uncomment the line for YOUR board:
#define BOARD_S3    // ESP32-S3-DevKitC-1
//#define BOARD_C6  // ESP32-C6-DevKitC-1
// ========================================

#ifdef BOARD_S3
  #define PIN_IN1              5
  #define PIN_IN2              6
  #define PIN_IN3              7
  #define PIN_IN4              17
  #define PIN_ENA              15
  #define PIN_ENB              16
  #define PIN_TRIG             12
  #define PIN_ECHO             14
  #define PIN_SERVO            13
#endif
#ifdef BOARD_C6
  #define PIN_IN1              19
  #define PIN_IN2              20
  #define PIN_IN3              22
  #define PIN_IN4              23
  #define PIN_ENA              3
  #define PIN_ENB              4
  #define PIN_TRIG             10
  #define PIN_ECHO             11
  #define PIN_SERVO            5
#endif

#include <WiFi.h>
#include <ESPAsyncWebServer.h>
#include <ESP32Servo.h>

#define BASE_SPEED      150
#define DANGER_DIST_CM  20
#define SWEEP_DELAY_MS  150

Servo scanServo;
AsyncWebServer server(80);

bool autoMode = true;
int distLeft = 100, distCenter = 100, distRight = 100;

const char* ssid     = "ObstacleBot";
const char* password = "buildcool";

long measureDist() {
  digitalWrite(PIN_TRIG, LOW);
  delayMicroseconds(2);
  digitalWrite(PIN_TRIG, HIGH);
  delayMicroseconds(10);
  digitalWrite(PIN_TRIG, LOW);
  long duration = pulseIn(PIN_ECHO, HIGH, 30000);
  return duration * 0.034 / 2;
}

void driveForward(int spd = BASE_SPEED) {
  digitalWrite(PIN_IN1, HIGH); digitalWrite(PIN_IN2, LOW);
  digitalWrite(PIN_IN3, HIGH); digitalWrite(PIN_IN4, LOW);
  ledcWrite(PIN_ENA, spd); ledcWrite(PIN_ENB, spd);
}
void turnLeft(int spd = 120) {
  digitalWrite(PIN_IN1, LOW);  digitalWrite(PIN_IN2, HIGH);
  digitalWrite(PIN_IN3, HIGH); digitalWrite(PIN_IN4, LOW);
  ledcWrite(PIN_ENA, spd); ledcWrite(PIN_ENB, spd);
}
void turnRight(int spd = 120) {
  digitalWrite(PIN_IN1, HIGH); digitalWrite(PIN_IN2, LOW);
  digitalWrite(PIN_IN3, LOW);  digitalWrite(PIN_IN4, HIGH);
  ledcWrite(PIN_ENA, spd); ledcWrite(PIN_ENB, spd);
}
void stopMotors() {
  digitalWrite(PIN_IN1, LOW); digitalWrite(PIN_IN2, LOW);
  digitalWrite(PIN_IN3, LOW); digitalWrite(PIN_IN4, LOW);
  ledcWrite(PIN_ENA, 0); ledcWrite(PIN_ENB, 0);
}

const char dashHTML[] PROGMEM = R"rawliteral(
<!DOCTYPE html><html><head>
<meta name="viewport" content="width=device-width, initial-scale=1">
<title>Obstacle Bot</title>
<style>
  body{font-family:monospace;background:#111;color:#0f0;padding:20px}
  .bar{width:100%;background:#333;margin:5px 0}
  .fill{height:24px;background:#0f0;transition:width 0.2s}
  button{margin:5px;padding:12px 24px;background:#0f0;border:none;
         font-size:16px;cursor:pointer;font-weight:bold}
</style></head><body>
<h2>OBSTACLE BOT HUD</h2>
<p>Left: <span id="dl">--</span> cm</p>
<div class="bar"><div class="fill" id="bl" style="width:0%"></div></div>
<p>Center: <span id="dc">--</span> cm</p>
<div class="bar"><div class="fill" id="bc" style="width:0%"></div></div>
<p>Right: <span id="dr">--</span> cm</p>
<div class="bar"><div class="fill" id="br" style="width:0%"></div></div>
<br>
<button onclick="fetch('/auto')">AUTO MODE</button>
<button onclick="fetch('/manual')">MANUAL STOP</button>
<script>
setInterval(()=>{
  fetch('/data').then(r=>r.json()).then(d=>{
    document.getElementById('dl').textContent=d.l;
    document.getElementById('dc').textContent=d.c;
    document.getElementById('dr').textContent=d.r;
    document.getElementById('bl').style.width=Math.min(d.l,100)+'%';
    document.getElementById('bc').style.width=Math.min(d.c,100)+'%';
    document.getElementById('br').style.width=Math.min(d.r,100)+'%';
  });
},300);
</script></body></html>
)rawliteral";

void setup() {
  Serial.begin(115200);

  for (int p : {PIN_IN1, PIN_IN2, PIN_IN3, PIN_IN4})
    pinMode(p, OUTPUT);

  ledcAttach(PIN_ENA, 5000, 8);
  ledcAttach(PIN_ENB, 5000, 8);

  pinMode(PIN_TRIG, OUTPUT);
  pinMode(PIN_ECHO, INPUT);

  scanServo.attach(PIN_SERVO);
  scanServo.write(90);

  WiFi.softAP(ssid, password);
  Serial.print("AP IP: ");
  Serial.println(WiFi.softAPIP());

  server.on("/", HTTP_GET, [](AsyncWebServerRequest* r){
    r->send_P(200, "text/html", dashHTML);
  });
  server.on("/data", HTTP_GET, [](AsyncWebServerRequest* r){
    String json = "{\"l\":" + String(distLeft) +
                  ",\"c\":" + String(distCenter) +
                  ",\"r\":" + String(distRight) + "}";
    r->send(200, "application/json", json);
  });
  server.on("/auto",   HTTP_GET, [](AsyncWebServerRequest* r){
    autoMode = true; r->send(200, "text/plain", "AUTO"); });
  server.on("/manual", HTTP_GET, [](AsyncWebServerRequest* r){
    autoMode = false; stopMotors(); r->send(200, "text/plain", "STOP"); });
  server.begin();

  Serial.println("Ready! Connect to WiFi: ObstacleBot / buildcool");
}

void loop() {
  scanServo.write(0);   delay(SWEEP_DELAY_MS);
  distLeft   = measureDist();
  scanServo.write(90);  delay(SWEEP_DELAY_MS);
  distCenter = measureDist();
  scanServo.write(180); delay(SWEEP_DELAY_MS);
  distRight  = measureDist();
  scanServo.write(90);

  if (!autoMode) return;

  if (distCenter > DANGER_DIST_CM) {
    driveForward();
  } else {
    stopMotors();
    delay(200);
    if (distLeft > distRight) {
      turnLeft(); delay(400);
    } else {
      turnRight(); delay(400);
    }
    stopMotors();
  }

  delay(50);
}
Line-by-line: what every line does and why
Lines 1–3: Instruction books
#include <WiFi.h>
#include <ESPAsyncWebServer.h>
#include <ESP32Servo.h>
Three borrowed instruction books: one for creating a WiFi hotspot, one for serving web pages without pausing the robot, and one for controlling the servo that rotates the sensor.
Lines 7–35: Naming all the pins and settings
#define PIN_IN1              5
...
#define PIN_ENB              16
#define PIN_TRIG             12
#define PIN_ECHO             14
#define PIN_SERVO            13
#define BASE_SPEED      150
#define DANGER_DIST_CM  20
These are the ESP32-S3 pin numbers; the #ifdef BOARD_C6 block has the C6 ones. BASE_SPEED = 150 is the cruising speed (out of 255 maximum). DANGER_DIST_CM = 20 is the trip wire — if anything is within 20 cm ahead, the robot stops and turns. Increase this number if the robot bumps into things before turning.
measureDist(): Sonar in 5 lines
digitalWrite(PIN_TRIG, LOW);
delayMicroseconds(2);
digitalWrite(PIN_TRIG, HIGH);
delayMicroseconds(10);
digitalWrite(PIN_TRIG, LOW);
long duration = pulseIn(PIN_ECHO, HIGH, 30000);
return duration * 0.034 / 2;
The HC-SR04 sensor works like a bat. To trigger it: pull TRIG LOW (clear any previous pulse), then HIGH for exactly 10 microseconds (a microsecond is one millionth of a second), then LOW again. The sensor fires 8 pulses of ultrasonic sound and listens for the echo. pulseIn(PIN_ECHO, HIGH, 30000) measures how long ECHO stays HIGH — that’s the travel time in microseconds. Multiply by 0.034 (the speed of sound in cm per microsecond) and divide by 2 (sound goes out AND back). Result: centimetres to the nearest object.
Motor functions: Four named movements
void driveForward(int spd = BASE_SPEED) { ... }
void turnLeft(int spd = 120) { ... }
void turnRight(int spd = 120) { ... }
void stopMotors() { ... }
Each function sets four direction pins and two speed values. int spd = BASE_SPEED means “use 150 as default speed unless told otherwise” — the = BASE_SPEED is a default value. For turning, the trick is: left motor runs one direction, right motor runs the opposite — the robot pivots in place.
dashHTML with PROGMEM: Web page in flash memory
const char dashHTML[] PROGMEM = R"rawliteral(...)rawliteral";PROGMEM stores this text in flash memory (the chip’s long-term storage, like a hard drive) instead of RAM. The ESP32 only has 512 KB of RAM but 4 MB of flash. A web page can easily be 1–2 KB — storing it in RAM would waste space needed for the robot’s brain. send_P() reads it from flash directly.
/data endpoint: Live JSON for the dashboard
String json = "{\"l\":" + String(distLeft) + ",\"c\":" + ... + "}";
r->send(200, "application/json", json);
The phone’s JavaScript calls /data every 300ms and receives JSON — a simple text format for numbers. {\"l\":45,\"c\":100,\"r\":78} means left=45cm, center=100cm, right=78cm. The JavaScript then sets the bar widths to those percentages. \" is an escaped quote — needed because the text is already inside double-quote marks.
loop(): The radar sweep and decision
scanServo.write(0);   delay(SWEEP_DELAY_MS);  distLeft   = measureDist();
scanServo.write(90);  delay(SWEEP_DELAY_MS);  distCenter = measureDist();
scanServo.write(180); delay(SWEEP_DELAY_MS);  distRight  = measureDist();
Three positions, three measurements. The delay(150) after each write gives the servo time to physically move — sending a new position command before the servo gets there would produce garbage measurements. This is the “let the hardware catch up” pattern.
if (!autoMode) return;
if (distCenter > DANGER_DIST_CM) {
  driveForward();
} else {
  stopMotors(); delay(200);
  if (distLeft > distRight) { turnLeft(); delay(400); }
  else                       { turnRight(); delay(400); }
  stopMotors();
}
!autoMode — the ! means NOT. If autoMode is false (you pressed MANUAL STOP on the dashboard), skip everything and exit. Otherwise: if center is clear, drive forward. If blocked, stop, check which side has more space, turn that way for 400ms (roughly a quarter turn), then stop again.
The whole thing in one sentence
The robot sweeps its sensor three directions 50 times per second, drives forward when clear, and turns toward the roomier side when blocked — while its web server serves a live distance radar to any phone on its WiFi.
First thing to try: Upload, connect to ObstacleBot WiFi, open 192.168.4.1. Hold your hand 10 cm in front of the sensor — the Center bar should shrink. Move it left — the Left bar shrinks. The robot “sees” your hand in real time.
Check: Upload succeeds. Serial Monitor shows
AP IP: 192.168.4.1. Connect your phone to WiFi network ObstacleBot (password: buildcool). Open a browser and go to192.168.4.1. You should see the radar dashboard with three distance bars.
Step 3: Test the radar
Time: ~5 minutes
Before running AUTO mode, verify the sensor works.
- In the browser dashboard, watch the three bars. Hold your hand 15 cm in front of the sensor — the Center bar should shrink (shorter bar = closer object).
- Move your hand to the left — Left bar shrinks.
- Move your hand to the right — Right bar shrinks.
If all three bars are stuck at 0 or 100, check the TRIG/ECHO wiring and the HC-SR04’s 5V power.
Step 4: Let it roam!
Put the robot on the floor with at least 1 meter of clear space around it. In the browser, tap AUTO MODE. Set it down and step back.
Watch it navigate. When it approaches a wall, the center bar shrinks rapidly, the robot turns toward the clearer side. In your browser you see this happening in real time — the bars shift half a second after the robot does.
It’s genuinely weird and excellent.
Tuning tip: If the robot turns too late (bumps things), reduce
DANGER_DIST_CMfrom 20 to 25 or 30. If it turns too eagerly (avoids things too far away), reduce it to 15.
What just happened (what you learned)
-
Ultrasonic sensing (echolocation) — HC-SR04 works exactly like a bat. It emits 8 pulses of 40 kHz sound (inaudible to humans), then listens for the echo. Time from transmit to receive ÷ speed of sound ÷ 2 = distance. The ÷2 is because sound travels out AND back. Cold weather slows sound slightly, affecting accuracy.
-
WiFi access point mode —
WiFi.softAP()makes the ESP32 act like a mini router. Your phone connects directly to it (no home router needed). The downside: while connected to the robot’s WiFi, your phone loses internet. For a mobile robot with no fixed location, this is the right trade-off. -
ESPAsyncWebServer — Unlike the basic WebServer library, this one handles HTTP requests asynchronously. It doesn’t pause the main
loop()while waiting for a browser to receive data. That’s crucial here — the robot needs to keep running sensors and motors while also serving the dashboard. -
PROGMEM —
const char dashHTML[] PROGMEM = R"rawliteral(...)rawliteral";stores the web page HTML in flash memory instead of RAM. The ESP32 only has 512 KB of RAM but 4–8 MB of flash. Large HTML pages live in flash;send_P()reads them directly from flash without copying to RAM.
Level Up
Wall-follower mode: Instead of stopping when blocked, follow the right wall at a constant 15 cm distance. If distRight > 20, steer slightly right. If distRight < 10, steer slightly left. The robot hugs the room perimeter like a Roomba.
Speed-proportional approach: Instead of full speed or stopped, scale motor speed with center distance: speed = map(distCenter, DANGER_DIST_CM, 100, 80, 255). The robot slows as it approaches obstacles — smoother and more realistic.
Two fixed sensors, no servo: Mount one HC-SR04 facing forward-left at 45° and one facing forward-right at 45°. No servo, no sweep delay, twice the update rate. Less precise but faster reaction. Choose based on what your robot needs.
★★ You completed: Obstacle Avoidance Bot!
Troubleshooting
| Problem | Fix |
|---|---|
| Browser can’t reach 192.168.4.1 | Check your phone is connected to “ObstacleBot” WiFi, not your home WiFi. Open browser, not the WiFi settings screen. |
| All distance bars show 0 | HC-SR04 power issue — check VCC is on 5V (not 3.3V). Check TRIG on GPIO 12 (C6: GPIO 10) and ECHO on GPIO 14 (C6: GPIO 11), and the 1kΩ + 2kΩ divider on ECHO. |
| Robot spins in place and never drives forward | Left/right distance readings are swapped or both near zero. Test sensor manually first (hold hand in front, check bars change). |
| Robot bumps into walls before turning | Increase DANGER_DIST_CM to 30 and re-upload. |
| Servo doesn’t move | Check signal wire (orange) on GPIO 13 (C6: GPIO 5). Check servo is powered from ESP32 5V pin (not 3.3V). |
| Web page doesn’t update | Phone went back to home WiFi. Re-connect to ObstacleBot in phone’s WiFi settings. |
| Motors don’t spin | Check 9V battery is connected to L298N (not ESP32). Check IN1–IN4 wiring. |