Parent info
Parts you need
Affiliate links — we may earn a small commission
Try this circuit in your browser!
Run the code, press the buttons and watch what happens — before you buy any parts. No account needed.
Open in Simulator →One pumpkin. Four modes. Your phone is the remote.
Imagine this: you put a pumpkin on the porch. Open your phone, tap “Lightning” — and every 5 to 30 seconds, the entire pumpkin blazes white. Tap “Purple Pulse” and it starts slowly breathing in deep violet like it’s alive.
No app to install. No Bluetooth pairing. Just your WiFi and a browser.
That’s what we’re building. In 1 hour. For about $30.
What you’ll need
| Part | What it does | Price |
|---|---|---|
| ESP32-S3-DevKitC-1 (or an ESP32-C6-DevKitC-1) | The brain + WiFi web server | ~$12 |
| WS2812B LED Strip (1m) | Each LED is individually programmable, any color | ~$9 |
| 5V 3A Power Supply | Powers the strip (can’t run from ESP32 alone) | ~$8 |
| 330Ω resistor | Protects the first LED from voltage spikes | ~$2 |
| 1000µF capacitor | Absorbs power surges when all LEDs switch at once | ~$2 |
| USB-C cable | For uploading code | ~$5 |
Total: ~$38 | Time: ~1 hour | Difficulty: ●○○○○
Pumpkin: Either a real carved pumpkin or a 3D-printed shell in translucent orange PETG. The filament color diffuses the LEDs beautifully — search Thingiverse for “hollow pumpkin lamp” and print in two halves.
How it works (60 seconds)
Think of WS2812B LEDs like a chain of tiny computers. Each one has a chip inside that receives color data over a single wire. FastLED sends precisely timed pulses (down to nanoseconds) that every LED reads in sequence — the first LED takes its color data, then passes the rest down the chain.
The ESP32 also runs a tiny web server — exactly like a website, but only on your local WiFi (or on the pumpkin’s own little WiFi hotspot). When you open the IP address in your phone browser and tap a button, your phone sends an HTTP request to the ESP32. The ESP32 updates a variable. The animation changes. No internet needed.
Step 0: Prepare your pumpkin
Time: ~10 minutes
Cut your LED strip to fit. WS2812B strips cut cleanly at the marked copper pads between LEDs — you’ll see the cut markers. 20–30 LEDs is plenty for a standard pumpkin.
Look at the strip’s data direction arrow. Cut from the end WITHOUT the arrow — the data needs to flow from the wire end you’re connecting.
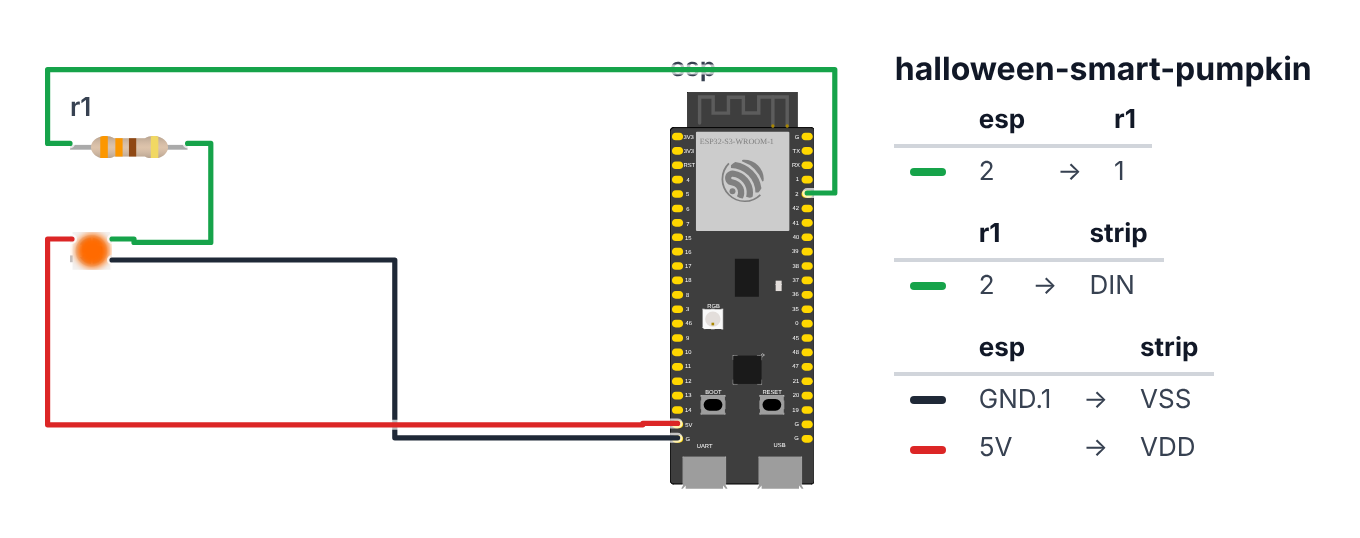
Solder (or use the supplied connector) on three wires: VCC (red), GND (black), Data In (green). Add the 330Ω resistor in series on the Data In wire before it reaches the board’s data pin (GPIO 2 on an ESP32-S3, GPIO 8 on an ESP32-C6).
Important: Add a 1000µF capacitor across the 5V and GND on the power supply’s output wires (positive to positive, negative to negative). This absorbs the power surge when lots of LEDs switch on at once — it protects everything.
Curl the strip inside the pumpkin, facing the carved front. Route the wires out the bottom or the back notch.
Safety for parents: A real carved pumpkin is wet inside. Only the LED strip goes inside the pumpkin — keep the ESP32 board and the power supply outside (or sealed in a zip bag). And never put a real candle in the same pumpkin as the electronics.
Step 1: Wire it up
Time: ~10 minutes
LED Strip (3 wires):
- Strip Data In → board GPIO 2 (ESP32-S3) or GPIO 8 (ESP32-C6) via 330Ω resistor — green wire
- Strip VCC (red) → 5V power supply positive output
- Strip GND (black) → 5V power supply negative output (common GND)
Power the ESP32: 4. ESP32 5V pin → 5V power supply positive output — red wire 5. ESP32 GND → 5V power supply negative output — black wire
Critical: Do NOT power the LED strip from the ESP32’s 5V pin. At full brightness, 30 LEDs draw ~1.8A — far more than the ESP32 can supply. Both the strip and the ESP32 connect to the external 5V power supply separately. (The code also has a built-in power limit of 2.5A, so it never asks more than a 3A supply can give.)
Good to know: In the wiring picture and in the simulator, the strip’s 5V wire goes to the board’s 5V pin. That’s only because the drawing has no separate power supply. On your real build, the strip’s 5V and the ESP32’s 5V pin both go to the 5V supply.
Check: The 330Ω resistor is on the data wire between the data pin (GPIO 2 on S3 / GPIO 8 on C6) and the strip’s first LED. The capacitor is across the power rails at the strip end. Strip VCC goes to the power supply, NOT the ESP32.
ESP32-C6 note: On the C6 DevKit, GPIO 8 is also wired to the little RGB LED on the board itself. That’s fine — the on-board LED will simply copy the color of your first strip LED.
Step 2: Upload the code
Time: ~15 minutes
Install these libraries via Arduino IDE Library Manager (Sketch → Include Library → Manage Libraries…):
FastLEDby Daniel GarciaESP Async WebServerby ESP32AsyncAsync TCPby ESP32Async (required by ESP Async WebServer)
Careful: Don’t use the old “ESPAsyncWebServer by me-no-dev” ZIP from GitHub — it doesn’t compile on the current ESP32 board package (3.x). The ESP32Async versions from Library Manager are the maintained ones.
In Tools → Board pick ESP32S3 Dev Module (or ESP32C6 Dev Module), and in Tools → Partition Scheme pick Huge APP (3MB No OTA) — the web page and Wi-Fi code need some room.
Two things to change at the top of the code before uploading:
- Choose your board — leave
#define BOARD_S3as it is for an ESP32-S3, or put//in front of it and remove the//in front of#define BOARD_C6for an ESP32-C6. - Your WiFi name and password — or leave them as they are, and the pumpkin will make its own WiFi hotspot instead (see Step 3).
The big picture first. This program turns the ESP32 into a WiFi-controlled light show inside your pumpkin:
- The ESP32 is the brain and the WiFi radio — it runs animations AND serves a web page.
- The WS2812B LED strip is the eye — each LED is independently programmable with any color.
- Your phone browser is the remote control — you tap a button, your phone sends a tiny message to the ESP32 over WiFi, and the animation changes.
A program is like a recipe. The computer reads it top to bottom and does exactly what’s written, nothing more. Copy this entire recipe into Arduino IDE before uploading:
// ========== CHOOSE YOUR BOARD ==========
// Uncomment the line for YOUR board:
#define BOARD_S3    // ESP32-S3-DevKitC-1
//#define BOARD_C6  // ESP32-C6-DevKitC-1
// ========================================

#ifdef BOARD_S3
  #define PIN_NEOPIXEL         2
#endif
#ifdef BOARD_C6
  #define PIN_NEOPIXEL         8
#endif

#include <FastLED.h>
#include <WiFi.h>
#include <ESPmDNS.h>
#include <ESPAsyncWebServer.h>

// ---------- Settings ----------
#define NUM_LEDS      30
#define LED_TYPE      WS2812B
#define COLOR_ORDER   GRB
#define BRIGHTNESS    180
#define MAX_MILLIAMPS 2500
#define FRAME_MS      40
#define MODE_COUNT    4

// ---------- Wi-Fi ----------
const char* WIFI_NAME = "YOUR_WIFI_NAME";
const char* WIFI_PASSWORD = "YOUR_PASSWORD";
const char* HOTSPOT_NAME = "BuildCool-Pumpkin";
const char* HOTSPOT_PASSWORD = "buildcool";
const char* WEB_NAME = "pumpkin";

// ---------- Parts ----------
CRGB leds[NUM_LEDS];
AsyncWebServer server(80);

// ---------- Memory ----------
volatile int currentMode = 0;
volatile int brightness = BRIGHTNESS;
volatile bool strikeNow = false;
int shownBrightness = BRIGHTNESS;

unsigned long lastUpdate    = 0;
unsigned long nextLightning = 0;
int  flashStep              = 0;
unsigned long flashStepEnd  = 0;
int  pulseDir               = 1;
int  pulseBrightness        = 10;
uint8_t rainbowHue          = 0;
String webAddress = "";

// ---------- Web page ----------
const char INDEX_HTML[] PROGMEM = R"rawliteral(
<!doctype html><html lang="en"><head><meta charset="utf-8">
<meta name="viewport" content="width=device-width,initial-scale=1">
<title>Smart Pumpkin · BuildCool</title>
<style>
:root{--o:#f97316;--o6:#ea580c;--o7:#c2410c;--o50:#fff7ed;--o200:#fed7aa;--g9:#111827;--g7:#374151;--g5:#6b7280;--g2:#e5e7eb;--g0:#f9fafb}
*{box-sizing:border-box}
body{margin:0;font-family:-apple-system,BlinkMacSystemFont,"Segoe UI",Roboto,"Helvetica Neue",Arial,sans-serif;color:var(--g9);background:var(--g0)}
header{position:sticky;top:0;z-index:9;background:rgba(255,255,255,.9);backdrop-filter:blur(8px);border-bottom:1px solid var(--g2)}
.wrap{max-width:640px;margin:0 auto;padding:12px 16px}
.bar{display:flex;align-items:center;justify-content:space-between}
.logo{font-size:20px;font-weight:800;letter-spacing:-.02em;color:var(--g9);text-decoration:none}
.logo span{color:var(--o)}
.badge{display:inline-flex;align-items:center;gap:8px;background:var(--o50);border:1px solid var(--o200);color:var(--o7);font-size:13px;font-weight:500;padding:4px 12px;border-radius:999px}
.dot{width:8px;height:8px;border-radius:50%;background:var(--o);animation:p 2s infinite}
.off .dot{background:var(--g5);animation:none}
@keyframes p{50%{opacity:.35}}
h1{font-size:30px;font-weight:800;letter-spacing:-.02em;line-height:1.1;margin:20px 0 6px}
h1 span{color:var(--o)}
.sub{color:var(--g5);margin:0 0 20px}
.grid{display:grid;grid-template-columns:repeat(auto-fit,minmax(140px,1fr));gap:12px}
.card{background:#fff;border:1px solid var(--g2);border-radius:16px;padding:16px}
.wide{grid-column:1/-1}
.label{font-size:13px;color:var(--g5);font-weight:500}
.value{font-size:26px;font-weight:800;letter-spacing:-.02em;margin-top:4px}
.btn{display:inline-flex;justify-content:center;align-items:center;padding:12px 20px;background:var(--o);color:#fff;font-weight:600;border:0;border-radius:12px;font-size:15px;text-decoration:none;cursor:pointer;box-shadow:0 10px 15px -3px var(--o200)}
.btn:active{transform:scale(.95)}
.btn.ghost{background:#fff;color:var(--g7);border:1px solid var(--g2);box-shadow:none}
.btn.big{width:100%;padding:18px;font-size:18px}
.list{display:grid;gap:10px;margin-top:10px}
input[type=range]{width:100%;accent-color:var(--o);margin-top:12px}
footer{color:var(--g5);font-size:13px;text-align:center;padding:28px 16px}
footer a{color:var(--o);font-weight:600;text-decoration:none}
</style></head><body>
<header><div class="wrap bar"><a class="logo" href="https://buildcool.fun">Build<span>Cool</span></a>
<span class="badge" id="live"><span class="dot"></span><span id="livetxt">Live</span></span></div></header>
<main class="wrap">
<h1>Smart <span>Pumpkin</span></h1>
<p class="sub">Pick a spooky light show for your pumpkin</p>
<div class="grid">
<div class="card wide"><div class="label">Now showing</div><div class="value" id="now">–</div></div>
<div class="card wide"><div class="label">Light shows</div><div class="list" id="list"></div>
<div class="list"><button class="btn big ghost" id="strike" onclick="act('strike',1)">⚡ Strike lightning now</button></div></div>
<div class="card wide"><div class="label">Brightness · <span id="brv">–</span></div>
<input type="range" min="10" max="255" id="br" onchange="act('brightness',this.value)"></div>
</div></main>
<footer>Made with <a href="https://buildcool.fun">buildcool.fun</a></footer>
<script>
const $=id=>document.getElementById(id);
const N=["Candle Flicker","Lightning","Purple Pulse","Rainbow"];
$("list").innerHTML=N.map((n,i)=>'<button class="btn big ghost" id="b'+i+'" onclick="act(\'mode\','+i+')">'+n+'</button>').join("");
function live(ok){$("live").classList.toggle("off",!ok);$("livetxt").textContent=ok?"Live":"Offline"}
async function act(k,v){try{await fetch("/api/set?"+k+"="+encodeURIComponent(v),{method:"POST"});tick()}catch(e){live(false)}}
async function tick(){
 try{const d=await (await fetch("/api")).json();
  $("now").textContent=N[d.mode];
  N.forEach((n,i)=>$("b"+i).className="btn big"+(i==d.mode?"":" ghost"));
  $("strike").style.display=d.mode==1?"":"none";
  $("brv").textContent=Math.round(d.brightness*100/255)+" %";
  if(document.activeElement!==$("br"))$("br").value=d.brightness;
  live(true)}catch(e){live(false)}
}
tick();setInterval(tick,2000);
</script></body></html>
)rawliteral";

// ---------- Wi-Fi ----------
void flashStrip(CRGB color) {
  fill_solid(leds, NUM_LEDS, color);
  FastLED.show();
  delay(600);
  FastLED.clear();
  FastLED.show();
}

void startWiFi() {
  if (String(WIFI_NAME) != "YOUR_WIFI_NAME") {
    WiFi.mode(WIFI_STA);
    WiFi.begin(WIFI_NAME, WIFI_PASSWORD);
    Serial.print("# Joining Wi-Fi");
    unsigned long start = millis();
    while (WiFi.status() != WL_CONNECTED && millis() - start < 15000) {
      delay(250);
      Serial.print(".");
    }
    Serial.println();
    if (WiFi.status() == WL_CONNECTED) {
      webAddress = WiFi.localIP().toString();
      if (MDNS.begin(WEB_NAME)) {
        Serial.print("# Also try: http://");
        Serial.print(WEB_NAME);
        Serial.println(".local");
      }
      Serial.print("# Pumpkin ready! Open in your phone browser: http://");
      Serial.println(webAddress);
      flashStrip(CRGB::Green);
      return;
    }
    Serial.println("# Could not join Wi-Fi, starting own hotspot instead");
  }
  WiFi.mode(WIFI_AP);
  WiFi.softAP(HOTSPOT_NAME, HOTSPOT_PASSWORD);
  webAddress = WiFi.softAPIP().toString();
  Serial.print("# Connect your phone to Wi-Fi \"");
  Serial.print(HOTSPOT_NAME);
  Serial.print("\" (password: ");
  Serial.print(HOTSPOT_PASSWORD);
  Serial.print("), then open http://");
  Serial.println(webAddress);
  flashStrip(CRGB::Orange);
}

// ---------- Web server ----------
String stateJson() {
  String json = "{";
  json += "\"mode\":" + String(currentMode);
  json += ",\"brightness\":" + String(brightness);
  json += "}";
  return json;
}

void startWebServer() {
  server.on("/", HTTP_GET, [](AsyncWebServerRequest *request) {
    request->send(200, "text/html", INDEX_HTML);
  });
  server.on("/api", HTTP_GET, [](AsyncWebServerRequest *request) {
    request->send(200, "application/json", stateJson());
  });
  server.on("/api/set", HTTP_POST, [](AsyncWebServerRequest *request) {
    if (request->hasParam("mode")) {
      int mode = request->getParam("mode")->value().toInt();
      if (mode >= 0 && mode < MODE_COUNT) currentMode = mode;
    }
    if (request->hasParam("brightness")) {
      brightness = constrain(request->getParam("brightness")->value().toInt(), 10, 255);
    }
    if (request->hasParam("strike")) strikeNow = true;
    request->send(200, "application/json", stateJson());
  });
  server.begin();
}

// ---------- Animations ----------
void animateCandle() {
  for (int i = 0; i < NUM_LEDS; i++) {
    uint8_t flicker = random8(180, 255);
    leds[i] = CRGB(flicker, flicker / 3, 0);
  }
}

void animateLightning(unsigned long now) {
  if (flashStep == 0 && (strikeNow || now >= nextLightning)) {
    strikeNow = false;
    flashStep = 1;
    flashStepEnd = now;
  }
  if (flashStep == 0) {
    fill_solid(leds, NUM_LEDS, CRGB(0, 0, 10));
    return;
  }
  if (now < flashStepEnd) return;

  if (flashStep > 6) {
    flashStep = 0;
    nextLightning = now + random(5000, 30000);
    fill_solid(leds, NUM_LEDS, CRGB(0, 0, 10));
    return;
  }
  if (flashStep % 2 == 1) {
    fill_solid(leds, NUM_LEDS, CRGB::White);
    flashStepEnd = now + random(20, 80);
  } else {
    fill_solid(leds, NUM_LEDS, CRGB(0, 0, 10));
    flashStepEnd = now + random(20, 60);
  }
  flashStep++;
}

void animatePulse() {
  pulseBrightness += pulseDir * 3;
  if (pulseBrightness >= 220) { pulseBrightness = 220; pulseDir = -1; }
  if (pulseBrightness <= 10)  { pulseBrightness = 10;  pulseDir =  1; }
  fill_solid(leds, NUM_LEDS, CRGB(pulseBrightness / 2, 0, pulseBrightness));
}

void animateRainbow() {
  fill_rainbow(leds, NUM_LEDS, rainbowHue++, 7);
}

// ---------- Setup ----------
void setup() {
  Serial.begin(115200);

  FastLED.addLeds<LED_TYPE, PIN_NEOPIXEL, COLOR_ORDER>(leds, NUM_LEDS);
  FastLED.setMaxPowerInVoltsAndMilliamps(5, MAX_MILLIAMPS);
  FastLED.setBrightness(brightness);
  fill_solid(leds, NUM_LEDS, CRGB::Black);
  FastLED.show();

  startWiFi();
  startWebServer();

  nextLightning = millis() + random(5000, 30000);
}

// ---------- Loop ----------
void loop() {
  unsigned long now = millis();
  if (now - lastUpdate < FRAME_MS) return;
  lastUpdate = now;

  if (shownBrightness != brightness) {
    shownBrightness = brightness;
    FastLED.setBrightness(shownBrightness);
  }

  switch (currentMode) {
    case 0: animateCandle();       break;
    case 1: animateLightning(now); break;
    case 2: animatePulse();        break;
    case 3: animateRainbow();      break;
  }
  FastLED.show();
}
Line-by-line: what every line does and why
Lines 1–12: Choosing your board
#define BOARD_S3    // ESP32-S3-DevKitC-1
//#define BOARD_C6  // ESP32-C6-DevKitC-1

#ifdef BOARD_S3
  #define PIN_NEOPIXEL         2
#endif
#ifdef BOARD_C6
  #define PIN_NEOPIXEL         8
#endif
This is like a light switch for the whole program. #define BOARD_S3 flips the switch to “S3”. The // in front of the C6 line turns that line into a comment, so the computer skips it. Then #ifdef BOARD_S3 means “only if the S3 switch is on, read the next lines”. So on an S3, PIN_NEOPIXEL becomes 2, and on a C6 it becomes 8. Everywhere else in the code we just write PIN_NEOPIXEL — the code doesn’t care which board you have, the switch handles it.
Lines 14–17: Borrowing instruction books
#include <FastLED.h>
#include <WiFi.h>
#include <ESPmDNS.h>
#include <ESPAsyncWebServer.h>
#include means “grab this instruction book.” FastLED knows how to talk to WS2812B LEDs — it handles precise nanosecond-level timing so you can just say “set LED 5 to orange.” WiFi knows how to connect to your home network (or make its own). ESPmDNS gives the pumpkin a name on your network, so you can type pumpkin.local instead of a number. ESPAsyncWebServer knows how to answer web requests without stopping the animation.
Lines 19–26: Settings
#define NUM_LEDS      30
#define LED_TYPE      WS2812B
#define COLOR_ORDER   GRB
#define BRIGHTNESS    180
#define MAX_MILLIAMPS 2500
#define FRAME_MS      40
#define MODE_COUNT    4
#define gives names to settings, so you change them in ONE place. NUM_LEDS 30 — count your LEDs and change this number. WS2812B tells FastLED which type of LED to use. COLOR_ORDER GRB is important: this LED type expects color data in Green-Red-Blue order, not Red-Green-Blue. If colors look wrong, this is why. BRIGHTNESS 180 is the starting brightness (out of 255). MAX_MILLIAMPS 2500 is a power budget — more on that in setup(). FRAME_MS 40 means one new animation picture every 40 milliseconds. MODE_COUNT 4 says there are 4 light shows (numbered 0, 1, 2, 3).
Lines 28–33: WiFi names and passwords
const char* WIFI_NAME = "YOUR_WIFI_NAME";
const char* WIFI_PASSWORD = "YOUR_PASSWORD";
const char* HOTSPOT_NAME = "BuildCool-Pumpkin";
const char* HOTSPOT_PASSWORD = "buildcool";
const char* WEB_NAME = "pumpkin";
const char* is a type for storing text, and const means “this text won’t change while the program runs.” The first two lines are YOUR home WiFi — both are case-sensitive. The next two are the pumpkin’s own WiFi, which it creates if it can’t join yours (we call that a hotspot). WEB_NAME is the pumpkin’s nickname on your network: http://pumpkin.local.
Lines 35–52: Parts and memory boxes
CRGB leds[NUM_LEDS];
AsyncWebServer server(80);

volatile int currentMode = 0;
volatile int brightness = BRIGHTNESS;
volatile bool strikeNow = false;
int shownBrightness = BRIGHTNESS;
CRGB leds[NUM_LEDS] is a shelf with 30 compartments, one per LED. Each compartment holds a color — red, green, and blue values. When we write leds[5] = CRGB(255, 0, 0), we’re setting LED number 5 to red. server(80) creates a web server on port 80 — the standard door for websites.
currentMode remembers which animation is active: 0 = candle, 1 = lightning, 2 = pulse, 3 = rainbow. brightness is what your phone slider asked for, and strikeNow becomes true when you tap “Strike lightning now”.
Why volatile? The web server runs in the background, like a waiter taking orders while the cook (loop()) is busy cooking. volatile tells the compiler: “someone else may change this box at any moment — always look inside, never remember an old copy.” shownBrightness is the brightness the strip is using right now; loop() compares it with brightness to notice when your slider moved.
unsigned long lastUpdate    = 0;
unsigned long nextLightning = 0;
int  flashStep              = 0;
unsigned long flashStepEnd  = 0;
int  pulseDir               = 1;
int  pulseBrightness        = 10;
uint8_t rainbowHue          = 0;
String webAddress = "";
Boxes for each animation to remember where it is between frames. nextLightning is the time of the next strike. flashStep and flashStepEnd remember which part of a lightning flash we’re in (explained below). pulseDir is +1 (getting brighter) or -1 (getting dimmer). rainbowHue is the current starting color of the rainbow. webAddress keeps the pumpkin’s address so we can print it.
Lines 54–119: The web page stored in the chip
const char INDEX_HTML[] PROGMEM = R"rawliteral(
<!doctype html>...
)rawliteral";
This is a real web page — HTML, CSS, and JavaScript — stored right inside the ESP32. PROGMEM tells the compiler: “store this in flash memory (megabytes), not in RAM (about 512 KB).” The R"rawliteral(...)rawliteral" is a way to write text with quotation marks inside it without confusing C++.
What’s on the page: the BuildCool header with a Live badge, a “Now showing” card, one button per light show, a “⚡ Strike lightning now” button (it only appears in Lightning mode), and a brightness slider. Every 2 seconds the page asks the pumpkin “what are you doing?” (fetch("/api")). If the pumpkin answers, the badge says Live. If not (unplugged, out of WiFi range), it switches to Offline — so you always know if your taps are reaching the pumpkin.
Lines 121–165: startWiFi() — join home WiFi, or make your own
if (String(WIFI_NAME) != "YOUR_WIFI_NAME") {
  WiFi.begin(WIFI_NAME, WIFI_PASSWORD);
  while (WiFi.status() != WL_CONNECTED && millis() - start < 15000) {
First a check: did you actually type in your WiFi name? If yes, try to join. The while loop waits — but at most 15 seconds (15000 milliseconds). The old version waited forever with a dark pumpkin if the password had one typo. Now:
- Joined your WiFi? The strip flashes green, Serial Monitor prints the address (like
http://192.168.1.47), andMDNS.begin("pumpkin")lets you also usehttp://pumpkin.local. - Didn’t work (or you never changed the name)? The pumpkin makes its own WiFi hotspot called
BuildCool-Pumpkin(passwordbuildcool), and the strip flashes orange. Connect your phone to that WiFi and openhttp://192.168.4.1.
This trick is called a hotspot fallback — like a phone that switches to its own battery when the power goes out. The pumpkin always works, with or without your home WiFi.
flashStrip() (just above startWiFi()) is the tiny helper that lights the whole strip in one color for 0.6 seconds and turns it off again.
Lines 167–195: The web server — three doors
server.on("/", HTTP_GET, ...);
server.on("/api", HTTP_GET, ...);
server.on("/api/set", HTTP_POST, ...);
server.on(...) registers handlers — rules that say “when someone knocks on this door, do this.” The [](...) part is a lambda — a tiny function with no name, written right where it’s needed.
/sends the web page./apianswers with the pumpkin’s state as JSON, a tiny text format computers love:{"mode":1,"brightness":180}.stateJson()builds that text./api/setreceives your taps, like/api/set?mode=2or/api/set?brightness=120.
int mode = request->getParam("mode")->value().toInt();
if (mode >= 0 && mode < MODE_COUNT) currentMode = mode;
brightness = constrain(request->getParam("brightness")->value().toInt(), 10, 255);
This is input checking — the bouncer at the door. Anyone can type any address into a browser, for example mode=7. There is no mode 7, and the old code would freeze the strip. Now a mode is only accepted if it’s 0, 1, 2 or 3. constrain(x, 10, 255) squeezes the brightness into a safe range: anything below 10 becomes 10, anything above 255 becomes 255. Rule for life: never trust what comes in over the network.
Lines 197–242: The four animation functions
animateCandle(): Each LED gets a random brightness between 180 and 255. Color is warm orange: high red, one-third of red as green, zero blue. Because every LED flickers independently and randomly, it looks like a real flame.
animateLightning(): This one is special. A lightning strike is 3 white flashes with short dark gaps — 6 little steps. The old code did it with delay(), which froze the whole pumpkin for almost half a second. Now it’s a state machine:
if (now < flashStepEnd) return;
if (flashStep % 2 == 1) {
  fill_solid(leds, NUM_LEDS, CRGB::White);
  flashStepEnd = now + random(20, 80);
}
flashStep++;
Think of a board game: flashStep is which square you’re on, and flashStepEnd is “you can’t move until this time.” Every frame, the function checks the clock. Not time yet? return — do nothing, come back next frame. Time’s up? Do the next step and move one square. Odd squares (1, 3, 5) are white flashes, even squares (2, 4, 6) are dark blue. % gives the remainder, so flashStep % 2 == 1 means “odd number”. After square 6, flashStep goes back to 0 and the next strike is scheduled in 5–30 seconds with random(5000, 30000). Between strikes the pumpkin glows dark blue. If you tap “Strike lightning now”, strikeNow starts a strike right away.
animatePulse(): Add pulseDir * 3 to brightness each frame. When brightness hits 220, flip pulseDir to -1 (start dimming). When it hits 10, flip back to +1 (start brightening). Color is purple: half brightness red, zero green, full brightness blue.
animateRainbow(): fill_rainbow() fills the LED shelf with consecutive hues, starting at rainbowHue. The ++ after rainbowHue means “use the current value, then add 1.” Each frame the starting hue advances by 1, scrolling the rainbow across the strip.
Lines 244–258: setup() — runs once at power-on
FastLED.addLeds<LED_TYPE, PIN_NEOPIXEL, COLOR_ORDER>(leds, NUM_LEDS);
FastLED.setMaxPowerInVoltsAndMilliamps(5, MAX_MILLIAMPS);
FastLED.setBrightness(brightness);
fill_solid(leds, NUM_LEDS, CRGB::Black);
FastLED.show();
Register the LED strip with FastLED on our data pin. setMaxPowerInVoltsAndMilliamps(5, 2500) is the power budget: FastLED calculates how much current the colors would need, and if it’s more than 2500 mA (2.5 A), it dims everything a little. Like a parent saying “you can spend 25 dollars, not more” — your power supply never gets overloaded, even when all 30 LEDs flash white. fill_solid(..., CRGB::Black) sets every LED to off, and FastLED.show() pushes the colors to the real strip — without show(), changes stay on the shelf in memory and nothing lights up.
Then startWiFi() connects (or makes a hotspot), startWebServer() opens the three doors, and the first lightning strike is scheduled.
Lines 260–278: loop() — repeats forever
if (now - lastUpdate < FRAME_MS) return;
lastUpdate = now;
Rate-limiting to 25 frames per second: 1000 ms / 40 ms = 25 frames. Without this, the animations would update thousands of times per second — wasting power and making the effects way too fast. Notice there is no delay() anywhere in loop(): it checks the clock with millis() and leaves right away if it’s not time yet. That’s why the pumpkin answers your phone instantly.
if (shownBrightness != brightness) {
  shownBrightness = brightness;
  FastLED.setBrightness(shownBrightness);
}
Did the slider on your phone move? If the wanted brightness is different from what the strip shows, update it. We do this here in loop() and not in the web handler, so only one “cook” touches the LEDs.
switch (currentMode) {
    case 0: animateCandle();       break;
    case 1: animateLightning(now); break;
    case 2: animatePulse();        break;
    case 3: animateRainbow();      break;
}
FastLED.show();
switch is like a menu selector — it looks at currentMode and jumps to the matching case. break exits the switch after each case. After whichever animation runs, FastLED.show() sends the new colors to the strip.
The whole thing in one sentence
When powered on, the pumpkin joins your WiFi (or makes its own hotspot) and opens a web server (setup); then 25 times per second forever (loop) it draws one frame of whichever animation matches currentMode — and whenever your phone taps a button or moves the slider, the web server checks the value and updates currentMode or brightness, so the show changes instantly.
First thing to try: upload the code and open Serial Monitor at 115200 baud. Watch the strip: a green flash means it joined your WiFi (the address is in Serial Monitor), an orange flash means it’s in hotspot mode. Open the page on your phone, tap “Lightning”, then hit “⚡ Strike lightning now”.
Check: You see the BuildCool page with four light-show buttons, the badge says Live, and tapping a button lights it up orange on the page and changes the pumpkin.
Step 3: Control your pumpkin
Time: ~2 minutes
There are two ways to reach your pumpkin — the strip tells you which one at start-up:
| Strip flash at start | Mode | What to do on your phone |
|---|---|---|
| Green | Joined your home WiFi | Stay on your home WiFi and open http://pumpkin.local — or the address printed in Serial Monitor, like http://192.168.1.47 |
| Orange | Own hotspot | Connect to the WiFi BuildCool-Pumpkin (password buildcool), then open http://192.168.4.1 |
You’ll see one button per light show:
Candle Flicker — warm orange, every LED independent. Looks like a real flame.
Lightning — dark blue background, then blazing white flashes every 5–30 seconds. Perfect for outdoors. Can’t wait? Tap ⚡ Strike lightning now and time it with a trick-or-treater stepping onto the porch.
Purple Pulse — deep violet breathing in and out every few seconds. Great for a dark hallway or window.
Rainbow — the LED rave mode. Makes the most over-engineered Jack-o’-lantern on your street.
The Brightness slider dims or brightens every mode. Lower it indoors — it also saves power.
Note: In home-WiFi mode your phone must stay on the same WiFi as the pumpkin. If you switch to mobile data, the page shows Offline — but the pumpkin keeps running whatever animation was last selected.
For parents: Anyone on the same WiFi can open the page and change the light show (harmless). If you use hotspot mode, change
HOTSPOT_PASSWORDin the code to your own password so neighbors can’t join.
What just happened (what you learned)
-
Addressable LEDs and data protocols — each WS2812B has a tiny chip inside that receives color data over a single wire. FastLED sends precisely timed pulses that every LED reads in sequence. The 330Ω resistor protects the first LED from voltage spikes.
-
Embedded web servers and APIs — the ESP32 serves a web page just like any website, plus a tiny
/apithat answers in JSON. Your phone asks for the state every 2 seconds and sends changes with/api/set. No internet needed. -
Hotspot fallback — if the home WiFi doesn’t work within 15 seconds, the ESP32 becomes a WiFi network itself. The project always works.
-
Input validation — every number that comes over the network is checked (
modemust be 0–3,brightnessis squeezed into 10–255) before the program uses it. -
Non-blocking state machines — the lightning flash is split into small timed steps instead of
delay(), so the pumpkin never freezes and always answers your phone. -
Power budgets —
setMaxPowerInVoltsAndMilliamps()keeps the strip under 2.5 A, so a 3 A power supply is never overloaded. -
PROGMEM (flash storage) — the ESP32 has about 512 KB of RAM but megabytes of flash.
PROGMEMstores the web page in flash, keeping RAM free for your animations.
Level Up
PIR-triggered lightning: Connect a PIR motion sensor to a free pin (GPIO 4 on the S3, GPIO 0 on the C6). When it detects someone approaching, set strikeNow = true to fire the lightning strike immediately. Suddenly the pumpkin knows when to look scariest.
Automatic schedule: Use configTime() and getLocalTime() to get real time (this needs your home WiFi, not hotspot mode). At 6pm, automatically switch to candle mode. At midnight, turn off. Set it and forget it.
More animations: Add a fifth mode — “Creep Mode” — that runs for 60 seconds slowly shifting from warm orange to deep blood red, then back. Use blend() from FastLED to mix between colors. Don’t forget to change MODE_COUNT to 5 and add the name to the list N in the web page.
★★ You completed: Smart Pumpkin with LED Eyes!
Troubleshooting
| Problem | Fix |
|---|---|
| Strip flashes orange, but I typed my WiFi | It couldn’t join within 15 seconds. Double-check name and password (case-sensitive). The ESP32 only connects to 2.4GHz WiFi, not 5GHz. Meanwhile the hotspot BuildCool-Pumpkin works. |
| No green or orange flash at all | Check strip power and the data wire (see “LEDs don’t light up”). Serial Monitor at 115200 still shows the address. |
| Control page won’t load on phone | Home-WiFi mode: phone must be on the same WiFi; try the number address from Serial Monitor if pumpkin.local doesn’t work (some Android phones don’t support .local). Hotspot mode: phone must be connected to BuildCool-Pumpkin; open http://192.168.4.1. |
| Page says “Offline” | The page can’t reach the pumpkin any more — it was unplugged, restarted, or your phone left its WiFi. Reload the page. |
Compile error about ESPAsyncWebServer or AsyncTCP |
You have the old me-no-dev library. Remove it from your Arduino/libraries folder and install ESP Async WebServer and Async TCP by ESP32Async from Library Manager. |
| “Sketch too big” error | Tools → Partition Scheme → Huge APP (3MB No OTA). |
| LEDs don’t light up | Check: strip VCC goes to 5V power supply (not ESP32). 330Ω resistor on data wire. Data wire on GPIO 2 (S3) / GPIO 8 (C6) and the right #define BOARD_... line is active. Strip data direction arrow points away from the ESP32. |
| First LED always wrong color | The 330Ω resistor might be missing or too high. Also check the strip is GRB not RGB — change COLOR_ORDER if colors look wrong. |
| LEDs too dim | Move the brightness slider up. White flashes are also limited by the 2.5A power budget (MAX_MILLIAMPS) — that’s on purpose, to protect a 3A power supply. |
| Lightning never fires | The timer is 5–30 seconds. Wait for it, or tap ⚡ Strike lightning now. For faster strikes, change random(5000, 30000) to random(1000, 5000). |