Parent info
Parts you need
Affiliate links — we may earn a small commission
Try this circuit in your browser!
Run the code, press the buttons and watch what happens — before you buy any parts. No account needed.
Open in Simulator →Your phone controls the Christmas tree.
Imagine this: you’re on the couch. You tap a button on your phone — no app, just a browser — and your Christmas tree shifts from twinkling white stars to a slow rainbow wave rolling up every branch.
You built that. You wired it, you coded it, you made it happen. And it runs all season without touching a thing.
That’s what we’re building. In about an hour. For roughly $27.
What you’ll need
| Part | What it does | Price |
|---|---|---|
| ESP32-S3 Dev Board | The brain — runs the web server and controls the LEDs | ~$12 |
| WS2812B LED Strip, 5m | The lights — each LED is individually addressable | ~$15 |
| 5V 2A Power Supply | Powers the LEDs (the ESP32 cannot handle a full strip) | ~$6 |
| 330-ohm resistor | Protects the first LED from signal spikes on startup | ~$1 |
| Breadboard + jumper wires | Connects everything. No soldering for the ESP32 side. | ~$5 |
You also need: a computer with Arduino IDE installed, your home WiFi name and password.
Total: ~$27 | Time: ~1 hour | Difficulty: ●○○○○
Note: Power the LED strip directly from the 5V supply — NOT from the ESP32’s 3.3V pin. A full strip draws more current than the board can safely provide.
How it works (60 seconds)
Think of it like this: each LED on the strip has its own tiny brain.
The strip is a chain of smart LEDs. The ESP32 sends a message down the chain: “LED 1, be red. LED 2, be blue. LED 3, be off.” Each LED reads its own instruction and passes the rest down to the next one.
The 330-ohm resistor is a speed bump — it slows the electrical signal just enough to stop the first LED from getting confused by a voltage spike when the board powers on.
The web server is the clever part. Your phone’s browser connects to a tiny website running on the ESP32 itself — no internet needed, just your home WiFi. When you tap a button, it sends a request to the board, and the pattern changes. Like changing the channel on a TV, except the TV is hanging on your Christmas tree.
Step 0: Cut and prep your LED strip
Time: ~10 minutes
WS2812B strips have cut marks every 3 LEDs — little scissors symbols printed on the backing. Cut there only.
For a typical small tree, 90 LEDs (1.5 metres) is a good starting point. For a tall tree, go up to 150.
Solder three short wires (~10cm) to the input pads at the start of your strip:
- Red wire → VCC pad
- Black wire → GND pad
- Any other colour → DIN (data input) pad
Check: The DIN pad is the input end. LED strips have a direction — the arrow on the backing points from input to output. Start from the end with no arrow pointing away from it.
Step 1: Wire it up
Time: ~10 minutes
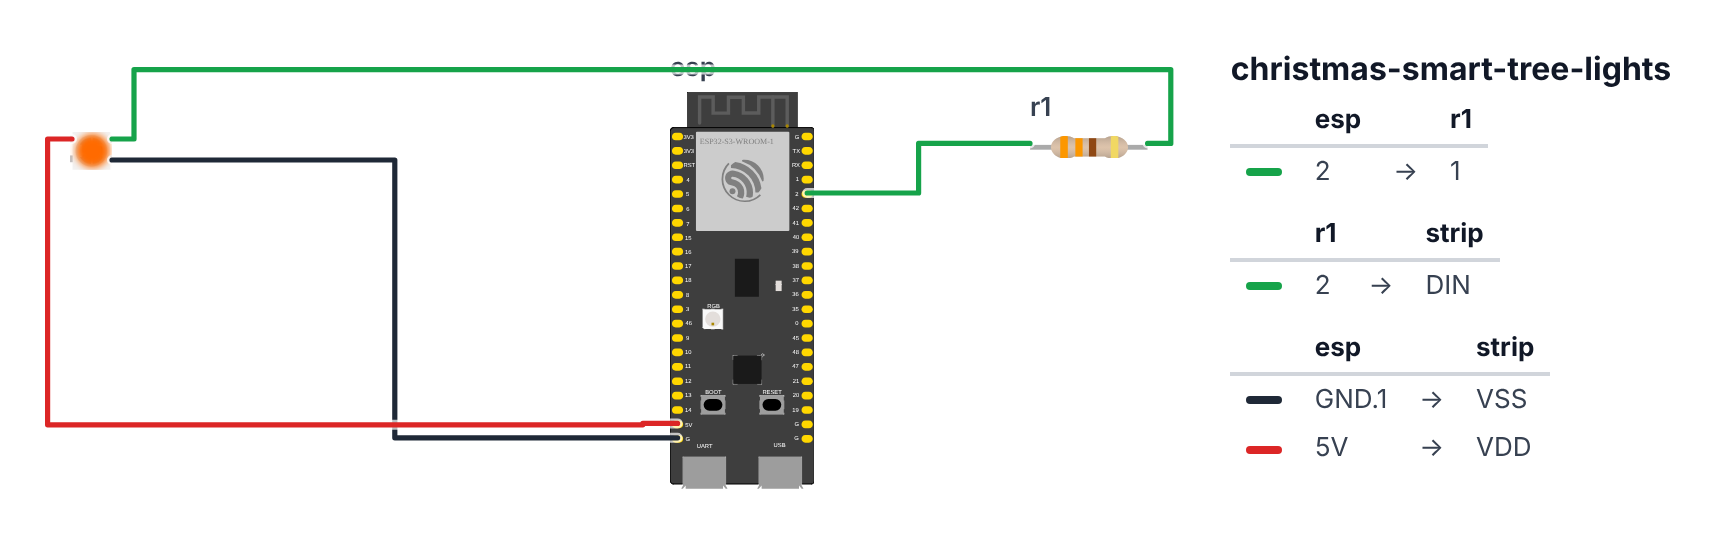
You’re making 4 connections.
LED strip power (2 wires from strip to 5V supply):
- Strip VCC (red) → 5V supply +5V — red wire
- Strip GND (black) → 5V supply GND — black wire
LED strip data (2 connections through the resistor): 3. Strip DIN → one leg of the 330-ohm resistor 4. Other leg of resistor → ESP32 GPIO 2 (C6: GPIO 8) — any colour wire
Shared ground: 5. ESP32 GND pin → 5V supply GND (same rail as the strip GND)
Check: Count your connections: 2 wires from strip to power supply, 1 wire from strip DIN through a resistor to GPIO 2 (C6: GPIO 8), and ESP32 GND connected to the same ground as the power supply. The ESP32’s USB-C is NOT plugged in yet.
Common mistake: Connecting the LED strip VCC to the ESP32’s 3.3V pin. That pin is for sensors, not for powering a whole LED strip. Use the external 5V supply.
Step 2: Upload the code
Time: ~10 minutes
- Open Arduino IDE on your computer.
- Go to Tools → Board → Boards Manager and make sure “esp32 by Espressif” is installed.
- Go to Sketch → Include Library → Manage Libraries and search for “FastLED” — install it.
- Copy the complete code below into a new sketch.
- Find these two lines and fill in your WiFi details:
const char* ssid = "YourWiFiName"; const char* password = "YourWiFiPassword"; - Check
NUM_LEDSmatches your strip length (90 for 1.5m at 60LED/m). - Connect the ESP32 to your computer via USB-C. Select your board under Tools → Board and your port under Tools → Port.
- Click Upload.
The big picture first. This program turns the ESP32 into a WiFi-controlled Christmas tree. The ESP32 is the brain. The WS2812B LED strip wraps around your tree — each light has its own tiny chip that can display any colour on command. The ESP32 also runs a tiny website inside itself. When you open that website on your phone and tap a button, the tree’s pattern changes instantly. No app, no Bluetooth — just your home WiFi.
A program is like a recipe. Fill in your WiFi details and upload.
// ========== CHOOSE YOUR BOARD ==========
// Uncomment the line for YOUR board:
#define BOARD_S3    // ESP32-S3-DevKitC-1
//#define BOARD_C6  // ESP32-C6-DevKitC-1
// ========================================

#ifdef BOARD_S3
  #define PIN_NEOPIXEL           2
#endif
#ifdef BOARD_C6
  #define PIN_NEOPIXEL           8
#endif

#include <FastLED.h>
#include <WiFi.h>
#include <WebServer.h>

#define LED_PIN       PIN_NEOPIXEL
#define NUM_LEDS      90
#define BRIGHTNESS    80
#define LED_TYPE      WS2812B
#define COLOR_ORDER   GRB

const char* ssid     = "YourWiFiName";
const char* password = "YourWiFiPassword";

CRGB leds[NUM_LEDS];
WebServer server(80);
int currentPattern = 0;
unsigned long lastPatternChange = 0;
const unsigned long PATTERN_DURATION = 30000;

const char* htmlPage = R"rawhtml(
<!DOCTYPE html><html><head>
<title>Christmas Tree</title>
<meta name="viewport" content="width=device-width,initial-scale=1">
<style>body{font-family:sans-serif;text-align:center;background:#1a0a00;color:#fff;padding:20px;}
button{font-size:1.2em;margin:10px;padding:15px 30px;border:none;border-radius:8px;cursor:pointer;}</style>
</head><body>
<h1>🎄 Christmas Tree</h1>
<p>Choose a pattern:</p>
<button style="background:#c41e3a;" onclick="fetch('/pattern?id=0')">Twinkling Stars</button>
<button style="background:#228b22;" onclick="fetch('/pattern?id=1')">Rainbow Wave</button>
<button style="background:#fff;color:#c41e3a;" onclick="fetch('/pattern?id=2')">Candy Cane</button>
<button style="background:#4488ff;" onclick="fetch('/pattern?id=3')">Snowfall</button>
<button style="background:#555;" onclick="fetch('/pattern?id=4')">Auto Cycle</button>
</body></html>
)rawhtml";

void patternTwinkle() {
  fadeToBlackBy(leds, NUM_LEDS, 20);
  int pos = random16(NUM_LEDS);
  leds[pos] += CHSV(0, 0, random8(150, 255));
}

void patternRainbow() {
  static uint8_t hue = 0;
  fill_rainbow(leds, NUM_LEDS, hue, 7);
  hue++;
}

void patternCandyCane() {
  static uint8_t offset = 0;
  for (int i = 0; i < NUM_LEDS; i++) {
    if (((i + offset) / 4) % 2 == 0) {
      leds[i] = CRGB::Red;
    } else {
      leds[i] = CRGB::White;
    }
  }
  offset++;
}

void patternSnowfall() {
  fadeToBlackBy(leds, NUM_LEDS, 30);
  if (random8() < 60) {
    int pos = random8(NUM_LEDS - 5, NUM_LEDS - 1);
    leds[pos] = CRGB(180, 200, 255);
  }
  for (int i = 0; i < NUM_LEDS - 1; i++) {
    if (leds[i + 1].getAverageLight() > 20) {
      leds[i] += leds[i + 1];
    }
  }
}

void setup() {
  Serial.begin(115200);
  FastLED.addLeds<LED_TYPE, LED_PIN, COLOR_ORDER>(leds, NUM_LEDS);
  FastLED.setBrightness(BRIGHTNESS);
  FastLED.clear();
  FastLED.show();

  WiFi.begin(ssid, password);
  Serial.print("Connecting to WiFi");
  while (WiFi.status() != WL_CONNECTED) {
    delay(500);
    Serial.print(".");
  }
  Serial.println("\nConnected! Open this in your phone browser: http://" + WiFi.localIP().toString());

  server.on("/", []() {
    server.send(200, "text/html", htmlPage);
  });
  server.on("/pattern", []() {
    if (server.hasArg("id")) {
      currentPattern = server.arg("id").toInt();
      lastPatternChange = millis();
    }
    server.send(200, "text/plain", "OK");
  });
  server.begin();
}

void loop() {
  server.handleClient();

  if (currentPattern == 4) {
    if (millis() - lastPatternChange > PATTERN_DURATION) {
      static int autoIndex = 0;
      autoIndex = (autoIndex + 1) % 4;
      currentPattern = autoIndex;
      lastPatternChange = millis();
    }
  }

  switch (currentPattern) {
    case 0: patternTwinkle();   break;
    case 1: patternRainbow();   break;
    case 2: patternCandyCane(); break;
    case 3: patternSnowfall();  break;
    case 4: patternTwinkle();   break;
  }

  FastLED.show();
  delay(30);
}
Line-by-line: what every line does and why
Lines 1–3: Borrowing three instruction books
#include <FastLED.h>
#include <WiFi.h>
#include <WebServer.h>
#include means “grab this instruction book.”
- FastLED — how to control smart LED strips.
- WiFi — how to connect to your home network.
- WebServer — how to turn the ESP32 into a tiny website.
Lines 5–10: Named numbers
#define LED_PIN       PIN_NEOPIXEL
#define NUM_LEDS      90
#define BRIGHTNESS    80
#define LED_TYPE      WS2812B
#define COLOR_ORDER   GRB
#define gives numbers or words names. Data wire on pin 2 (C6: pin 8) — the number comes from PIN_NEOPIXEL in the board block at the top. 90 LEDs (1.5m at 60/m). Brightness 80 out of 255 — gentle to start with. WS2812B is the model name of these smart LEDs. GRB is the colour order — this strip sends green before red internally. FastLED handles the translation.
Lines 12–13: WiFi details
const char* ssid     = "YourWiFiName";
const char* password = "YourWiFiPassword";
const char* stores a piece of text — like a sticky note. const means “don’t change this.” Replace the placeholders with your real WiFi name and password.
Lines 15–19: Global variables
CRGB leds[NUM_LEDS];
WebServer server(80);
int currentPattern = 0;
unsigned long lastPatternChange = 0;
const unsigned long PATTERN_DURATION = 30000;
CRGB leds[90]— a shelf with 90 boxes, one per LED. Each holds a colour.WebServer server(80)— creates the website engine on port 80. Port 80 is what browsers use. Namedserver.int currentPattern = 0— which pattern is active. 0 = twinkling stars.intmeans whole number.unsigned long lastPatternChange = 0— sticky note: when did the pattern last change?PATTERN_DURATION = 30000— 30 seconds in auto mode before switching.
The HTML web page
const char* htmlPage = R"rawhtml(
  ...buttons...
)rawhtml";
This is the webpage your phone sees. R"rawhtml(...)rawhtml" is a way to write a big block of text in the code without needing to escape every quote mark. The onclick="fetch('/pattern?id=0')" on each button means: when you tap it, the phone sends a request to /pattern?id=0 on the ESP32. That’s how the button communicates with the lights.
patternTwinkle(): random white sparks
void patternTwinkle() {
  fadeToBlackBy(leds, NUM_LEDS, 20);
  int pos = random16(NUM_LEDS);
  leds[pos] += CHSV(0, 0, random8(150, 255));
}
fadeToBlackBy(leds, NUM_LEDS, 20)— dim every LED by 20/255 each frame. Old sparks fade out.random16(NUM_LEDS)— pick a random position between 0 and 89.CHSV(0, 0, random8(150, 255))— CHSV means Hue, Saturation, Value. Hue 0, saturation 0 = pure white. Value = random brightness 150–255.leds[pos] +=— the+=adds to the existing colour rather than replacing it. This makes sparks build up before fading, looking more natural.
patternRainbow(): a rolling colour wave
void patternRainbow() {
  static uint8_t hue = 0;
  fill_rainbow(leds, NUM_LEDS, hue, 7);
  hue++;
}
static uint8_t hue = 0—staticremembers this between calls.hueis the starting colour (0=red, wraps around after 255).fill_rainbow(leds, NUM_LEDS, hue, 7)— FastLED’s built-in rainbow painter. Fills all 90 LEDs with a spectrum starting athue. The 7 is how much the hue shifts per LED.hue++— advance by 1 each frame. The rainbow slowly scrolls.
patternCandyCane(): red and white stripes scrolling
void patternCandyCane() {
  static uint8_t offset = 0;
  for (int i = 0; i < NUM_LEDS; i++) {
    if (((i + offset) / 4) % 2 == 0) {
      leds[i] = CRGB::Red;
    } else {
      leds[i] = CRGB::White;
    }
  }
  offset++;
}
static uint8_t offset = 0— remembered, increases each frame to scroll the pattern.for (int i = 0; i < NUM_LEDS; i++)— loop through all 90 LEDs.((i + offset) / 4) % 2 == 0— divide by 4 to make bands 4 LEDs wide, then% 2checks even/odd band. Even = red, odd = white.offset++— shift the whole pattern one step. This scrolls the stripes.
patternSnowfall(): snowflakes drifting down
void patternSnowfall() {
  fadeToBlackBy(leds, NUM_LEDS, 30);
  if (random8() < 60) {
    int pos = random8(NUM_LEDS - 5, NUM_LEDS - 1);
    leds[pos] = CRGB(180, 200, 255);
  }
  for (int i = 0; i < NUM_LEDS - 1; i++) {
    if (leds[i + 1].getAverageLight() > 20) {
      leds[i] += leds[i + 1];
    }
  }
}fadeToBlackBy(30)— slowly dim everything. Old snowflakes fade.random8() < 60— about 24% chance per frame to spawn a new snowflake at the top of the strip (near the end of the array = top of the tree).CRGB(180, 200, 255)— icy blue-white.- The
forloop copies each LED’s brightness to the one below it:leds[i] += leds[i + 1]. This makes the flake drift downward — it copies itself one step lower each frame.getAverageLight()checks if a flake is bright enough to be worth copying.
setup(): runs once on power-on
void setup() {
  Serial.begin(115200);
  FastLED.addLeds<LED_TYPE, LED_PIN, COLOR_ORDER>(leds, NUM_LEDS);
  FastLED.setBrightness(BRIGHTNESS);
  FastLED.clear();
  FastLED.show();
Standard LED setup: open the phone line, register the strip, set brightness, blank the strip, send to hardware.
  WiFi.begin(ssid, password);
  while (WiFi.status() != WL_CONNECTED) {
    delay(500);
    Serial.print(".");
  }
  Serial.println("\nConnected! Open this in your phone browser: http://" + WiFi.localIP().toString());
while (WiFi.status() != WL_CONNECTED) — != means “not equal to.” Wait, printing a dot every half second, until connected. Then print the IP address — this is what you type into your phone.
  server.on("/", []() {
    server.send(200, "text/html", htmlPage);
  });
  server.on("/pattern", []() {
    if (server.hasArg("id")) {
      currentPattern = server.arg("id").toInt();
      lastPatternChange = millis();
    }
    server.send(200, "text/plain", "OK");
  });
  server.begin();
}
server.on("/", ...)— when someone visits the root address, send them the HTML page. The[]() { ... }is a tiny nameless function (lambda).server.on("/pattern", ...)— when a button is tapped, the phone calls/pattern?id=0(or 1, 2, 3, 4).server.hasArg("id")checks ifidwas included.server.arg("id").toInt()reads its value as a number.currentPatterngets updated.server.begin()— start listening for connections.
loop(): the heartbeat — runs forever
void loop() {
  server.handleClient();
Must be called every frame. Checks if any phone is connecting or has tapped a button. Without this, the web server would freeze.
  if (currentPattern == 4) {
    if (millis() - lastPatternChange > PATTERN_DURATION) {
      static int autoIndex = 0;
      autoIndex = (autoIndex + 1) % 4;
      currentPattern = autoIndex;
      lastPatternChange = millis();
    }
  }
Pattern 4 = Auto Cycle mode. If 30 seconds have passed, advance autoIndex through 0–3 (% 4 wraps it), and set currentPattern to that. static int autoIndex remembers which pattern was last shown across frames.
  switch (currentPattern) {
    case 0: patternTwinkle();   break;
    case 1: patternRainbow();   break;
    case 2: patternCandyCane(); break;
    case 3: patternSnowfall();  break;
    case 4: patternTwinkle();   break;
  }
  FastLED.show();
  delay(30);
}
switch is a menu. Jump to the right pattern. FastLED.show() sends the frame to the strip. delay(30) = about 33 frames per second.
The whole thing in one sentence
When powered on, the ESP32 connects to WiFi and starts a tiny website (setup). Then it loops forever: check for button taps from your phone, draw the current pattern, send it to the strip — 33 times per second.
First thing to try: open Serial Monitor after uploading. Wait for the IP address to appear, type it into your phone browser, and tap each button to confirm all 4 patterns work.
Check: Open the Serial Monitor (Tools → Serial Monitor, set to 115200 baud). Wait for the message “Connected! Open this in your phone browser: http://192.168.x.x”. That IP address is what you type into your phone.
Step 3: Connect and pick a pattern
Time: ~5 minutes
- Plug the 5V power supply into the LED strip.
- On your phone, open any browser.
- Make sure your phone is on the same WiFi network as the ESP32.
- Type the IP address from the Serial Monitor (e.g.
http://192.168.1.42). - You’ll see a dark page with 5 coloured buttons. Tap one.
Check: The LEDs should change immediately when you tap. If nothing happens after 2 seconds, tap again — the first tap sometimes takes a moment on initial connection.
Step 4: Hang it on the tree!
Time: ~15 minutes
- Wrap the strip around your tree in a loose spiral — one LED roughly every 5cm works well.
- Use small cable clips or twist-ties every few LEDs to keep the strip from sliding down overnight.
- Tuck the ESP32 and power supply in a small basket or box at the base of the tree.
- Set to Auto Cycle before bed. Wake up to a different pattern every 30 seconds, all night.
What just happened (what you learned)
Congratulations — you just built your first IoT device. Here’s what’s actually going on:
-
FastLED controls addressable LEDs — each LED has a tiny chip that listens for colour commands, like a string of smart bulbs where you tell each one exactly what colour to be.
-
GPIO pins are the ESP32’s hands — numbered output ports that send or receive electrical signals. GPIO 2 (C6: GPIO 8) sends the data signal that tells the strip what to show each frame.
-
The 330-ohm resistor is a speed bump for electrical signals. It prevents a tiny voltage spike from frying the first LED in the chain when the ESP32 powers on.
-
The web server on the ESP32 means your board is literally a tiny website. Your phone’s browser connects to it the same way it connects to any website — just over home WiFi instead of the internet.
-
fadeToBlackBy()dims every LED a small amount each frame, so old colours fade out automatically. This is how you get smooth animations without tracking which LEDs you last touched.
Level Up
Add a new pattern without rewriting everything: The code is already set up to add more patterns. Write a new function like patternFireplace(), add it to the switch statement as case 5, and change % 4 to % 5 in the auto-cycle.
Make the tree dim itself at bedtime: The ESP32 is already on WiFi. Add configTime() to get the real time from the internet, then check the hour in loop() — if it’s past 10pm, reduce BRIGHTNESS to 20. The tree dims automatically.
Remember your last pattern after a power cut: Use the Preferences library (built into ESP32 Arduino) to save currentPattern to non-volatile storage every time it changes. Your tree will remember where you left it.
Troubleshooting
| Problem | Fix |
|---|---|
| Serial Monitor shows dots forever, no IP | Check WiFi name and password (case-sensitive). Make sure your router is 2.4GHz — ESP32 doesn’t support 5GHz. |
| Phone can’t reach the IP address | Your phone must be on the same WiFi network as the ESP32. Mobile data won’t work here. |
| LEDs don’t light up at all | Check that the 5V supply is plugged in. Check that GND is shared between the ESP32 and the power supply. |
| First LED is wrong colour or stays on | Make sure the DIN wire goes through the 330-ohm resistor before reaching GPIO 2 (C6: GPIO 8). |
| Pattern changes but LEDs look wrong | Set COLOR_ORDER GRB (not RGB) — most WS2812B strips use GRB order. |
| Upload fails in Arduino IDE | Make sure you selected the correct board (ESP32S3 Dev Module) and the correct COM port. |