Parent info
Parts you need
Affiliate links — we may earn a small commission
Try this circuit in your browser!
Run the code, press the buttons and watch what happens — before you buy any parts. No account needed.
Open in Simulator →The whole street sees your countdown.
Imagine this: your neighbours walk past your house on a dark December evening. They stop. On your window, a grid of LEDs is showing snowflakes drifting downward, then Santa’s tiny silhouette sliding across the display. Then: a red 8, a green 2. 82 days until Christmas.
Your window became a neighbourhood decoration. You made it.
That’s what we’re building. In about 1.5 hours. For around $28.
What you’ll need
| Part | What it does | Price |
|---|---|---|
| ESP32-S3 Dev Board | Runs the animations and syncs the time from the internet | ~$12 |
| WS2812B 8x32 LED Matrix Panel | 256 individually addressable LEDs in an 8-row, 32-column grid | ~$8 |
| 5V 2A USB Power Brick | Powers the panel (256 LEDs at full white need up to 5A — use a real supply) | ~$5 |
| Double-sided foam tape | Mounts the panel to the inside of your window glass | ~$2 |
| Jumper wires | 3 wires total to connect everything | ~$2 |
You also need: your home WiFi name and password (for the NTP clock sync).
Total: ~$28 | Time: ~1.5 hours | Difficulty: ●○○○○
Warning: The panel needs to face outward through the glass. Face the LED side toward the window and the ESP32 side toward the room. Neighbours see light; you see the back.
How it works (60 seconds)
Think of it like a newspaper made of light — a grid of 256 tiny lights you can individually turn on and off.
The 8x32 panel has its rows wired in a serpentine (zigzag) pattern: row 0 goes left-to-right, row 1 goes right-to-left, row 2 left-to-right again, and so on. This saves wire, but it means you can’t just count “LED number 33 is column 1 row 1.” You need a translation function — that’s what xy(x, y) does in the code.
The countdown uses NTP — your ESP32 asks a time server on the internet for the exact current date, calculates how many days until December 25, and displays that number as large digits. It stays accurate even after a power cut.
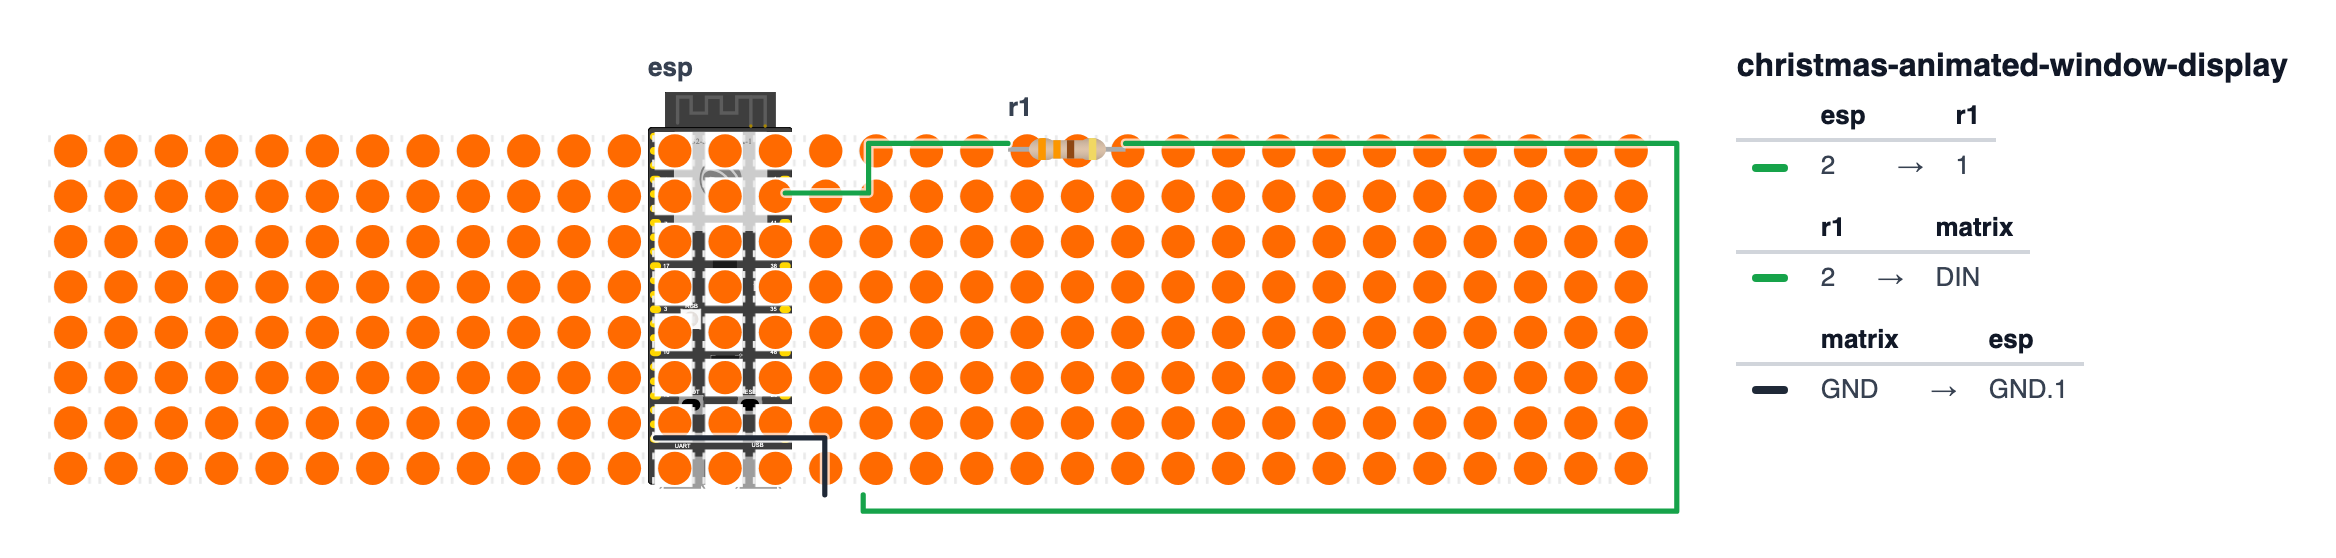
Step 0: Find the DIN end of your panel
Time: ~2 minutes
Your 8x32 panel has two connector ends — one labeled IN (or DIN) and one labeled OUT (or DOUT). You MUST connect to the IN end.
Look at the back of the panel. Find the connector where the arrows on the PCB are pointing away from it. That’s the input side.
Check: The panel’s PCB usually has a small arrow printed on it showing data flow direction. Data enters at IN, travels across the panel, exits at OUT. You want IN.
Step 1: Wire it up
Time: ~5 minutes
Three wires. That’s it.
LED panel power (from USB power brick, NOT from ESP32):
- Panel VCC → power supply +5V — red wire
- Panel GND → power supply GND + ESP32 GND — black wire
LED panel data: 3. Panel DIN → one leg of 330-ohm resistor → ESP32 GPIO 2 — any colour wire
Check: 256 LEDs at full white draw up to 5A. A typical USB port or the ESP32 board cannot handle that. Connect VCC directly to your 5V power brick’s output terminals or a proper power supply. The ESP32’s USB-C is for programming only.
Step 2: Upload the code
Time: ~10 minutes
The big picture first. This program turns the ESP32 into a neighbourhood window display. The ESP32 is the brain — a tiny computer smaller than a matchbox. The LED matrix is a grid of 256 tiny lights arranged in 8 rows and 32 columns, like a miniature billboard. The program shows four scenes: snowflakes falling, Santa’s sleigh sliding past, more snow, then a live countdown to Christmas. It knows the exact date because it asks an internet time server — like a clock that never needs setting.
A program is like a recipe. The computer reads it top to bottom and does exactly what’s written. Fill in your WiFi name and password at the top of this sketch, then upload it.
// ========== CHOOSE YOUR BOARD ==========
// Uncomment the line for YOUR board:
#define BOARD_S3    // ESP32-S3-DevKitC-1
//#define BOARD_C6  // ESP32-C6-DevKitC-1
// ========================================

#ifdef BOARD_S3
  #define PIN_NEOPIXEL         2
#endif
#ifdef BOARD_C6
  #define PIN_NEOPIXEL         8
#endif

#include <FastLED.h>
#include <WiFi.h>
#include "time.h"

#define LED_PIN    PIN_NEOPIXEL
#define NUM_LEDS   256
#define MATRIX_W   32
#define MATRIX_H   8
#define BRIGHTNESS 40

const char* ssid       = "YourWiFiName";
const char* password   = "YourWiFiPassword";
const char* ntpServer  = "pool.ntp.org";

CRGB leds[NUM_LEDS];

int xy(int x, int y) {
  if (y < 0 || y >= MATRIX_H || x < 0 || x >= MATRIX_W) return 0;
  if (y % 2 == 0) return y * MATRIX_W + x;
  else            return y * MATRIX_W + (MATRIX_W - 1 - x);
}

const uint8_t font5x3[][5] = {
  {0b111,0b101,0b101,0b101,0b111},
  {0b010,0b110,0b010,0b010,0b111},
  {0b111,0b001,0b111,0b100,0b111},
  {0b111,0b001,0b111,0b001,0b111},
  {0b101,0b101,0b111,0b001,0b001},
  {0b111,0b100,0b111,0b001,0b111},
  {0b111,0b100,0b111,0b101,0b111},
  {0b111,0b001,0b011,0b010,0b010},
  {0b111,0b101,0b111,0b101,0b111},
  {0b111,0b101,0b111,0b001,0b111},
};

void drawDigit(int digit, int xOffset, CRGB color) {
  for (int row = 0; row < 5; row++) {
    for (int col = 0; col < 3; col++) {
      if (font5x3[digit][row] & (1 << (2 - col))) {
        leds[xy(xOffset + col, row + 1)] = color;
      }
    }
  }
}

struct Flake { int x, y; uint8_t bright; bool active; };
Flake flakes[20];

void sceneSnowfall() {
  fadeToBlackBy(leds, NUM_LEDS, 25);
  for (int i = 0; i < 20; i++) {
    if (!flakes[i].active && random8() < 15) {
      flakes[i] = { (int)random8(MATRIX_W), 0, random8(180, 255), true };
    }
  }
  for (int i = 0; i < 20; i++) {
    if (flakes[i].active) {
      leds[xy(flakes[i].x, flakes[i].y)] = CRGB(flakes[i].bright, flakes[i].bright, 255);
      flakes[i].y++;
      if (flakes[i].y >= MATRIX_H) flakes[i].active = false;
    }
  }
}

const uint8_t santaBitmap[8] = {
  0b00001100,
  0b00011110,
  0b11111100,
  0b01111110,
  0b00000000,
  0b00000000,
  0b00000000,
  0b00000000,
};

void sceneSanta() {
  static int santaX = MATRIX_W;
  FastLED.clear();
  for (int row = 0; row < MATRIX_H; row++) {
    for (int col = 0; col < 8; col++) {
      if (santaBitmap[row] & (1 << (7 - col))) {
        int x = santaX + col;
        if (x >= 0 && x < MATRIX_W)
          leds[xy(x, row)] = CRGB(255, 50, 0);
      }
    }
  }
  santaX--;
  if (santaX < -8) santaX = MATRIX_W;
}

int daysUntilChristmas() {
  struct tm timeinfo;
  if (!getLocalTime(&timeinfo)) return -1;
  if (timeinfo.tm_mon + 1 == 12 && timeinfo.tm_mday == 25) return 0;
  int christmas = 359;
  int today     = timeinfo.tm_yday;
  int diff      = christmas - today;
  if (diff < 0) diff += 365;
  return diff;
}

void sceneCountdown() {
  FastLED.clear();
  int days = daysUntilChristmas();
  if (days == 0) { sceneSanta(); return; }
  if (days < 0)  { sceneSnowfall(); return; }
  int tens = days / 10;
  int ones = days % 10;
  drawDigit(tens, 2, CRGB::Red);
  drawDigit(ones, 8, CRGB::Green);
  leds[xy(13, 0)] = CRGB::Yellow;
  leds[xy(14, 1)] = CRGB::Yellow;
  leds[xy(13, 2)] = CRGB::Yellow;
}

void setup() {
  Serial.begin(115200);
  FastLED.addLeds<WS2812B, LED_PIN, GRB>(leds, NUM_LEDS);
  FastLED.setBrightness(BRIGHTNESS);
  FastLED.clear();
  FastLED.show();

  WiFi.begin(ssid, password);
  while (WiFi.status() != WL_CONNECTED) delay(500);
  configTime(0, 0, ntpServer);
  Serial.println("Window display ready! Countdown should appear in a few seconds.");
}

void loop() {
  static int scene = 0;
  static unsigned long lastSwitch = 0;
  const unsigned long SCENE_MS = 8000;

  if (millis() - lastSwitch > SCENE_MS) {
    scene = (scene + 1) % 4;
    lastSwitch = millis();
    FastLED.clear();
  }

  switch (scene) {
    case 0: sceneSnowfall();  break;
    case 1: sceneSanta();     break;
    case 2: sceneSnowfall();  break;
    case 3: sceneCountdown(); break;
  }

  FastLED.show();
  delay(80);
}
Line-by-line: what every line does and why
Lines 1–3: Borrowing ready-made instruction books
#include <FastLED.h>
#include <WiFi.h>
#include "time.h"
#include means “grab this instruction book.” Someone already wrote the rules for controlling LEDs, connecting to WiFi, and reading the time — we borrow all three.
- FastLED is the book for controlling smart LED strips and panels.
- WiFi lets the ESP32 connect to your home internet.
- time.h is the book for reading clocks and dates.
Lines 5–9: Setting up named numbers
#define LED_PIN    2
#define NUM_LEDS   256
#define MATRIX_W   32
#define MATRIX_H   8
#define BRIGHTNESS 40
#define gives a number a name — like writing “MATRIX_W” on a sticky note stuck to the number 32. Instead of writing 32 everywhere and forgetting what it means, we write MATRIX_W. The display is 32 columns wide and 8 rows tall. Those are pixels — tiny dots of light. 32 × 8 = 256 total LEDs.
Lines 11–13: Your WiFi and time server
const char* ssid       = "YourWiFiName";
const char* password   = "YourWiFiPassword";
const char* ntpServer  = "pool.ntp.org";
const char* stores a piece of text — like a sticky note with writing on it. const means “don’t change this.” Replace YourWiFiName with your real WiFi name. pool.ntp.org is a free time server on the internet — like calling a friend who always knows the exact time.
Line 15: The LED array — one box per light
CRGB leds[NUM_LEDS];Think of this as 256 boxes in a row, numbered 0 to 255. Each box holds one colour (red, green, blue mixed together). When we write leds[5] = CRGB::Red, we’re putting red into box number 5. CRGB stands for “Colour — Red, Green, Blue.”
Lines 17–21: The zigzag translator
int xy(int x, int y) {
  if (y < 0 || y >= MATRIX_H || x < 0 || x >= MATRIX_W) return 0;
  if (y % 2 == 0) return y * MATRIX_W + x;
  else            return y * MATRIX_W + (MATRIX_W - 1 - x);
}
This is a function — a mini recipe with its own name. Instead of thinking about LED numbers (0 to 255), we tell it “column 5, row 3” and it figures out the right LED number automatically.
Why is this needed? The panel wires its rows in a zigzag: row 0 goes left-to-right (LEDs 0–31), row 1 goes right-to-left (LEDs 32–63), row 2 left-to-right again. It’s like a snake. The math handles the flip for odd rows.
int x, int y— the function receives two numbers: column and row.intmeans a whole number.if (y < 0 || ...)—ifmeans “if.” The||means OR. This line asks: “Is the position outside the grid?” If yes, return 0 (safe fallback).y % 2 == 0—%means remainder. If row ÷ 2 has no remainder, the row is even (left-to-right).==means “is equal to?”- Even rows:
y * MATRIX_W + x— row number times 32, plus column. - Odd rows: the x is flipped —
MATRIX_W - 1 - xcounts backwards.
Lines 23–34: The digit font — pixels as 1s and 0s
const uint8_t font5x3[][5] = {
  {0b111,0b101,0b101,0b101,0b111},
  ...
};
Each digit (0–9) is described as 5 rows of 3 dots — like graph paper. 0b111 means “all three dots on.” 0b101 means “first on, middle off, last on.” The b tells the computer we’re writing in binary (only 1s and 0s). Together, five rows describe one digit shape. Row by row it’s like this for zero:
###   ← 0b111
# #   ← 0b101
# #   ← 0b101
# #   ← 0b101
### ← 0b111drawDigit(): stamping a digit onto the display
void drawDigit(int digit, int xOffset, CRGB color) {
  for (int row = 0; row < 5; row++) {
    for (int col = 0; col < 3; col++) {
      if (font5x3[digit][row] & (1 << (2 - col))) {
        leds[xy(xOffset + col, row + 1)] = color;
      }
    }
  }
}
This function draws one digit on the panel, starting at column xOffset.
for (int row = 0; row < 5; row++)— loop that counts row from 0 to 4.intis a whole number.++means “add 1 each time.”- The inner
forloop counts columns 0 to 2. font5x3[digit][row] & (1 << (2 - col))— this checks whether one specific dot in the font should be lit.&is a bitwise AND — like asking “is this particular bit a 1?”leds[xy(...)] = color— light up that LED with the chosen colour.
sceneSnowfall(): falling snowflakes
struct Flake { int x, y; uint8_t bright; bool active; };
Flake flakes[20];
struct is like a form with four fields: x position, y position, brightness, and whether it’s active. We have 20 snowflakes, each stored in a Flake.
void sceneSnowfall() {
  fadeToBlackBy(leds, NUM_LEDS, 25);
fadeToBlackBy dims every LED slightly — like turning the lights down a notch. This makes old snowflake positions fade away naturally.
  for (int i = 0; i < 20; i++) {
    if (!flakes[i].active && random8() < 15) {
      flakes[i] = { (int)random8(MATRIX_W), 0, random8(180, 255), true };
    }
  }
Loop through all 20 flakes. If a flake is not active (! means NOT), and a random number is small enough (about 1-in-17 chance), start a new flake at the top row (y=0) at a random column. random8() rolls a number between 0 and 255.
  for (int i = 0; i < 20; i++) {
    if (flakes[i].active) {
      leds[xy(flakes[i].x, flakes[i].y)] = CRGB(flakes[i].bright, flakes[i].bright, 255);
      flakes[i].y++;
      if (flakes[i].y >= MATRIX_H) flakes[i].active = false;
    }
  }
}
For each active flake: light up its LED in pale blue-white (high blue, equal red and green = white tint). Then move it down one row (y++ adds 1). If it fell off the bottom, mark it inactive so a new one can spawn.
sceneSanta(): the sleigh sliding across
const uint8_t santaBitmap[8] = {
  0b00001100, 0b00011110, 0b11111100, 0b01111110,
  0b00000000, 0b00000000, 0b00000000, 0b00000000,
};
This is Santa’s silhouette — 8 rows of 8 bits each. 1 = lit pixel, 0 = dark. The shape appears in the top 4 rows.
void sceneSanta() {
  static int santaX = MATRIX_W;
static means “remember this variable between calls.” santaX starts at 32 (off the right edge) and counts down. Each call draws Santa shifted one column left.
  santaX--;
  if (santaX < -8) santaX = MATRIX_W;
}
-- means “subtract 1.” When Santa slides completely off the left edge (position < -8), reset to the right edge and start over.
daysUntilChristmas(): asking the internet what day it is
int daysUntilChristmas() {
  struct tm timeinfo;
  if (!getLocalTime(&timeinfo)) return -1;
getLocalTime() asks the ESP32 for the current date and time (which it got from the internet). If it’s not ready yet, return -1 as a signal.
if (timeinfo.tm_mon + 1 == 12 && timeinfo.tm_mday == 25) return 0;tm_mon is the month (0–11, so we add 1 to get 1–12). tm_mday is the day. If today is December 25 — return 0. It’s Christmas!
  int diff = christmas - today;
  if (diff < 0) diff += 365;
  return diff;
}
Subtract today’s day-of-year from December 25’s day number. If the result is negative (Christmas was earlier this year), add 365 to count forward to next year’s Christmas.
setup(): the morning routine — runs once on power-on
void setup() {
  Serial.begin(115200);
  FastLED.addLeds<WS2812B, LED_PIN, GRB>(leds, NUM_LEDS);
  FastLED.setBrightness(BRIGHTNESS);
  FastLED.clear();
FastLED.show();Serial.begin(115200)— turns on the “phone line” to your computer. 115200 is the speed.FastLED.addLeds<...>— tells FastLED “I have a WS2812B strip, it’s connected to pin 2, colours are in GRB order, and there are 256 of them.”FastLED.setBrightness(40)— sets overall brightness. 255 = maximum. 40 is gentle — this faces a window.FastLED.clear()— turn off all LEDs.FastLED.show()— actually send the colours to the strip. Think of it as:.clear()changes your plan,.show()executes it.
  WiFi.begin(ssid, password);
  while (WiFi.status() != WL_CONNECTED) delay(500);
configTime(0, 0, ntpServer);WiFi.begin()starts connecting.whilemeans “keep doing this until…” — it waits until connected.configTime(0, 0, ntpServer)— contacts the time server. First0is your timezone offset in seconds. Change to3600for UTC+1,-18000for UTC-5.
loop(): the heartbeat — runs forever
void loop() {
  static int scene = 0;
  static unsigned long lastSwitch = 0;
  const unsigned long SCENE_MS = 8000;
static variables remember their value between loops. scene tracks which scene is currently showing (0–3). lastSwitch remembers when we last changed scenes. unsigned long is a box that holds very large numbers — milliseconds since power-on.
  if (millis() - lastSwitch > SCENE_MS) {
    scene = (scene + 1) % 4;
    lastSwitch = millis();
    FastLED.clear();
  }
millis() is a stopwatch — counts milliseconds since power-on. If more than 8000ms (8 seconds) have passed, advance to the next scene. % 4 means after scene 3 it wraps back to 0 — like a clock.
  switch (scene) {
    case 0: sceneSnowfall();  break;
    case 1: sceneSanta();     break;
    case 2: sceneSnowfall();  break;
    case 3: sceneCountdown(); break;
  }
  FastLED.show();
  delay(80);
}
switch is like a menu. The ESP32 checks which scene number is current, jumps to that option, runs the scene function, then breaks out. FastLED.show() sends the new colours to the panel. delay(80) waits 80 milliseconds — giving about 12 frames per second, which looks good from outside.
The whole thing in one sentence
When powered on, the display connects to WiFi and gets the date (setup). Then it loops forever: every 8 seconds it switches to the next scene — snow, Santa, snow, countdown — and sends that picture to the LED panel.
First thing to try: change SCENE_MS from 8000 to 2000 and watch the scenes flip fast. Then change it back for a real window display.
Check: Open Serial Monitor (115200 baud). You should see “Window display ready!” — the NTP sync takes a few seconds. Wait for it before checking the countdown.
Step 3: Mount on the window
Time: ~10 minutes
- Clean the inside of your window with a dry cloth. Dust and finger oils are why things fall off glass.
- Attach double-sided foam tape around the back edge of the panel.
- Press the panel against the glass, LED side facing the glass (outward toward the street).
- Hold for 30 seconds.
- Tuck the ESP32 and power brick behind the curtain.
Check: Walk outside and look at the window. You should see the animations clearly from the pavement. If the brightness is too low, increase
BRIGHTNESSin the code (max 40 for window display — neighbours don’t need to be blinded).
Step 4: Verify the countdown
Time: ~2 minutes
The countdown shows two large digits. If today is October 6, 2026, the display should show 80 (80 days until Christmas).
Check: On Christmas morning (December 25), the countdown switches to the Santa animation automatically. No changes needed.
Timezone:
configTime(0, 0, ntpServer)assumes UTC. Change the first0to your timezone offset in seconds:3600for UTC+1 (Central Europe),-18000for UTC-5 (US Eastern),28800for UTC+8 (Singapore).
What just happened (what you learned)
-
A serpentine LED matrix wires rows in alternating directions to save wire. The
xy()function translates (column, row) grid coordinates into the correct LED index automatically. -
NTP (Network Time Protocol) lets the ESP32 ask a server on the internet for the exact current time.
configTime()sets it up in two lines andgetLocalTime()gives you year, month, day, and hour whenever you need them. -
A bitmap font stores letter shapes as rows of 1s and 0s. Each 1 means “light this pixel”, each 0 means leave it dark. The
font5x3array stores each digit as 5 rows of 3-bit patterns. -
tm_ydayis a field in the C time struct that counts the day of the year from 0 to 364. Subtracting today’stm_ydayfrom December 25’s day number gives you days-until-Christmas with a single subtraction.
Level Up
Add scrolling text: Before the countdown scene, scroll “MERRY CHRISTMAS” across the display. Key insight: subtract an incrementing scrollOffset variable from each character’s x coordinate every frame. When the offset exceeds the total text width, reset to 0.
Make the Santa sprite wider: The current Santa is 8 pixels wide. Extend it to 16 columns using two bytes per row. A wider sprite scrolls more impressively across the 32-column display.
Brightness sensor: Add an LDR (light sensor) to an analog pin and automatically lower BRIGHTNESS when it’s already light outside. The display adapts to time of day on its own.
Troubleshooting
| Problem | Fix |
|---|---|
| Countdown shows wrong number of days | Set your timezone offset in configTime(). See the note above. |
| Animations look mirrored on every other row | You have the xy() function wrong, or the panel is mounted upside-down. Try flipping the panel 180 degrees before mounting. |
| Panel falls off the window | Clean the glass more thoroughly. Make sure the glass is at room temperature — cold glass weakens tape adhesion. |
| Display is too dim to see from outside | Increase BRIGHTNESS from 40 to 60. Don’t go higher than 80 — it draws too much current. |
| “Window display ready!” appears but countdown shows snow | NTP hasn’t synced yet. Wait 30 seconds, it will update. Check your WiFi credentials. |
| Half the panel is dark | Your DIN wire is connected to the OUT end, not the IN end. Check the arrows on the panel PCB. |