Parent info
Parts you need
Affiliate links — we may earn a small commission
Try this circuit in your browser!
Run the code, press the buttons and watch what happens — before you buy any parts. No account needed.
Open in Simulator →You move your hand. The air sings.
Imagine this: two small boxes on your desk. You bring your right hand near one and slowly move it higher — a tone rises from low to high, gliding through musical notes. The LED strip glows red for low notes, shifts through orange, yellow, green, then deep violet for the highest note. You move your left hand closer to the other box — the volume swells.
You are playing music without touching anything. Like a wizard. Like Leon Theremin in 1920.
This version costs $18 and takes 1.5 hours to build.
What you’ll need
| Part | What it does | Price |
|---|---|---|
| ESP32-S3-DevKitC-1 | Brain + audio output. The sound comes out of GPIO 46 (C6: GPIO 10). | ~$8 |
| 2× HC-SR04 ultrasonic sensors | Measure how far your hands are. One controls pitch, one controls volume. | ~$4 |
| WS2812B LED strip (30 LEDs) | Glows the color of the note you’re playing — red for low, violet for high. | ~$4 |
| 3.5mm audio jack (TRS) | Headphone or amp output. | ~$1 |
| 100Ω resistor | Protects the audio pin. | cents |
| Voltage divider resistors (1kΩ + 2kΩ × 2) | HC-SR04 ECHO pins output 5V — these bring it down to 3.3V safe for the ESP32. | cents |
Total: ~$18 | Time: ~1.5 hours | Difficulty: ●●○○○
Important: The sound comes out of GPIO 46 (C6: GPIO 10). The ESP32-S3 and ESP32-C6 have no hardware DAC, so the code uses fast PWM instead (
ledcWrite): it switches the pin on and off 25,000 times per second, and the 100Ω resistor plus your headphones smooth that into sound.
How it works (60 seconds)
Think of it as echolocation — like a bat.
The HC-SR04 sends an invisible burst of sound at 40,000 Hz (way above human hearing) and listens for the echo. The time between “send” and “receive” divided by the speed of sound gives the distance to your hand.
One sensor faces up — your right hand height (5–50cm above it) maps to musical pitch. Close = high note. Far = low note. The other sensor faces sideways — your left hand distance controls volume.
The ESP32 runs a hardware timer 44,100 times per second, generating the next audio sample each time. It writes that sample to the audio pin as a fast PWM signal, which acts like a voltage between 0 and 3.3V. That voltage drives the speaker.
The clever part: instead of jumping between notes, the code uses exponential smoothing — each sample, the actual pitch moves a little toward the target. This gives the characteristic gliding sound of a real theremin.
Step 0: Build the voltage dividers
Time: ~10 minutes
The HC-SR04 ECHO pin outputs 5V, but the ESP32 GPIO pins only handle 3.3V. You must protect each ECHO pin with a voltage divider before connecting.
For each HC-SR04 (build two):
- Connect ECHO pin → 1kΩ resistor → ESP32 GPIO
- Connect a 2kΩ resistor from that junction to GND
This creates a resistor network: 5V × (2kΩ / (1kΩ + 2kΩ)) = 3.33V — safe for the ESP32.
Check: Verify with a multimeter: ECHO wire at the ESP32 end should read ~3.3V when the sensor is active. If you skip voltage dividers, you risk permanently damaging your ESP32’s GPIO input.
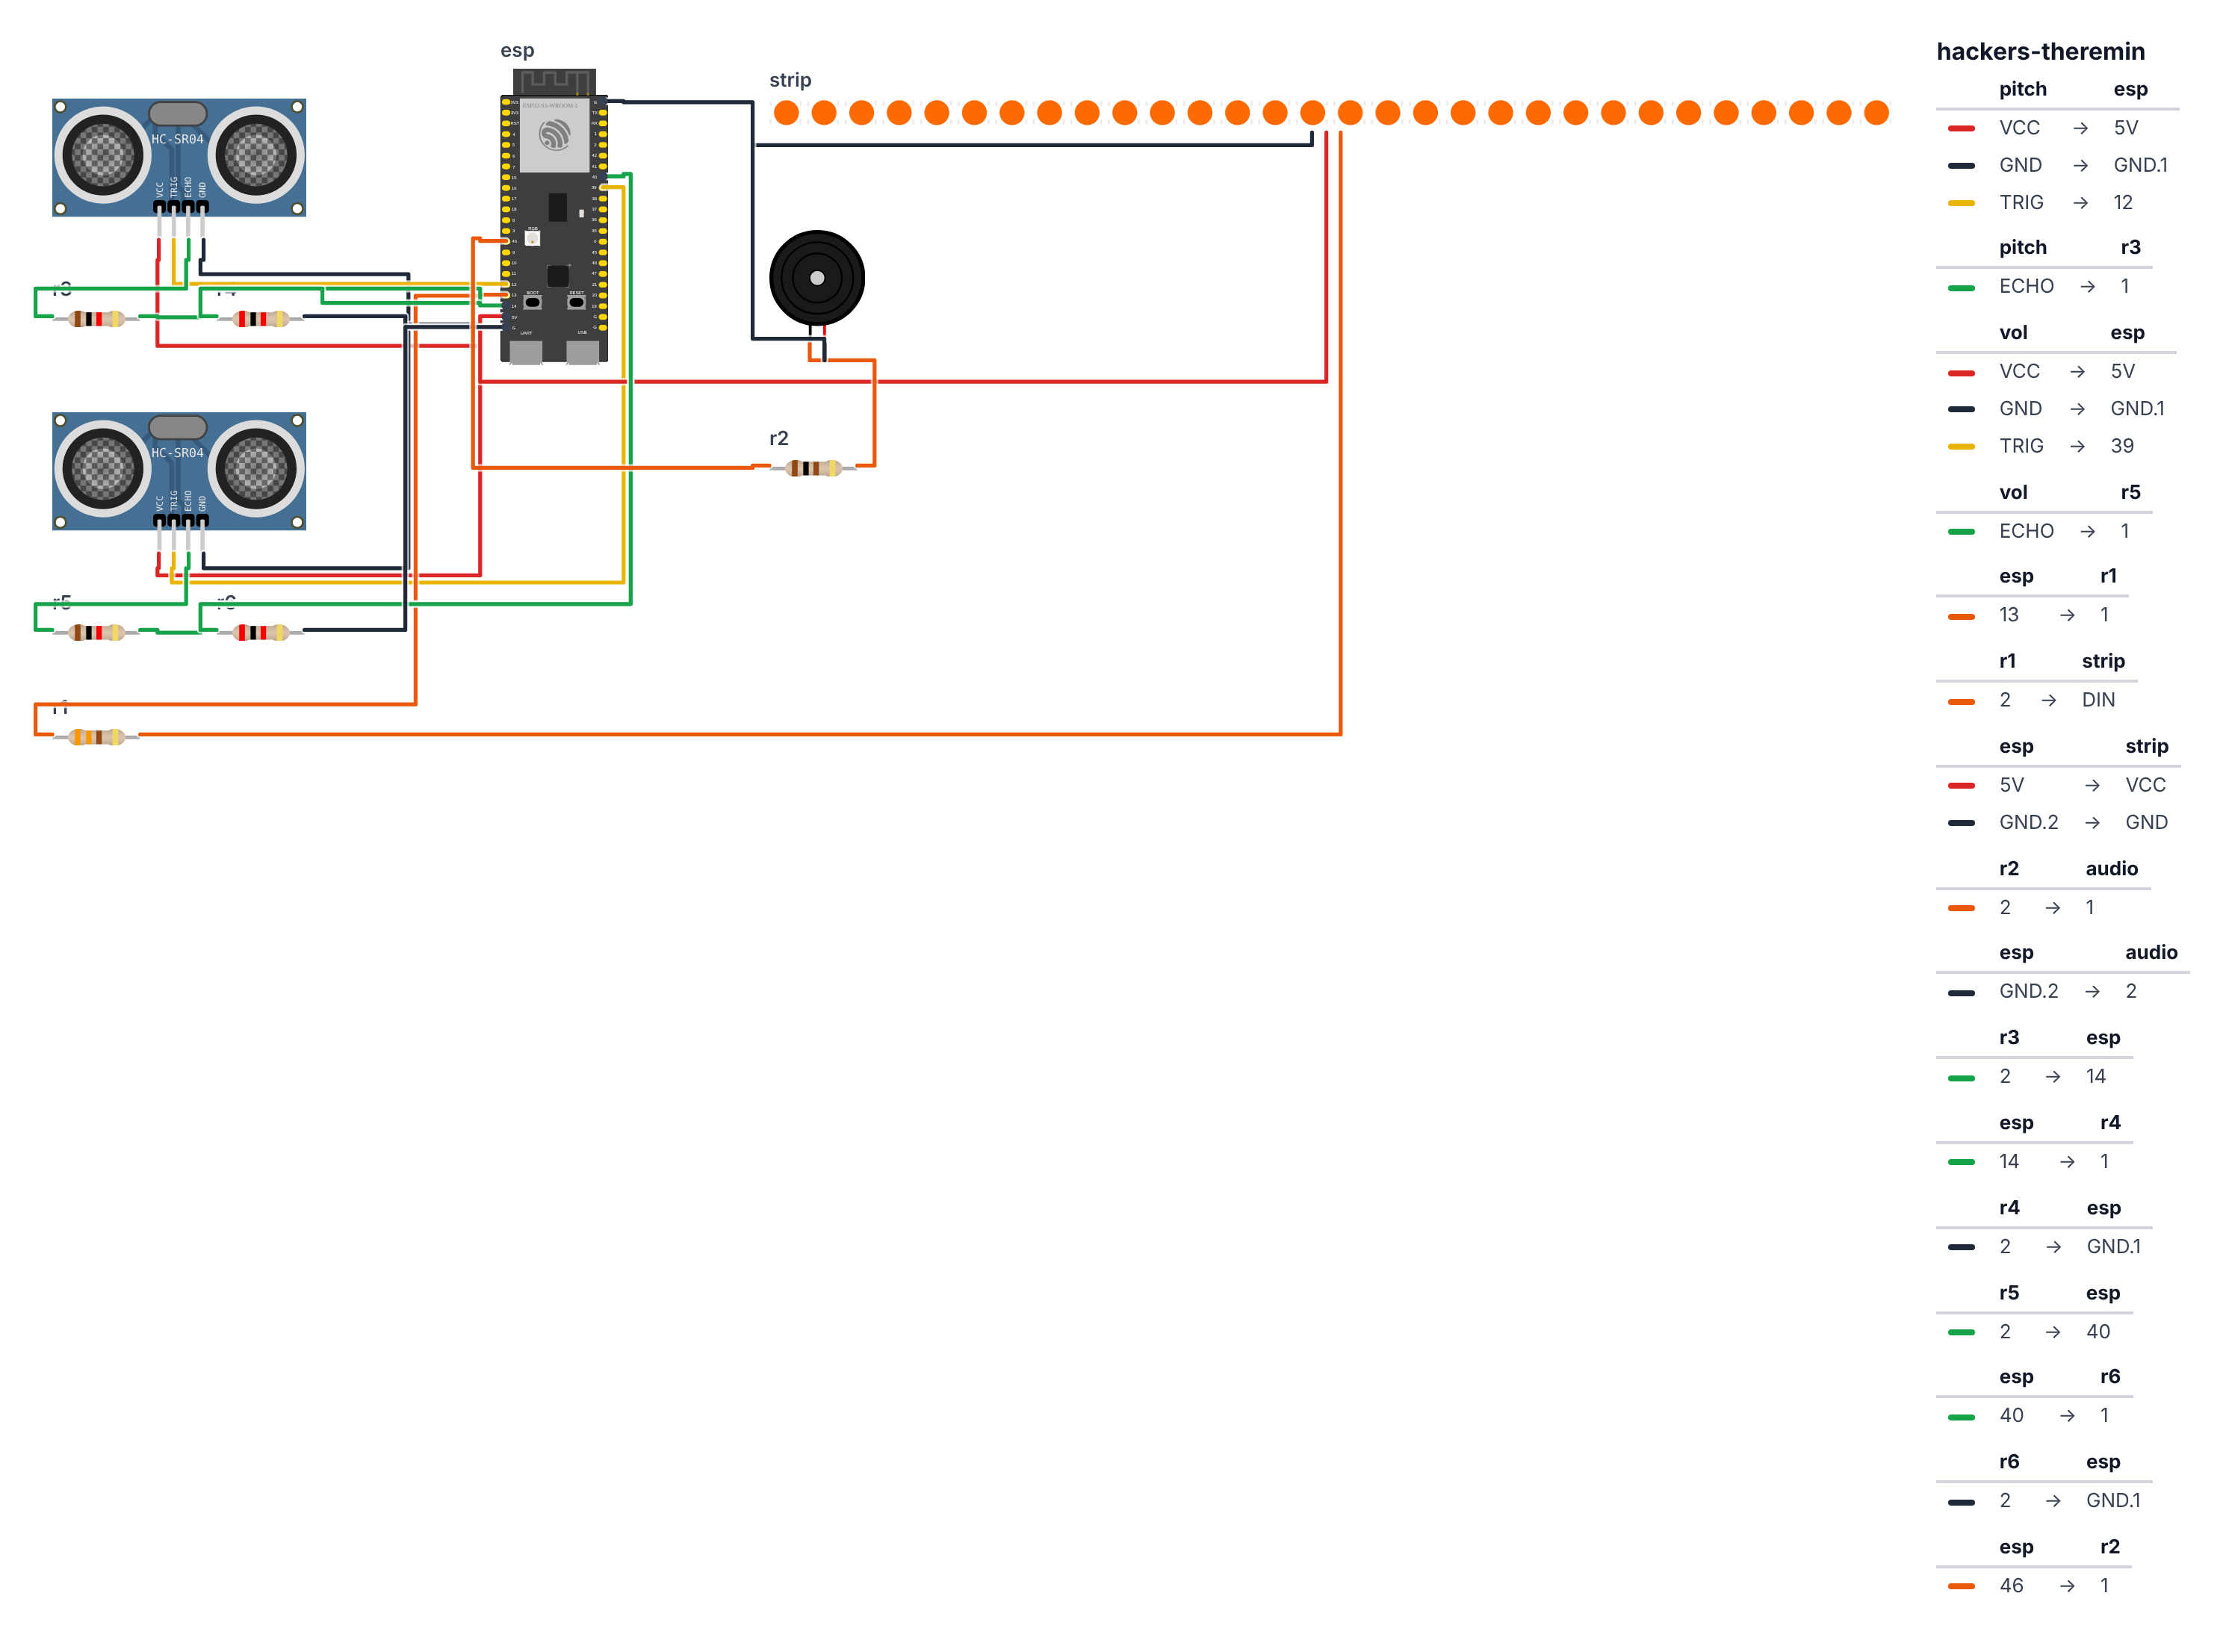
Step 1: Wire it up
Time: ~15 minutes
HC-SR04 #1 — Pitch sensor (faces up):
- TRIG → GPIO 12 (C6: GPIO 11)
- ECHO → 1kΩ → GPIO 14 (C6: GPIO 2) (with 2kΩ to GND at that same GPIO)
- VCC → 5V
- GND → GND
HC-SR04 #2 — Volume sensor (faces sideways): 5. TRIG → GPIO 39 (C6: GPIO 22) 6. ECHO → 1kΩ → GPIO 40 (C6: GPIO 23) (with 2kΩ to GND at that same GPIO) 7. VCC → 5V 8. GND → GND
WS2812B LED Strip (3 wires): 9. LED DIN → 330Ω → GPIO 13 (C6: GPIO 5) 10. LED VCC → 5V 11. LED GND → GND
Audio Output (2 wires): 12. GPIO 46 (C6: GPIO 10) → 100Ω → jack TIP 13. GND → jack SLEEVE
Check: Count your voltage dividers — you need 2 of them, one per ECHO pin. Both HC-SR04s powered from 5V, not 3.3V.
Step 2: Flash the code
Time: ~10 minutes
Install in Arduino IDE Library Manager:
- FastLED — WS2812B LED control
The big picture first. Two ultrasonic sensors act like bat ears — each one sends out a burst of 40,000 Hz sound (way above human hearing), waits for the echo, and measures the time. Shorter time = closer hand. Your right hand’s height above one sensor picks the musical note. Your left hand’s distance from the other sensor controls the volume. The ESP32 converts those distances into a frequency and an amplitude, then a hardware timer generates the audio at 44,100 samples per second. The clever trick is exponential smoothing: instead of jumping instantly to the new frequency when your hand moves, the code moves only 5% of the way toward the target each audio sample. This gives the characteristic smooth glide of a real theremin — notes slide into each other rather than clicking. The LED strip shows the pitch as a color: low notes glow red, high notes glow violet, with the whole rainbow in between.
// ========== CHOOSE YOUR BOARD ==========
// Uncomment the line for YOUR board:
#define BOARD_S3    // ESP32-S3-DevKitC-1
//#define BOARD_C6  // ESP32-C6-DevKitC-1
// ========================================

#ifdef BOARD_S3
  #define PIN_TRIG_PITCH       12
  #define PIN_ECHO_PITCH       14
  #define PIN_TRIG_VOL         39
  #define PIN_ECHO_VOL         40
  #define PIN_AUDIO            46
  #define PIN_NEOPIXEL         13
#endif
#ifdef BOARD_C6
  #define PIN_TRIG_PITCH       11
  #define PIN_ECHO_PITCH       2
  #define PIN_TRIG_VOL         22
  #define PIN_ECHO_VOL         23
  #define PIN_AUDIO            10
  #define PIN_NEOPIXEL         5
#endif

#include <FastLED.h>
#include <math.h>

#define TRIG_PITCH  PIN_TRIG_PITCH
#define ECHO_PITCH  PIN_ECHO_PITCH
#define TRIG_VOL    PIN_TRIG_VOL
#define ECHO_VOL    PIN_ECHO_VOL
#define AUDIO_PIN   PIN_AUDIO
#define LED_PIN     PIN_NEOPIXEL
#define NUM_LEDS    30

CRGB leds[NUM_LEDS];

volatile float targetFreq  = 220.0f;
volatile float targetAmp   = 0.0f;
volatile float audioPhase  = 0.0f;
float          smoothFreq  = 220.0f;
float          smoothAmp   = 0.0f;

hw_timer_t* audioTimer = NULL;
void IRAM_ATTR audioISR() {
  smoothFreq += (targetFreq - smoothFreq) * 0.05f;
  smoothAmp  += (targetAmp  - smoothAmp)  * 0.05f;

  float phaseInc = smoothFreq / 44100.0f;
  audioPhase += phaseInc;
  if (audioPhase >= 1.0f) audioPhase -= 1.0f;

  float sample = sinf(audioPhase * 2.0f * M_PI) * smoothAmp;
  int dacVal   = (int)(sample * 100.0f) + 128;
  dacVal       = constrain(dacVal, 0, 255);
  ledcWrite(AUDIO_PIN, dacVal);
}

float measureDistance(int trigPin, int echoPin) {
  digitalWrite(trigPin, LOW);
  delayMicroseconds(2);
  digitalWrite(trigPin, HIGH);
  delayMicroseconds(10);
  digitalWrite(trigPin, LOW);

  long duration = pulseIn(echoPin, HIGH, 30000);
  if (duration == 0) return 50.0f;

  return (duration * 0.0343f) / 2.0f;
}

float distanceToFreq(float dist) {
  const float notes[] = {
    110.0f, 130.8f, 146.8f, 164.8f, 196.0f,
    220.0f, 261.6f, 293.7f, 329.6f, 392.0f,
    440.0f, 523.3f, 587.3f, 659.3f, 784.0f
  };
  int numNotes = 15;

  dist = constrain(dist, 5.0f, 50.0f);
  float normalized = 1.0f - ((dist - 5.0f) / 45.0f);
  int noteIdx = (int)(normalized * (numNotes - 1));
  return notes[constrain(noteIdx, 0, numNotes - 1)];
}

void updateLEDs(float freq, float amp) {
  float minFreq = 110.0f, maxFreq = 784.0f;
  float hue = map((int)freq, (int)minFreq, (int)maxFreq, 0, 200);
  uint8_t brightness = (uint8_t)(amp * 200.0f);

  for (int i = 0; i < NUM_LEDS; i++) {
    leds[i] = CHSV((uint8_t)hue, 255, brightness);
  }
  FastLED.show();
}

void setup() {
  pinMode(TRIG_PITCH, OUTPUT);
  pinMode(ECHO_PITCH, INPUT);
  pinMode(TRIG_VOL,   OUTPUT);
  pinMode(ECHO_VOL,   INPUT);

  ledcAttach(AUDIO_PIN, 25000, 8);

  FastLED.addLeds<WS2812B, LED_PIN, GRB>(leds, NUM_LEDS);
  FastLED.setBrightness(80);

  audioTimer = timerBegin(44100);
  timerAttachInterrupt(audioTimer, &audioISR);
  timerAlarm(audioTimer, 1, true, 0);
}

void loop() {
  float pitchDist = measureDistance(TRIG_PITCH, ECHO_PITCH);
  targetFreq = distanceToFreq(pitchDist);

  float volDist = measureDistance(TRIG_VOL, ECHO_VOL);
  volDist = constrain(volDist, 5.0f, 40.0f);
  targetAmp = 1.0f - ((volDist - 5.0f) / 35.0f);

  updateLEDs(targetFreq, targetAmp);

  delay(20);
}
Line-by-line: what every line does and why
Audio state: two pairs of variables
volatile float targetFreq  = 220.0f;
volatile float targetAmp   = 0.0f;
float          smoothFreq  = 220.0f;
float          smoothAmp   = 0.0f;
There are two pairs because the main loop and the audio interrupt run at different speeds. The main loop reads sensors 50 times per second. The audio interrupt runs 44,100 times per second. targetFreq and targetAmp are the goals — set by the main loop from sensor readings. smoothFreq and smoothAmp are the actual values used for audio — they slowly chase the targets. This separation prevents clicking sounds when your hand moves. volatile on the target variables means “the interrupt reads these — always read fresh from memory, never cache.”
audioISR — exponential smoothing explained
  smoothFreq += (targetFreq - smoothFreq) * 0.05f;
  smoothAmp  += (targetAmp  - smoothAmp)  * 0.05f;
This is called exponential smoothing — the single most useful formula in audio programming. Imagine you are trying to catch a ball that is moving toward you. Instead of jumping to where it is right now, you move 5% of the remaining distance each step. If targetFreq = 440 Hz and smoothFreq = 220 Hz, the difference is 220 Hz. You move 5% of 220 = 11 Hz closer. Next step: difference is now 209 Hz, move 10.45 Hz. Each step the gap gets smaller until smoothFreq arrives at 440 Hz gradually over dozens of samples. At 44,100 samples per second, this takes just a few milliseconds — smooth to the ear but fast enough to feel responsive.
The 0.05 value controls speed: 0.05 = fast glide. 0.01 = slow glide (sounds dreamy and legato). 0.2 = very fast (almost immediate, slightly clicky). Experiment.
  float sample = sinf(audioPhase * 2.0f * M_PI) * smoothAmp;
  int dacVal   = (int)(sample * 100.0f) + 128;
smoothAmp multiplies the sine wave sample — when smoothAmp is 0.0, the result is 0 (silence). When it is 1.0, the sample passes through at full volume. This is amplitude modulation — the mathematical equivalent of a volume knob. sample * 100 + 128 converts the -1.0 to +1.0 sine wave into the 28–228 range that fits in the 0–255 PWM output.
measureDistance — the sonar sequence
  digitalWrite(trigPin, LOW);
  delayMicroseconds(2);
  digitalWrite(trigPin, HIGH);
  delayMicroseconds(10);
  digitalWrite(trigPin, LOW);
This is the exact startup ritual the HC-SR04 datasheet requires. Pull TRIG LOW for 2 microseconds to ensure a clean starting state. Pull it HIGH for 10 microseconds to fire the ultrasonic burst (8 pulses of 40kHz sound). Pull it LOW again to end the trigger. The sensor is now in “waiting for echo” mode.
  long duration = pulseIn(echoPin, HIGH, 30000);
  if (duration == 0) return 50.0f;
  return (duration * 0.0343f) / 2.0f;
pulseIn measures how long the ECHO pin stays HIGH — which is exactly how long the sound took to travel to your hand and back. 30000 is the timeout in microseconds (30ms = 5 meters maximum range). If no echo comes back within 30ms, pulseIn returns 0 — which means nothing is in range, so return 50 cm (the maximum distance that turns off the sound). The calculation: speed of sound at room temperature is 343 meters per second = 0.0343 centimeters per microsecond. Dividing by 2 because the sound traveled there AND back — we only want the one-way distance.
distanceToFreq — snapping to musical notes
  dist = constrain(dist, 5.0f, 50.0f);
  float normalized = 1.0f - ((dist - 5.0f) / 45.0f);
  int noteIdx = (int)(normalized * (numNotes - 1));
  return notes[constrain(noteIdx, 0, numNotes - 1)];
constrain(dist, 5, 50) clamps distance to the playable range — below 5cm the sensor gives unreliable readings, above 50cm is too far. (dist - 5) / 45 maps 5–50cm to 0.0–1.0. Subtracting from 1.0 flips it: close hand (small distance) = 1.0 = high note index. normalized * 14 converts 0.0–1.0 to 0–14 to pick one of 15 notes from the array. This snapping to discrete notes is called quantization — instead of a continuous pitch that sounds out of tune as your hand wobbles, you get clean musical notes that hold steady.
updateLEDs — pitch to color mapping
  float hue = map((int)freq, (int)minFreq, (int)maxFreq, 0, 200);
  uint8_t brightness = (uint8_t)(amp * 200.0f);
  leds[i] = CHSV((uint8_t)hue, 255, brightness);
map converts the frequency (110–784 Hz) to a hue value (0–200). In the HSV color model (Hue, Saturation, Value), hue 0 is red and hue 200 is violet — the two ends of the visible rainbow. This means low notes (110 Hz) glow red, middle notes glow green-yellow, high notes glow violet. brightness = amp * 200 means when your left hand is far away (amp ≈ 0), the LEDs are dark. As you bring your hand closer (amp → 1), brightness rises to 200 (bright). CHSV sets the color in HSV — changing just the hue cycles through the rainbow without recalculating RGB values.
loop — reading sensors 50 times per second
targetAmp = 1.0f - ((volDist - 5.0f) / 35.0f);(volDist - 5) / 35 maps 5–40 cm to 0.0–1.0. Subtracting from 1.0 inverts it: hand at 5cm (close) = amplitude 1.0 (loud). Hand at 40cm (far) = amplitude 0.0 (silent). This means you control volume by moving your hand closer and farther from the side sensor — exactly how a real theremin works.
delay(20);A 20ms pause gives 50 sensor readings per second. Too fast and the ultrasonic sensors interfere with each other (one ping can be mistaken for another sensor’s echo). 50Hz is fast enough for smooth hand tracking but slow enough to be reliable.
The whole thing in one sentence
Two ultrasonic sensors measure hand distances 50 times per second, converting right-hand height into a musical note and left-hand distance into volume, while a hardware timer running 44,100 times per second smoothly glides the audio frequency toward the target using exponential smoothing, and the LED strip colors itself to match whatever note is playing.
First thing to try: Upload, plug in headphones, hold your right hand about 15cm above the pitch sensor — you should hear a tone. Slowly raise your hand and watch the pitch drop and the LEDs shift from yellow toward red. Then bring your left hand close to the volume sensor to make it louder.
Check: After upload, clap near the pitch sensor — you should hear a sound. Wave your hand at different heights while watching the LEDs change color.
Step 3: Mount your sensors
Time: ~5 minutes
Mounting matters. The two sensors must point in different directions:
-
Pitch sensor: Mount facing UP on a stand or box. Your right hand moves up/down above it. Hand at 5cm from sensor = highest note. Hand at 50cm = lowest note.
-
Volume sensor: Mount facing SIDEWAYS (horizontally). Your left hand moves closer/farther from the side. Hand at 5cm = loud. Hand at 40cm = silent.
Mount them ~15cm apart so they don’t interfere with each other.
Pro tip: Film yourself playing in a dark room with the LEDs on — the color-shifting strip creates a genuinely cinematic visual effect.
Step 4: Play!
Time: forever
Plug in headphones or connect the audio jack to a speaker amp.
Right hand: Hold it 5cm above the pitch sensor. Slowly raise it — the note lowers. Lower it — the note rises. Move through the range to hear all 15 pentatonic notes.
Left hand: Hold it 40cm from the volume sensor (silence). Slowly bring it closer — the volume swells in. Keep it at about 10–20cm for comfortable playing volume.
Try this: Sustain a note with your right hand at a fixed height, then slowly bring your left hand in and out for a fade-in fade-out effect. Then move both hands simultaneously — pitch changes while volume swells.
Note: The pentatonic scale mapping means you cannot play a “wrong” note. Every position produces a note that sounds good with every other note. This makes the instrument much more playable than a continuous-pitch theremin.
What just happened (what you learned)
-
Ultrasonic distance sensing — the HC-SR04 emits 8 pulses of 40kHz sound (inaudible — above human hearing), then listens for the echo. Time ÷ speed of sound ÷ 2 = distance. Same principle as bats navigating in darkness and ships using sonar.
-
Exponential smoothing (the 0.05f multiplier) is a simple low-pass filter. Each sample, move 5% of the way toward the target instead of jumping directly. This is equivalent to an RC circuit (resistor + capacitor) in analog electronics. Result: pitch glides smoothly toward the target, removing the clicking that sudden jumps would cause.
-
Original theremin physics — Leon Theremin’s 1920 instrument worked through capacitance: your hand changes the antenna’s capacitance, which changes an oscillator circuit’s frequency. This version replaces capacitance with ultrasound. The expressive control is identical; the physics just work through sound instead of electric fields.
-
Pentatonic quantization — rather than mapping distance to continuous frequency, the code snaps to the nearest pentatonic note. Quantization = the same thing a keyboard does. Without it, the theremin sounds “out of tune” as your hand wavers slightly. With it, every position is a precise musical note.
Level Up
Add continuous pitch mode. Replace distanceToFreq() with a linear mapping: return 110.0f * pow(2.0f, normalized * 3.0f) — gives continuous pitch from A2 to A5, like a real theremin. Play both versions. Which is more expressive? Which is more musical?
Add vibrato. Detect when the pitch hand stays stable for 200ms, then add a small sine wave to targetFreq: targetFreq *= (1.0f + 0.02f * sin(millis() * 0.031f)). The 0.031 = 2π × 5Hz / 1000. This is how classical violinists use their left hand.
Add a second waveform mode. Add a button that toggles between SINE and SQUARE in the audio ISR. Square wave through a theremin sounds distinctly different — more aggressive, more alien.
★★ You completed: Theremin!
Troubleshooting
| Problem | Fix |
|---|---|
| No sound in headphones | Check GPIO 46 (C6: GPIO 10) → 100Ω → jack TIP. Check GND → jack SLEEVE. Try a continuous tone: targetFreq = 440; targetAmp = 0.8; in setup(). |
| ESP32 GPIO damage / no readings | ECHO pin voltage too high — check voltage dividers on both ECHO pins. Use 1kΩ + 2kΩ per pin. |
| Pitch jumps randomly | Objects in the room are reflecting the ultrasonic pulse. Mount sensors away from walls, bookshelves, and other reflective surfaces. |
| Volume doesn’t change | Check volume sensor ECHO pin voltage divider. Check targetAmp varies: Serial.println(targetAmp) to verify. |
| LEDs stay one color | Check DIN on GPIO 13 (C6: GPIO 5) with 330Ω resistor. Verify FastLED.show() is called. |
| Notes sound clicky | Increase the smoothing factor: change 0.05f to 0.02f in the ISR for slower (smoother) transitions. |