Parent info
Parts you need
Affiliate links — we may earn a small commission
Try this circuit in your browser!
Run the code, press the buttons and watch what happens — before you buy any parts. No account needed.
Open in Simulator →Whatever walks past the fireplace at midnight — you’ll have the photo.
Imagine this: you set this up on Christmas Eve, hide it behind a decoration, and go to bed. At 2am, your phone buzzes. A photo lands in your family group chat. Caption: “INTRUDER DETECTED near the fireplace!”
It might be your partner sneaking a biscuit. It might be the dog. On a very good year, it might be genuinely inexplicable. Either way, you have photographic evidence. Morning chaos is guaranteed.
That’s what we’re building. About 1.5 hours. Around $18.
What you’ll need
| Part | What it does | Price |
|---|---|---|
| ESP32-CAM (AI-Thinker) | Camera + ESP32 all in one — takes the photo and sends it | ~$5 |
| PIR Motion Sensor (HC-SR501) | Watches for movement — triggers the camera when something moves | ~$2 |
| FTDI USB-to-Serial adapter | Programs the ESP32-CAM (it has no USB port of its own) | ~$3 |
| 5V USB power supply | Powers everything once programmed | ~$4 |
| Jumper wires | 6 connections total | ~$2 |
You also need: a Telegram account (free), home WiFi.
Total: ~$18 | Time: ~1.5 hours | Difficulty: ●○○○○
ESP32-CAM note: The AI-Thinker ESP32-CAM has no USB port. You program it using the FTDI adapter, then disconnect the FTDI and run it from a regular USB power supply. This sounds more complicated than it is — the step-by-step below walks you through it.
How it works (60 seconds)
Think of it like a wildlife camera trap — except it texts you.
The PIR sensor emits invisible infrared radiation and detects when something warm (a person, a pet) moves through its field. When it triggers, it sends a HIGH signal to the ESP32-CAM’s GPIO 13 pin.
The ESP32-CAM runs an interrupt — a tiny piece of code that fires instantly when GPIO 13 goes HIGH, no matter what else the board is doing. It sets a flag: “motion detected.” In the main loop, the board sees that flag, waits 500ms for the subject to walk into frame, takes a JPEG photo, and uploads it to Telegram using the Telegram Bot API.
The whole sequence from motion to message in your phone: 3–5 seconds.
Step 0: Set up your Telegram bot
Time: ~5 minutes
You need a Telegram bot and a chat to send photos to. Do this before touching the hardware.
- Open Telegram. Search for @BotFather and start a chat.
- Type
/newbot. Follow the prompts. Name your bot — “SantaDetectorBot” works. - BotFather gives you a bot token — a long string like
110201543:AAHdqTcvCH1vGWJxfSeofSs4tNoFx...— copy this. - Add the bot to your family group chat (or just chat to it directly in a personal chat).
- Send any message to the chat with your bot.
- Visit this URL in your browser (replace YOUR_TOKEN):
https://api.telegram.org/botYOUR_TOKEN/getUpdates - Find
"chat":{"id":in the response. That number is your chat ID. For group chats it’s a negative number (e.g.-123456789).
Check: Save both: the bot token and the chat ID. You’ll paste them into the code.
Step 1: Wire the PIR sensor
Time: ~5 minutes
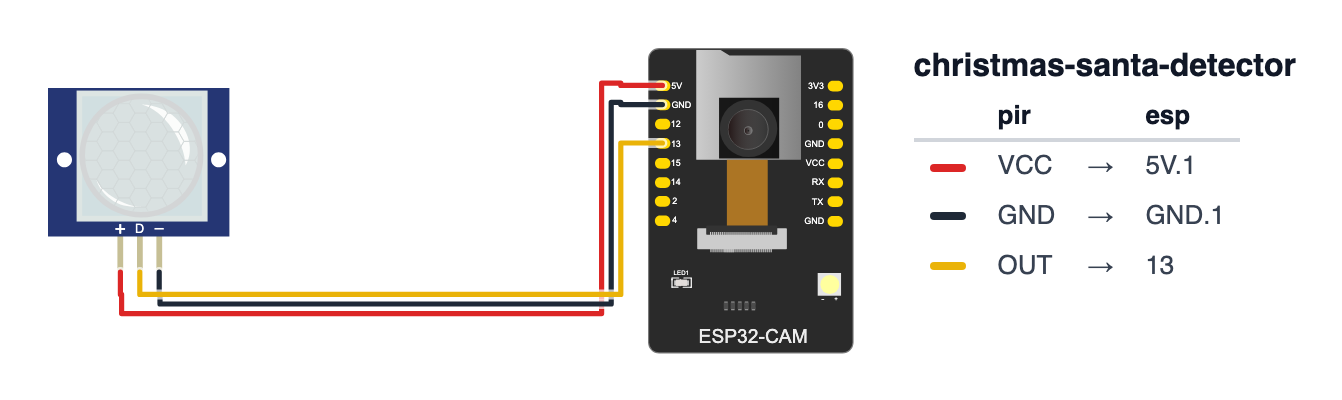
The HC-SR501 has 3 pins:
- PIR VCC → 5V power supply +5V
- PIR GND → power supply GND + ESP32-CAM GND
- PIR OUT → ESP32-CAM GPIO 13
Check: The HC-SR501 has a warm-up period of about 30–60 seconds after first power-on. During this time it will fire false triggers. This is normal. Wait a minute after powering on before testing.
PIR adjustment: The HC-SR501 has two trim pots on the back. The left one adjusts sensitivity (how much movement triggers it). The right one adjusts delay time (how long it stays triggered). Set both to mid-position for now.
Step 2: Program with the FTDI adapter
Time: ~10 minutes
The ESP32-CAM has no USB — you program it through its UART pins using the FTDI adapter.
Connect FTDI → ESP32-CAM:
- FTDI TX → ESP32-CAM U0RXD
- FTDI RX → ESP32-CAM U0TXD
- FTDI GND → ESP32-CAM GND
- FTDI VCC (5V) → ESP32-CAM 5V
To enter flash mode: 5. Connect a jumper wire from ESP32-CAM GPIO 0 to GND
Check: With GPIO 0 grounded, the board enters flash (programming) mode instead of running normally. You MUST have this jumper in place before pressing Upload in Arduino IDE.
Step 3: Install the library and upload
Time: ~10 minutes
- In Arduino IDE: Sketch → Include Library → Manage Libraries → search “UniversalTelegramBot” → install it.
- In Tools → Board → Boards Manager, make sure “esp32 by Espressif” is installed.
- Select “AI Thinker ESP32-CAM” as your board.
- Select the FTDI adapter’s COM port.
- Fill in your WiFi credentials, bot token, and chat ID in the code below.
- Click Upload.
- After “Done uploading” — remove the jumper from GPIO 0 to GND.
- Press the ESP32-CAM’s reset button (small button on the side), or cycle the power.
The big picture first. This program turns the ESP32-CAM into a Christmas night security camera — but a fun one. The ESP32-CAM is a tiny board with a camera and a microcontroller all in one. The PIR sensor is a motion detector — it senses warm bodies moving past it. When the PIR detects movement, it instantly tells the ESP32 (using a hardware interrupt — like tapping the ESP32 on the shoulder). The ESP32 waits half a second for the subject to walk into frame, takes a photo, and sends it to your Telegram chat. All while you’re asleep.
A program is like a recipe. Fill in your credentials and upload.
#include "esp_camera.h"
#include <WiFi.h>
#include <UniversalTelegramBot.h>
#include <WiFiClientSecure.h>

#define PWDN_GPIO_NUM     32
#define RESET_GPIO_NUM    -1
#define XCLK_GPIO_NUM      0
#define SIOD_GPIO_NUM     26
#define SIOC_GPIO_NUM     27
#define Y9_GPIO_NUM       35
#define Y8_GPIO_NUM       34
#define Y7_GPIO_NUM       39
#define Y6_GPIO_NUM       36
#define Y5_GPIO_NUM       21
#define Y4_GPIO_NUM       19
#define Y3_GPIO_NUM       18
#define Y2_GPIO_NUM        5
#define VSYNC_GPIO_NUM    25
#define HREF_GPIO_NUM     23
#define PCLK_GPIO_NUM     22

const char* ssid     = "YourWiFiName";
const char* password = "YourWiFiPassword";
const char* botToken = "YOUR_TELEGRAM_BOT_TOKEN";
const char* chatId   = "YOUR_TELEGRAM_CHAT_ID";

#define PIR_PIN  13

WiFiClientSecure client;
UniversalTelegramBot bot(botToken, client);

volatile bool pirTriggered = false;
bool alertSent    = false;
unsigned long lastCheck = 0;
unsigned long alertTime = 0;

void setupCamera() {
  camera_config_t config;
  config.ledc_channel = LEDC_CHANNEL_0;
  config.ledc_timer   = LEDC_TIMER_0;
  config.pin_d0 = Y2_GPIO_NUM; config.pin_d1 = Y3_GPIO_NUM;
  config.pin_d2 = Y4_GPIO_NUM; config.pin_d3 = Y5_GPIO_NUM;
  config.pin_d4 = Y6_GPIO_NUM; config.pin_d5 = Y7_GPIO_NUM;
  config.pin_d6 = Y8_GPIO_NUM; config.pin_d7 = Y9_GPIO_NUM;
  config.pin_xclk     = XCLK_GPIO_NUM;
  config.pin_pclk     = PCLK_GPIO_NUM;
  config.pin_vsync    = VSYNC_GPIO_NUM;
  config.pin_href     = HREF_GPIO_NUM;
  config.pin_sscb_sda = SIOD_GPIO_NUM;
  config.pin_sscb_scl = SIOC_GPIO_NUM;
  config.pin_pwdn     = PWDN_GPIO_NUM;
  config.pin_reset    = RESET_GPIO_NUM;
  config.xclk_freq_hz = 20000000;
  config.pixel_format = PIXFORMAT_JPEG;

  if (psramFound()) {
    config.frame_size   = FRAMESIZE_VGA;
    config.jpeg_quality = 10;
    config.fb_count     = 2;
  } else {
    config.frame_size   = FRAMESIZE_QVGA;
    config.jpeg_quality = 12;
    config.fb_count     = 1;
  }

  esp_err_t err = esp_camera_init(&config);
  if (err != ESP_OK) {
    Serial.printf("Camera init failed with error 0x%x\n", err);
  } else {
    Serial.println("Camera ready.");
  }
}

void sendPhotoToTelegram(String caption) {
  camera_fb_t* fb = esp_camera_fb_get();
  if (!fb) {
    Serial.println("Camera capture failed");
    return;
  }
  esp_camera_fb_return(fb);
  client.setInsecure();
  bool sent = bot.sendMessage(chatId, "🎅 Motion detected! " + caption, "");

  if (sent) Serial.println("Alert sent to Telegram successfully!");
  else Serial.println("Failed to send alert. Check your token and chat ID.");
}

void IRAM_ATTR onMotion() {
  pirTriggered = true;
}

void setup() {
  Serial.begin(115200);
  pinMode(PIR_PIN, INPUT);
  attachInterrupt(digitalPinToInterrupt(PIR_PIN), onMotion, RISING);

  setupCamera();

  WiFi.begin(ssid, password);
  while (WiFi.status() != WL_CONNECTED) delay(500);
  Serial.println("WiFi connected.");
  Serial.println("Santa Detector is ARMED. Good night.");
}

void loop() {
  if (pirTriggered && !alertSent) {
    pirTriggered = false;
    alertSent    = true;
    alertTime    = millis();

    Serial.println("Motion detected! Taking photo...");
    delay(500);

    String timeStr = "at T+" + String(millis() / 1000) + "s";
    String caption = "INTRUDER DETECTED near the fireplace! Evidence captured " + timeStr;

    sendPhotoToTelegram(caption);
    bot.sendMessage(chatId, "HO HO HO! Someone was in the living room!", "");
  }

  if (alertSent && millis() - alertTime > 60000) {
    alertSent = false;
    Serial.println("Cooldown over. Detector re-armed.");
  }
}
Line-by-line: what every line does and why
Lines 1–4: Borrowing four instruction books
#include "esp_camera.h"
#include <WiFi.h>
#include <UniversalTelegramBot.h>
#include <WiFiClientSecure.h>
#include means “grab this instruction book.”
- esp_camera — how to take photos with this specific camera chip.
- WiFi — how to connect to the internet.
- UniversalTelegramBot — how to send messages and photos to Telegram.
- WiFiClientSecure — a secure connection (HTTPS) needed to talk to Telegram’s servers.
Lines 6–22: Camera pin definitions
#define PWDN_GPIO_NUM     32
#define RESET_GPIO_NUM    -1
...
#define PCLK_GPIO_NUM     22
#define gives each number a name — like labelling the terminals on a complicated machine. The camera chip has many wires going to many pins. These exact pin numbers are fixed by the hardware of the AI-Thinker ESP32-CAM board. Don’t change them. -1 for RESET means “no reset pin connected.”
Lines 24–28: Your credentials
const char* ssid     = "YourWiFiName";
const char* password = "YourWiFiPassword";
const char* botToken = "YOUR_TELEGRAM_BOT_TOKEN";
const char* chatId   = "YOUR_TELEGRAM_CHAT_ID";
const char* stores text — like a sticky note. Replace the placeholders with your real values. botToken is the long code BotFather gave you. chatId is the number of your chat (negative for group chats).
Lines 30–38: Creating helper objects and flags
#define PIR_PIN  13
WiFiClientSecure client;
UniversalTelegramBot bot(botToken, client);
volatile bool pirTriggered = false;
bool alertSent    = false;
unsigned long alertTime = 0;
PIR_PIN 13— the PIR sensor’s output wire connects to pin 13.WiFiClientSecure client— creates a secure internet connection. Namedclient.UniversalTelegramBot bot(...)— creates the Telegram bot using your token and the secure connection. Namedbot.volatile bool pirTriggered = false— a flag (on/off box).boolmeans true or false.volatiletells the computer “this can change at any moment from an interrupt — always re-read it, don’t cache it.” It starts false (no motion yet).bool alertSent = false— have we already sent a photo for this motion event? Prevents spamming Telegram.unsigned long alertTime— when did we last send an alert, in milliseconds?
setupCamera(): configuring the camera
void setupCamera() {
  camera_config_t config;
  config.ledc_channel = LEDC_CHANNEL_0;
  config.pin_d0 = Y2_GPIO_NUM;
  ...
  config.pixel_format = PIXFORMAT_JPEG;
camera_config_t config is a form with many fields to fill in — like a camera settings menu. We tell it which pins the camera’s wires use, how fast the clock runs (20MHz), and that we want JPEG output (smaller files than raw data).
  if (psramFound()) {
    config.frame_size   = FRAMESIZE_VGA;
    config.jpeg_quality = 10;
    config.fb_count     = 2;
  } else {
    config.frame_size   = FRAMESIZE_QVGA;
    config.jpeg_quality = 12;
    config.fb_count     = 1;
  }
if (psramFound()) — if means “if.” The ESP32-CAM has extra memory called PSRAM. If it’s there, take a bigger photo (VGA = 640×480) at better quality (lower number = better JPEG). Without PSRAM, use smaller QVGA (320×240) to fit in regular RAM.
  esp_err_t err = esp_camera_init(&config);
  if (err != ESP_OK) {
    Serial.printf("Camera init failed...");
  }
}
esp_camera_init submits the config form and starts the camera. err != ESP_OK — != means “not equal to.” If the camera didn’t start successfully, print an error.
sendPhotoToTelegram(): taking and sending a photo
void sendPhotoToTelegram(String caption) {
  camera_fb_t* fb = esp_camera_fb_get();
  if (!fb) { ... return; }
esp_camera_fb_get() takes a photo and gives back a “frame buffer” — a block of memory holding the JPEG data. if (!fb) — ! means NOT. If the photo failed, print an error and return (stop this function early).
  esp_camera_fb_return(fb);
  client.setInsecure();
  bool sent = bot.sendMessage(chatId, "🎅 Motion detected! " + caption, "");
}esp_camera_fb_return(fb)— release the memory. Every photo taken claims a buffer. If you never return it, you run out of memory after a few photos and the camera stops working. This is like returning a library book.client.setInsecure()— skip checking the SSL certificate. This is fine for a home project.bot.sendMessage(...)— send a text alert to Telegram with the motion caption. Returnstrueif sent successfully.
onMotion(): the interrupt function
void IRAM_ATTR onMotion() {
  pirTriggered = true;
}
This tiny function runs instantly when the PIR pin goes HIGH — no matter what else the code is doing. It’s called an interrupt handler — like a fire alarm that interrupts everything.
IRAM_ATTR means “store this function in fast RAM (IRAM), not in flash memory.” This is required because interrupts must execute immediately — flash memory can be temporarily unavailable.
The function only sets pirTriggered = true. It cannot do anything complex (like sending to Telegram) — interrupts must be super short. The actual work happens in loop().
setup(): runs once on power-on
void setup() {
  Serial.begin(115200);
  pinMode(PIR_PIN, INPUT);
  attachInterrupt(digitalPinToInterrupt(PIR_PIN), onMotion, RISING);
  setupCamera();
  WiFi.begin(ssid, password);
  while (WiFi.status() != WL_CONNECTED) delay(500);
  Serial.println("Santa Detector is ARMED. Good night.");
}
pinMode(PIR_PIN, INPUT)— configure pin 13 as an input (reading a signal, not sending one).attachInterrupt(digitalPinToInterrupt(PIR_PIN), onMotion, RISING)— register the interrupt. “When pin 13 goes from LOW to HIGH (RISING), immediately callonMotion().”digitalPinToInterrupt()converts a pin number to the correct interrupt number for that pin.setupCamera()— configure and start the camera.while (WiFi.status() != WL_CONNECTED)— keep waiting until WiFi connects.
loop(): the heartbeat — runs forever
void loop() {
  if (pirTriggered && !alertSent) {
    pirTriggered = false;
    alertSent    = true;
    alertTime    = millis();
    delay(500);
    String caption = "INTRUDER DETECTED near the fireplace! Evidence captured ...";
    sendPhotoToTelegram(caption);
    bot.sendMessage(chatId, "HO HO HO! ...", "");
  }
if (pirTriggered && !alertSent)—&&means AND.!means NOT. “If the PIR fired AND we haven’t already sent an alert…”- Set the flag back to
false, markalertSent = true, note the time. delay(500)— wait 500 milliseconds (half a second) for the subject to walk into the frame centre.- Send the photo with a caption. Then send a text message too.
  if (alertSent && millis() - alertTime > 60000) {
    alertSent = false;
    Serial.println("Cooldown over. Detector re-armed.");
  }
}
After 60 seconds (60,000 milliseconds), reset alertSent so the detector can fire again. This cooldown prevents flooding your Telegram with 20 photos of the same cat.
The whole thing in one sentence
When powered on, the detector arms itself by connecting to WiFi and registering the PIR interrupt (setup). Then it sleeps in loop(), waiting. When motion happens, the interrupt taps it on the shoulder, it takes a photo, sends it to Telegram, then rests for 60 seconds before being ready again.
First thing to try: after uploading and powering on, wait 60 seconds (PIR warm-up), then wave your hand in front of the sensor. You should see “Motion detected!” in Serial Monitor and a photo in Telegram within 5 seconds.
Check: Open Serial Monitor (115200 baud). You should see “Camera ready.”, then “WiFi connected.”, then “Santa Detector is ARMED. Good night.” Wave your hand in front of the PIR. Within 5 seconds you should see “Motion detected!” in Serial and a photo in your Telegram chat.
Step 4: Position and hide it
Time: ~5 minutes
- Disconnect the FTDI adapter (it was only for programming).
- Connect a regular 5V USB power supply to the ESP32-CAM’s 5V and GND pins (or use a USB-A to bare wire adapter).
- Angle the PIR sensor to cover the area in front of the fireplace. The HC-SR501 has a cone of about 110 degrees — aim it at the spot you want to monitor.
- Hide everything behind a Christmas stocking, a plant, or a decoration. The camera lens just needs a small gap to see through.
- The PIR needs about 60 seconds to warm up and stabilise after power-on. False triggers during this period are normal.
Check: After 60 seconds, walk through the detection area. Photo should appear in Telegram within 5 seconds.
What just happened (what you learned)
-
Hardware interrupts —
attachInterrupt(digitalPinToInterrupt(PIR_PIN), onMotion, RISING)tells the ESP32 to runonMotion()the instant GPIO 13 goes HIGH, no matter what else the code is doing. TheIRAM_ATTRkeyword stores the function in fast RAM so it executes even during flash memory operations. -
PSRAM and image quality — The ESP32-CAM has 4MB of PSRAM (extra RAM). The
psramFound()check lets the code take a higher-quality photo when PSRAM is available. Without it, the smaller QVGA frame fits in 512KB internal RAM. Same principle as choosing file size based on available storage. -
Camera frame buffer management —
esp_camera_fb_get()claims a buffer.esp_camera_fb_return(fb)releases it. Forgetting to return it causes a memory leak — after a few photos the camera fails because all buffers are claimed and never freed. -
Telegram Bot API —
UniversalTelegramBotwraps HTTPS calls toapi.telegram.org. Your token is the password; the chat ID is the address. The bot can only send to chats it’s been added to. -
Interrupt flags and loop() coordination —
onMotion()only setspirTriggered = true. The actual photo and Telegram send happen inloop(). You cannot send HTTPS requests inside an interrupt (network operations block and interrupts must return instantly). The flag is the handshake between the interrupt world and the normal world.
Level Up
Night filter: Use configTime() to get real time. Only arm the detector between 11pm and 7am. Outside those hours, PIR triggers just log to Serial — no Telegram spam during the day.
Burst mode: When motion is detected, take 3 photos, 1 second apart, and send all three to Telegram. Gives you a before/during/after sequence. Store a burstCount variable and only start the cooldown after all 3 are sent.
Morning summary: At 8am every day (using NTP), send a Telegram message: “Good morning! The detector was triggered X times overnight.” Store event times in an array. Your family gets a daily security report.
Troubleshooting
| Problem | Fix |
|---|---|
| “Camera init failed” | Check GPIO 0 is NOT connected to GND anymore (only needed during upload). Press reset button after disconnecting. |
| PIR triggers immediately on power-on | This is normal. The HC-SR501 takes 60 seconds to stabilise. Wait it out. |
| Photo sends but Telegram says “error” | Check your bot token and chat ID. Bot token has no spaces. Chat ID for groups is a negative number. |
| Upload fails (IDE shows error) | Make sure GPIO 0 is connected to GND during upload. Press reset on the board after connecting GPIO 0 to GND and before clicking Upload. |
| “WiFi connected” but alert never sends | client.setInsecure() is needed for Telegram HTTPS. Make sure it’s in your code before the sendMessage call. |
| Photo is dark / can’t see anything | The OV2640 camera needs some light. Add a small LED (like a candle) near the detection area. The camera cannot see in total darkness without an IR illuminator. |