Parent info
Parts you need
Affiliate links — we may earn a small commission
Try this circuit in your browser!
Run the code, press the buttons and watch what happens — before you buy any parts. No account needed.
Open in Simulator →This sweater has actual lights. It runs all evening. You win the contest.
Imagine this: you walk into the office ugly sweater contest. Everyone else has a jumper with a felt reindeer stuck on. You’re wearing 60 LEDs sewn into the front, cycling through Rudolf’s pulsing nose, a twinkling Christmas tree, and a full rainbow party mode.
You accept the trophy. You say it was “just a quick project.” This is a lie.
That’s what we’re building. About 2 hours of work. Around $30. The sweater costs $3 at a charity shop.
What you’ll need
| Part | What it does | Price |
|---|---|---|
| ESP32-S3 Dev Board | Runs the light patterns autonomously — no phone needed | ~$12 |
| WS2812B LED strip, 1m, 60 LED/m | The lights sewn into the sweater front | ~$5 |
| LiPo 2000mAh flat battery | All-evening power — 4–6 hours | ~$5 |
| TP4056 USB-C charger module | Safely charges the LiPo via USB-C (red=charging, blue=done) | ~$2 |
| MT3608 boost converter | Steps up 3.7V battery to 5V for the LEDs and ESP32 | ~$2 |
| Toggle switch | Cuts all power cleanly — essential for a wearable | ~$1 |
You also need: an ugly Christmas sweater (~$3 at a charity shop), thick needle and thread, hot glue gun, voltmeter to set the boost converter output.
Total: ~$30 | Time: ~2 hours | Difficulty: ●●○○○
Wearable constraint: Everything is dictated by the fact that you wear this. Power must be battery. The strip must be sewn down so it doesn’t pull loose when you move. The switch must be reachable without undressing. The charger port must be accessible without disassembly. Design for real life, not a workbench.
How it works (60 seconds)
Think of it like a phone battery powering a string of smart fairy lights.
A LiPo battery gives 3.7V. The TP4056 module handles safe USB-C charging — plug in USB, red LED means charging, blue LED means done. The MT3608 boost converter takes that 3.7V and steps it up to 5V — the LED strip and ESP32 both need 5V. The toggle switch cuts everything cleanly when you’re not wearing it.
The ESP32 runs five patterns in a loop, switching every 15 seconds automatically. No WiFi, no phone, no setup. Turn on the switch, the sweater runs.
Step 0: Set the boost converter to 5.0V
Time: ~5 minutes. Do this BEFORE connecting anything else.
The MT3608 has a small trim pot on the top — a tiny screw you adjust with a small flathead.
- Connect the boost converter input to a charged LiPo or USB power source.
- Measure the output voltage with a voltmeter while adjusting the trim pot.
- Set it to exactly 5.0V. No higher — 5.2V will damage the ESP32 over time.
Check: Voltmeter reads 5.0V ± 0.1V. Once set, you won’t need to touch it again.
Step 1: Wire the power circuit
Time: ~15 minutes
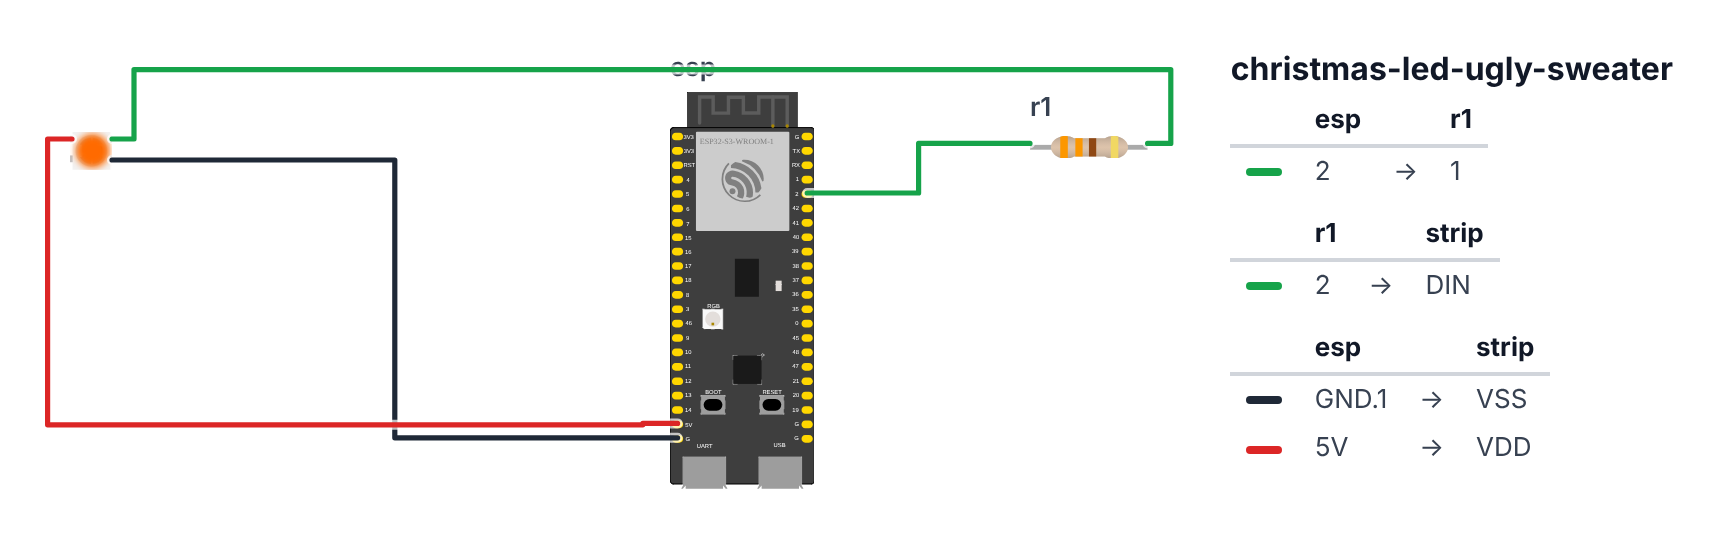
This is the one complex part of this build. There are four components in the power chain.
[LiPo +] → [TP4056 BAT+]
[LiPo -] → [TP4056 BAT-]

[TP4056 OUT+] → [MT3608 IN+]
[TP4056 OUT-] → [MT3608 IN- / GND]

[MT3608 OUT+ 5V] → [Toggle Switch]
[Toggle Switch] → [ESP32 VIN]  AND  [LED Strip VCC]

[MT3608 GND] → [ESP32 GND]  AND  [LED Strip GND]
[ESP32 GPIO 2 (C6: GPIO 8)] → [330-ohm resistor] → [LED Strip DIN]
Check: With the toggle switch ON, the voltmeter should read 5.0V between the ESP32 VIN and GND pins. Turn the switch OFF — voltmeter reads 0V. This is correct. Plug USB-C into the TP4056 module to charge — the TP4056’s red LED comes on.
Step 2: Sew the LED strip onto the sweater
Time: ~30 minutes
This step is the most satisfying and the most fiddly.
-
Lay the sweater flat. Plan your LED route on the front — popular options:
- Christmas tree shape (triangle of LEDs)
- Reindeer outline
- Zigzag covering as much front area as possible
-
Pin the strip to the sweater front before sewing (use dressmaker pins).
-
Thread a thick needle. Sew the strip to the sweater with stitches between every third LED, catching the backing of the strip. Do NOT sew through the LED strip itself — only the backing between LEDs.
-
Every 20cm, add a second row of stitches. The strip will tug when you move — it needs to be held firmly from multiple points.
-
Sew a small rectangular pocket on the inside front hem, large enough for the ESP32, battery, and charging module.
-
Route the LED strip wire through the sweater lining to the inside pocket. Use a seam ripper to open a small channel in the lining seam, push the wire through, then stitch it closed.
Check: After sewing, gently pull on the strip at different points. It should feel firmly attached — no single stitch takes all the tension. If any section pulls easily, add more stitches there.
Step 3: Upload the code
Time: ~10 minutes
The big picture first. This program turns the ESP32 into a wearable light show controller — no phone, no WiFi needed, just turn it on and the sweater runs itself. The ESP32 is the brain. The WS2812B strip is 60 smart LEDs sewn into your sweater front. The program cycles through 5 patterns automatically every 15 seconds. It’s like a playlist of light shows on shuffle — it just keeps going until the battery dies.
A program is like a recipe. Upload this to the ESP32 before putting it inside the sweater — you can’t easily plug it in once it’s sewn in.
// ========== CHOOSE YOUR BOARD ==========
// Uncomment the line for YOUR board:
#define BOARD_S3    // ESP32-S3-DevKitC-1
//#define BOARD_C6  // ESP32-C6-DevKitC-1
// ========================================

#ifdef BOARD_S3
  #define PIN_NEOPIXEL         2
#endif
#ifdef BOARD_C6
  #define PIN_NEOPIXEL         8
#endif

#include <FastLED.h>

#define LED_PIN   PIN_NEOPIXEL
#define NUM_LEDS  60
#define BRIGHTNESS 80

CRGB leds[NUM_LEDS];

int currentPattern = 0;
unsigned long lastChange = 0;
const unsigned long PATTERN_MS = 15000;

void patternRudolfNose() {
  FastLED.clear();
  uint8_t pulse = beatsin8(20, 100, 255);
  leds[30] = CRGB(pulse, 0, 0);
}

void patternTwinklingTree() {
  fadeToBlackBy(leds, NUM_LEDS, 15);
  int pos = random16(NUM_LEDS);
  uint8_t r = random8(0, 50);
  uint8_t g = random8(150, 255);
  leds[pos] = CRGB(r, g, 0);
  if (random8() < 30) {
    int ornament = random8(NUM_LEDS);
    leds[ornament] = (random8() < 128) ? CRGB::Red : CRGB(255, 180, 0);
  }
}

void patternCandyCane() {
  static uint8_t offset = 0;
  for (int i = 0; i < NUM_LEDS; i++) {
    if (((i + offset) / 3) % 2 == 0) {
      leds[i] = CRGB::Red;
    } else {
      leds[i] = CRGB::White;
    }
  }
  offset++;
}

void patternRainbow() {
  static uint8_t hue = 0;
  fill_rainbow(leds, NUM_LEDS, hue, 4);
  hue += 3;
}

void patternSnow() {
  fadeToBlackBy(leds, NUM_LEDS, 20);
  if (random8() < 80) {
    leds[random8(NUM_LEDS)] = CRGB(200, 220, 255);
  }
}

void setup() {
  FastLED.addLeds<WS2812B, LED_PIN, GRB>(leds, NUM_LEDS);
  FastLED.setBrightness(BRIGHTNESS);
  FastLED.clear();
  FastLED.show();
  randomSeed(esp_random());
}

void loop() {
  if (millis() - lastChange > PATTERN_MS) {
    currentPattern = (currentPattern + 1) % 5;
    lastChange = millis();
    FastLED.clear();
  }

  switch (currentPattern) {
    case 0: patternRudolfNose();    break;
    case 1: patternTwinklingTree(); break;
    case 2: patternCandyCane();     break;
    case 3: patternRainbow();       break;
    case 4: patternSnow();          break;
  }

  FastLED.show();
  delay(30);
}
Line-by-line: what every line does and why
Line 1: Borrowing the LED instruction book
#include <FastLED.h>#include means “grab this instruction book.” FastLED is a library — someone already wrote all the hard rules for controlling smart LEDs, so we just borrow the book.
Lines 3–5: Named numbers
#define LED_PIN   PIN_NEOPIXEL
#define NUM_LEDS  60
#define BRIGHTNESS 80
#define gives a number a name — like a sticky note. LED_PIN PIN_NEOPIXEL means “the data wire goes to the pin from the board block at the top” — pin 2 on the ESP32-S3 (C6: pin 8). NUM_LEDS 60 means 60 LEDs in the strip. BRIGHTNESS 80 means 80 out of 255 — about 31% brightness. Good for a sweater you wear at a party; bright enough to see, not so bright it hurts to look at.
Line 7: The LED array — 60 boxes, one per light
CRGB leds[NUM_LEDS];Think of this as 60 boxes in a row, numbered 0 to 59. Each box holds one colour — a mix of red, green, blue. Writing leds[30] = CRGB::Red puts pure red into box 30. CRGB stands for “Colour — Red, Green, Blue.”
Lines 9–11: Pattern tracking and timing
int currentPattern = 0;
unsigned long lastChange = 0;
const unsigned long PATTERN_MS = 15000;
int currentPattern = 0— a box holding a whole number. Starts at 0. Counts up through the 5 patterns.intmeans whole number.unsigned long lastChange = 0— a sticky note: “when did I last switch patterns?” Starts at 0 (never switched yet).unsigned longholds very large numbers — needed because milliseconds get big fast.PATTERN_MS = 15000— 15,000 milliseconds = 15 seconds. How long each pattern shows.
patternRudolfNose(): Rudolf’s pulsing red nose
void patternRudolfNose() {
  FastLED.clear();
  uint8_t pulse = beatsin8(20, 100, 255);
  leds[30] = CRGB(pulse, 0, 0);
}
void means “this function doesn’t send back an answer, it just does something.”
FastLED.clear()— turn off all LEDs. Blank slate.beatsin8(20, 100, 255)— generates a smooth wave, like a heartbeat. 20 is the speed in BPM (beats per minute). The wave bounces between 100 and 255. Imagine a ball rolling slowly up and down a hill. The result — a number between 100 and 255 — goes into a box calledpulse.uint8_tmeans a whole number from 0 to 255.leds[30] = CRGB(pulse, 0, 0)— set LED 30 to the colour (pulse, 0, 0). In CRGB, the three numbers are red, green, blue. Since green and blue are 0, only red shows. Brighter whenpulseis high, dimmer when low. That’s the pulsing effect.
patternTwinklingTree(): random green sparkles
void patternTwinklingTree() {
  fadeToBlackBy(leds, NUM_LEDS, 15);
  int pos = random16(NUM_LEDS);
  uint8_t r = random8(0, 50);
  uint8_t g = random8(150, 255);
  leds[pos] = CRGB(r, g, 0);
  if (random8() < 30) {
    int ornament = random8(NUM_LEDS);
    leds[ornament] = (random8() < 128) ? CRGB::Red : CRGB(255, 180, 0);
  }
}
fadeToBlackBy(leds, NUM_LEDS, 15)— dim every LED by a small amount. Old sparkles fade away naturally, like a flame shrinking.random16(NUM_LEDS)— pick a random LED number between 0 and 59.random8(0, 50)— random red value, small (nearly no red).random8(150, 255)— random green value, big (very green). Together: a mostly-green twinkle.leds[pos] = CRGB(r, g, 0)— light up the random LED in that green.if (random8() < 30)—ifmeans “if.” Roll a number 0–255. If it’s less than 30 (about 1-in-9 chance), add an “ornament.” The?is a quick way to choose: if another random number < 128, use red; otherwise use gold.
patternCandyCane(): scrolling red and white stripes
void patternCandyCane() {
  static uint8_t offset = 0;
  for (int i = 0; i < NUM_LEDS; i++) {
    if (((i + offset) / 3) % 2 == 0) {
      leds[i] = CRGB::Red;
    } else {
      leds[i] = CRGB::White;
    }
  }
  offset++;
}
static uint8_t offset = 0—staticmeans “remember this number between calls.”offsettracks how far the stripe has scrolled.for (int i = 0; i < NUM_LEDS; i++)— a loop that counts i from 0 to 59.int i = 0creates the counter.i < NUM_LEDSruns as long as i is less than 60.i++adds 1 each time.((i + offset) / 3) % 2 == 0— divide the LED position by 3 (groups of 3), then check if the group number is even or odd.%means remainder. Even groups get red, odd groups get white. This creates alternating bands.offset++— shift the stripes by 1 each frame, making them scroll.
patternRainbow(): rolling rainbow
void patternRainbow() {
  static uint8_t hue = 0;
  fill_rainbow(leds, NUM_LEDS, hue, 4);
  hue += 3;
}
static uint8_t hue = 0— remembered between calls.hueis the starting colour (0 = red, 96 = green, 160 = blue, 255 wraps back to red).fill_rainbow(leds, NUM_LEDS, hue, 4)— FastLED’s built-in rainbow filler. Paints all 60 LEDs in a smooth spectrum starting athue. The 4 is how much the colour shifts between each LED.hue += 3— advance the starting colour by 3. Next frame the rainbow has shifted slightly. Over time this makes the whole rainbow roll along the strip.
patternSnow(): cool white sparkles
void patternSnow() {
  fadeToBlackBy(leds, NUM_LEDS, 20);
  if (random8() < 80) {
    leds[random8(NUM_LEDS)] = CRGB(200, 220, 255);
  }
}
fadeToBlackBy(leds, NUM_LEDS, 20)— slowly dim everything. Old sparkles shrink.if (random8() < 80)— about 31% chance each frame to add a new sparkle.CRGB(200, 220, 255)— a cool icy blue-white. High blue, slightly lower red and green.
setup(): runs once on power-on
void setup() {
  FastLED.addLeds<WS2812B, LED_PIN, GRB>(leds, NUM_LEDS);
  FastLED.setBrightness(BRIGHTNESS);
  FastLED.clear();
  FastLED.show();
  randomSeed(esp_random());
}
FastLED.addLeds<WS2812B, LED_PIN, GRB>(leds, NUM_LEDS)— “I have a WS2812B strip, data on pin 2 (C6: pin 8), colours in GRB order, 60 LEDs.”GRBmeans green-red-blue — the internal order this strip uses (not the same as RGB).FastLED.setBrightness(80)— overall brightness cap. Every colour gets scaled down.FastLED.clear()— set all boxes to black (off).FastLED.show()— send the colours to the strip. This is like a printer: you can edit the document all you want, but nothing prints until you press Print.randomSeed(esp_random())— start the random number generator with a truly random number. The ESP32 has a built-in random number maker that uses radio noise, so the patterns look different each time you turn on the sweater.
loop(): the heartbeat — runs forever
void loop() {
  if (millis() - lastChange > PATTERN_MS) {
    currentPattern = (currentPattern + 1) % 5;
    lastChange = millis();
    FastLED.clear();
  }
millis() is a stopwatch that started when the ESP32 powered on. millis() - lastChange is “how long since we last switched.” If more than 15,000ms (15 seconds) have passed:
(currentPattern + 1) % 5— add 1 to the pattern number.% 5means after 4 it wraps back to 0 — like counting on one hand.FastLED.clear()— wipe the strip clean so the old pattern doesn’t bleed into the new one.
  switch (currentPattern) {
    case 0: patternRudolfNose();    break;
    case 1: patternTwinklingTree(); break;
    case 2: patternCandyCane();     break;
    case 3: patternRainbow();       break;
    case 4: patternSnow();          break;
  }
  FastLED.show();
  delay(30);
}
switch is like a menu — jump to whichever pattern matches the current number. break says “stop here, don’t fall through to the next case.” FastLED.show() sends the new frame to the strip. delay(30) waits 30 milliseconds — about 33 frames per second, smooth enough for a party.
The whole thing in one sentence
When turned on, the ESP32 starts pattern 0 (setup). Then it loops forever: draw the current pattern, show it, wait 30ms, and every 15 seconds switch to the next one (loop).
First thing to try: change PATTERN_MS from 15000 to 3000. Each pattern will show for 3 seconds, so you can see all 5 quickly and confirm the sweater works before sewing anything.
Check: With ESP32 connected by USB-C to your computer and the LED strip connected, upload the code and confirm all 5 patterns cycle through correctly. Rudolf’s LED (index 30) should be the only one that lights up in pattern 1 — if your layout has Rudolf’s nose elsewhere, change
leds[30]to match.
Step 4: Assemble and charge
Time: ~10 minutes
- Sew the toggle switch onto the inside hem — somewhere you can reach it by sliding your hand under the sweater. Front pocket seam works well.
- Place ESP32, LiPo, TP4056, and MT3608 in the inside pocket you sewed.
- Connect all the wiring. Stuff it carefully into the pocket.
- Plug USB-C into the TP4056 module. Watch for the red charging LED.
- Charge until the blue “done” LED appears (usually 2-4 hours from flat).
- Toggle the switch on. All 60 LEDs should light up.
Check: Walk around the room while wearing the sweater. The strip should not flex or pull. If any section feels loose, add more stitches before the party.
What just happened (what you learned)
-
Battery power circuit chain — LiPo gives 3.7V, TP4056 manages safe charging, MT3608 boosts it to 5V, toggle switch breaks the circuit cleanly. Each component has one job. Understanding why you need all four (not just “LiPo to ESP32 direct”) is the key insight of this build.
-
fadeToBlackBy()vsFastLED.clear()—fadeToBlackBy(leds, n, amount)dims every LED by a fraction rather than wiping them. This is howpatternSnow()andpatternTwinklingTree()get their trails. CallingFastLED.clear()between patterns resets to black cleanly so the next pattern starts fresh. -
Wearable constraints — Every design decision here is dictated by someone wearing this. Battery-based power, strip sewn firmly, switch accessible, charger port reachable without disassembly. Real-world constraints beat theoretical designs every time.
-
random8()andrandom16()— FastLED’s faster random functions, tuned for microcontrollers.random8(NUM_LEDS)returns a value between 0 and 59 — exactly right for a random LED index. -
Pattern switching with
millis()—millis() - lastChange > PATTERN_MSis a non-blocking timer. Unlikedelay(15000), it lets the LED animation keep running smoothly while the sketch waits for the switch moment.
Level Up
Manual pattern skip button: Wire a button to GPIO 0 (C6: GPIO 9) — the built-in BOOT button on most ESP32 dev boards. Detect a press in loop() using edge detection. Each press advances currentPattern by one immediately, skipping the 15-second timer.
Sound-reactive mode: Add an INMP441 microphone on I2S pins. Add a 6th pattern that pulses all LEDs with the room’s audio amplitude — quiet = dim, loud = full brightness. The sweater reacts to the music at the party.
Bouncing bauble: A single pixel that bounces back and forth along the strip with easing (fast in the middle, slowing at the ends) and a comet tail. Alternates red and gold on each full bounce.
Battery life estimate: At BRIGHTNESS=80, 60 LEDs average about 30mA combined (they’re not all full-on). ESP32 adds ~80mA. Total ~110mA from the battery. On 2000mAh: about 15 hours theoretical, 6–8 hours practical (efficiency losses in the boost converter). More than enough for a full party.
Troubleshooting
| Problem | Fix |
|---|---|
| LEDs don’t light when toggle switch is ON | Check MT3608 output is actually 5V. Check the toggle switch wiring (switches can be normally-closed or normally-open). |
| Only some LEDs work, rest are dark | Bad solder joint on the strip. Check the connection at the first dark LED. |
| ESP32 resets or behaves erratically | MT3608 output voltage is too low or too high. Re-measure with a voltmeter — should be exactly 5.0V. |
| Strip won’t stay sewn on | You need more stitches. Aim for stitches every 5–6cm rather than every 10cm. Use strong thread. |
| TP4056 doesn’t charge (no red LED) | Make sure you’re using a USB-C data cable, not a charge-only cable. Check LiPo polarity — reversed polarity won’t charge and can damage the module. |
| Battery lasts less than 2 hours | Reduce BRIGHTNESS from 80 to 50. Or reduce NUM_LEDS (cut the strip shorter). Each LED draws ~20mA at full white. |