Parent info
Parts you need
Affiliate links — we may earn a small commission
Try this circuit in your browser!
Run the code, press the buttons and watch what happens — before you buy any parts. No account needed.
Open in Simulator →The gift that gets used every single day.
Imagine this: you hand your grandmother a small 3D-printed frame. She turns it over. On the screen, a family photo fades in — the one from last Christmas. Then another. Then one from when the kids were small.
She tears up. She shows everyone who visits for the next year. She’s never once plugged it into a computer. She added new photos herself, from her phone, without you explaining anything.
That’s what we’re building. In about 2 hours. For around $28.
What you’ll need
| Part | What it does | Price |
|---|---|---|
| ESP32-S3 Dev Board | Runs the slideshow and the WiFi web server | ~$12 |
| 2.8” TFT Display (ILI9341, SPI) | Shows the photos — 320x240 pixels, full colour | ~$8 |
| MicroSD card module (SPI) | Stores the photos on an SD card | ~$2 |
| MicroSD card, 8GB | The photos live here — plenty of space for hundreds | ~$4 |
| USB-C power cable | Frame runs from any USB charger | ~$5 |
You also need: a 3D printer or a small picture frame, your computer to prep the photos.
Total: ~$28 (plus frame/printing) | Time: ~2 hours | Difficulty: ●●○○○
Before you start: Resize all photos to exactly 320x240 pixels and save as JPEG. Use Preview (Mac), IrfanView (Windows), or any image editor. The display can’t show higher resolution than 320x240 — it just fills the screen with whatever you give it.
How it works (60 seconds)
Think of it like a digital TV channel that lives on the bookshelf.
Photos are stored as JPEG files on an SD card. The ESP32 reads them one at a time, decompresses each one, and paints it to the TFT screen. After 15 seconds, it moves to the next one.
The clever part is the WiFi web server. Your ESP32 hosts a tiny webpage — just an upload form. Anyone on the same WiFi network can open a browser on their phone, go to the frame’s address, and upload a new photo directly to the SD card. The frame picks it up on the next cycle.
The SD card and the TFT screen share the same SPI data bus (4 wires). Each device gets its own “chip select” pin — like raising your hand to get the teacher’s attention. Only one device talks at a time.
Step 0: Prepare your photos
Time: ~10 minutes
- Gather family photos on your computer.
- Resize them all to 320x240 pixels (or 240x320 if portrait orientation).
- Save as JPEG.
- Create a folder called
photoson the microSD card (at the root level). - Copy all resized photos into
/photos/. - Insert the microSD card into the SD module.
Check: On the SD card, the folder path should be:
photos/photo1.jpg,photos/photo2.jpg, etc. Not inside any other folder.
Step 1: Wire the TFT and SD card
Time: ~15 minutes
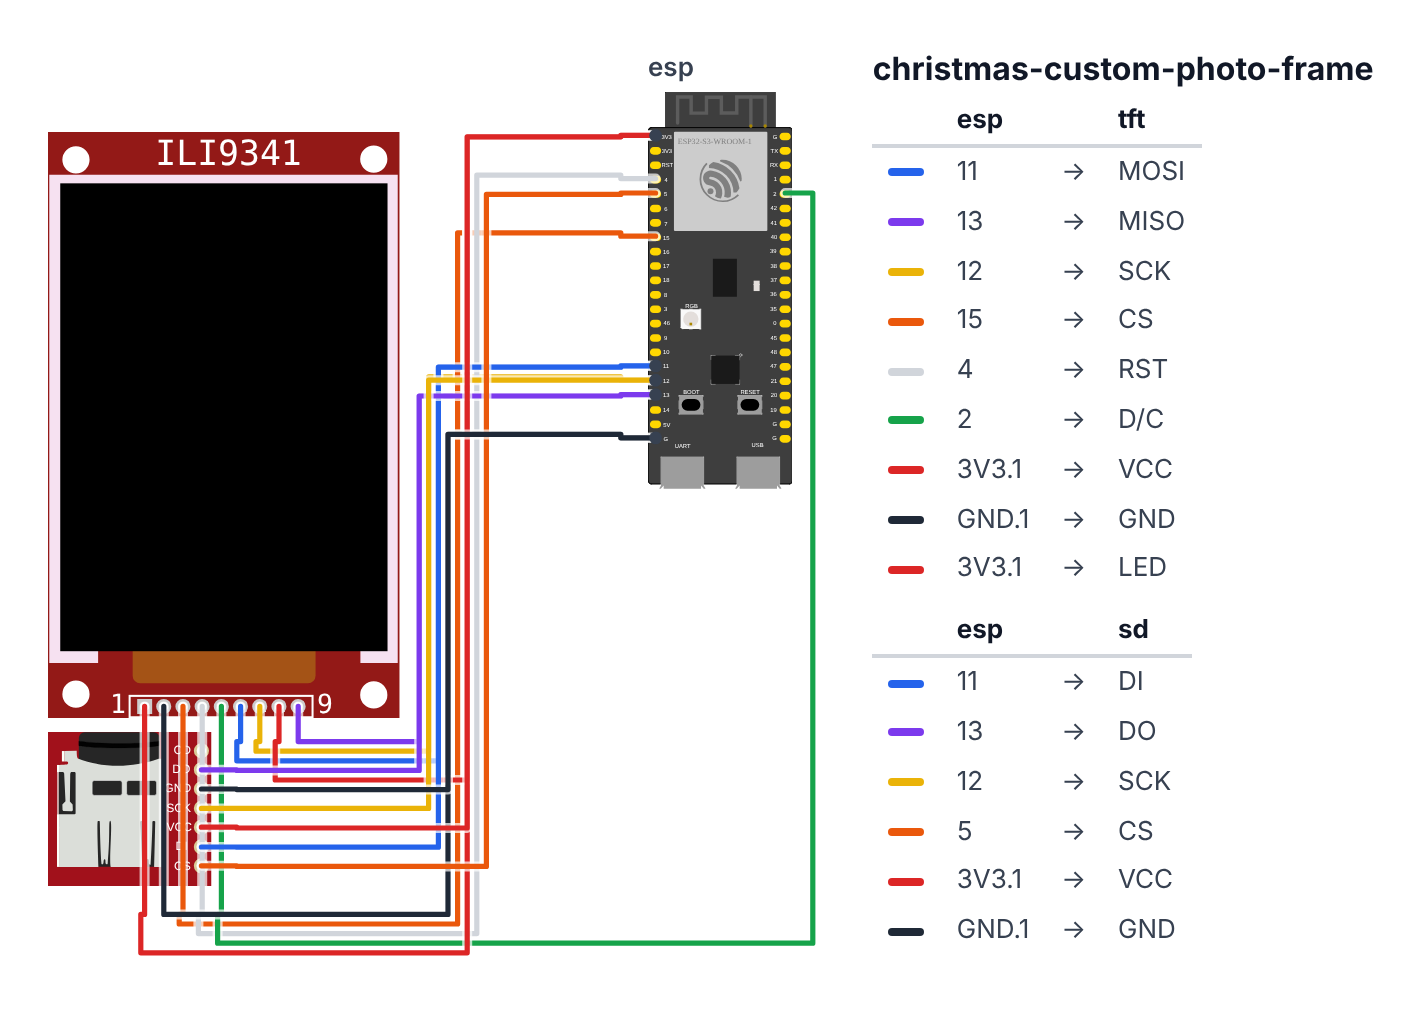
This is the most complex wiring in this project — 9 connections. Go slowly, double-check each one.
The TFT and SD card share the SPI bus (GPIO 11/12/13; C6: GPIO 19/20/21). Each gets its own CS pin.
| ESP32-S3 | ESP32-C6 | TFT Pin | SD Pin | Notes |
|---|---|---|---|---|
| GPIO 11 | GPIO 19 | MOSI | MOSI | Shared SPI data out |
| GPIO 13 | GPIO 20 | MISO | MISO | Shared SPI data in |
| GPIO 12 | GPIO 21 | SCK | SCK | Shared SPI clock |
| GPIO 15 | GPIO 3 | CS | — | TFT chip select |
| GPIO 5 | GPIO 18 | — | CS | SD card chip select |
| GPIO 4 | GPIO 0 | RESET | — | TFT reset |
| GPIO 2 | GPIO 10 | DC | — | TFT data/command toggle |
| 3.3V | 3.3V | VCC, LED | VCC | Both devices on 3.3V |
| GND | GND | GND | GND | Common ground |
Check: After wiring, look at each wire and trace it: TFT CS on GPIO 15 (C6: GPIO 3), SD CS on GPIO 5 (C6: GPIO 18). Swapping the CS pins is the most common mistake.
Step 2: Install the libraries
Time: ~5 minutes
In Arduino IDE: Sketch → Include Library → Manage Libraries, then install:
- “Adafruit GFX Library” — base graphics library
- “Adafruit ILI9341” — TFT driver
- “JPEGDEC” — decodes JPEG photos efficiently on the ESP32
The SD.h, SPI.h, WiFi.h, and WebServer.h libraries are already included with the ESP32 board package.
Step 3: Upload the code
Time: ~10 minutes
The big picture first. This program turns the ESP32 into a digital photo frame that anyone can add photos to from their phone. The ESP32 is the brain. The TFT screen is a small colour display that shows photos. The SD card stores the photo files. The clever part: the ESP32 also runs a tiny website — so your grandma can open a browser on her phone and send new photos straight to the frame, no computer needed.
A program is like a recipe. Fill in your WiFi credentials and upload.
// ========== CHOOSE YOUR BOARD ==========
// Uncomment the line for YOUR board:
#define BOARD_S3    // ESP32-S3-DevKitC-1
//#define BOARD_C6  // ESP32-C6-DevKitC-1
// ========================================

#ifdef BOARD_S3
  #define PIN_TFT_CS           15
  #define PIN_TFT_DC           2
  #define PIN_TFT_RST          4
  #define PIN_SD_CS            5
  #define PIN_SPI_SCK          12
  #define PIN_SPI_MISO         13
  #define PIN_SPI_MOSI         11
#endif
#ifdef BOARD_C6
  #define PIN_TFT_CS           3
  #define PIN_TFT_DC           10
  #define PIN_TFT_RST          0
  #define PIN_SD_CS            18
  #define PIN_SPI_SCK          21
  #define PIN_SPI_MISO         20
  #define PIN_SPI_MOSI         19
#endif

#include <SPI.h>
#include <Adafruit_GFX.h>
#include <Adafruit_ILI9341.h>
#include <SD.h>
#include <WiFi.h>
#include <WebServer.h>
#include <JPEGDEC.h>

#define TFT_CS   PIN_TFT_CS
#define TFT_DC    PIN_TFT_DC
#define TFT_RST   PIN_TFT_RST
#define SD_CS     PIN_SD_CS

const char* ssid     = "YourWiFiName";
const char* password = "YourWiFiPassword";

Adafruit_ILI9341 tft = Adafruit_ILI9341(TFT_CS, TFT_DC, TFT_RST);
WebServer server(80);
JPEGDEC jpeg;

String photoFiles[100];
int photoCount   = 0;
int currentPhoto = 0;
unsigned long lastSlide  = 0;
const unsigned long SLIDE_INTERVAL = 15000;

int jpegDrawCallback(JPEGDRAW *pDraw) {
  tft.startWrite();
  tft.setAddrWindow(pDraw->x, pDraw->y, pDraw->iWidth, pDraw->iHeight);
  tft.writePixels((uint16_t *)pDraw->pPixels, pDraw->iWidth * pDraw->iHeight);
  tft.endWrite();
  return 1;
}

void displayPhoto(String filename) {
  if (jpeg.open(SD.open(filename), jpegDrawCallback)) {
    tft.fillScreen(ILI9341_BLACK);
    jpeg.decode(0, 0, 0);
    jpeg.close();
  }
}

void scanSDForPhotos() {
  photoCount = 0;
  File root = SD.open("/photos");
  if (!root) return;
  File f = root.openNextFile();
  while (f && photoCount < 100) {
    String name = f.name();
    if (name.endsWith(".jpg") || name.endsWith(".JPG")) {
      photoFiles[photoCount++] = "/photos/" + name;
    }
    f = root.openNextFile();
  }
}

const char* uploadPage = R"rawhtml(
<!DOCTYPE html><html><head><title>Photo Frame Upload</title>
<meta name="viewport" content="width=device-width,initial-scale=1">
<style>body{font-family:sans-serif;max-width:480px;margin:40px auto;padding:20px;background:#fafafa;}
h1{color:#333;}input,button{width:100%;padding:12px;margin:8px 0;font-size:1em;box-sizing:border-box;}
button{background:#c41e3a;color:white;border:none;border-radius:6px;cursor:pointer;}</style>
</head><body>
<h1>Add a Photo</h1>
<p>Resize photos to 320x240 before uploading for best results.</p>
<form method="POST" action="/upload" enctype="multipart/form-data">
  <input type="file" name="photo" accept="image/jpeg">
  <button type="submit">Upload to Frame</button>
</form>
</body></html>
)rawhtml";

File uploadFile;

void setup() {
  Serial.begin(115200);
  SPI.begin(PIN_SPI_SCK, PIN_SPI_MISO, PIN_SPI_MOSI);
  tft.begin();
  tft.setRotation(1);
  tft.fillScreen(ILI9341_BLACK);
  tft.setTextColor(ILI9341_WHITE);
  tft.setTextSize(2);
  tft.setCursor(10, 100);
  tft.print("Starting...");

  if (!SD.begin(SD_CS)) {
    tft.setCursor(10, 130);
    tft.print("SD card failed!");
    Serial.println("SD card init failed. Check wiring and card.");
    while (1) delay(1000);
  }
  scanSDForPhotos();
  Serial.println("Found " + String(photoCount) + " photos on SD card.");

  WiFi.begin(ssid, password);
  tft.setCursor(10, 130);
  tft.print("Connecting WiFi");
  while (WiFi.status() != WL_CONNECTED) {
    delay(500);
    tft.print(".");
  }

  String ip = WiFi.localIP().toString();
  tft.fillScreen(ILI9341_BLACK);
  tft.setCursor(10, 100);
  tft.print("Add photos at:");
  tft.setCursor(10, 130);
  tft.setTextSize(1);
  tft.print(ip);
  Serial.println("Frame ready! Upload photos at: http://" + ip);
  delay(4000);

  server.on("/", []() {
    server.send(200, "text/html", uploadPage);
  });
  server.on("/upload", HTTP_POST,
    []() {
      server.send(200, "text/plain", "Upload done! Slideshow will include your photo shortly.");
      scanSDForPhotos();
    },
    []() {
      HTTPUpload& up = server.upload();
      if (up.status == UPLOAD_FILE_START) {
        String path = "/photos/" + up.filename;
        uploadFile = SD.open(path, FILE_WRITE);
      } else if (up.status == UPLOAD_FILE_WRITE) {
        if (uploadFile) uploadFile.write(up.buf, up.currentSize);
      } else if (up.status == UPLOAD_FILE_END) {
        if (uploadFile) uploadFile.close();
      }
    });
  server.begin();

  if (photoCount > 0) displayPhoto(photoFiles[0]);
}

void loop() {
  server.handleClient();

  if (photoCount > 0 && millis() - lastSlide > SLIDE_INTERVAL) {
    currentPhoto = (currentPhoto + 1) % photoCount;
    displayPhoto(photoFiles[currentPhoto]);
    lastSlide = millis();
  }
}
Line-by-line: what every line does and why
Lines 1–7: Borrowing ready-made instruction books
#include <SPI.h>
#include <Adafruit_GFX.h>
#include <Adafruit_ILI9341.h>
#include <SD.h>
#include <WiFi.h>
#include <WebServer.h>
#include <JPEGDEC.h>
#include means “grab this instruction book.” We need seven of them:
- SPI — the communication language the screen and SD card use (like a private wire conversation).
- Adafruit_GFX — general drawing tools: lines, text, shapes.
- Adafruit_ILI9341 — instructions specifically for this brand of screen.
- SD — how to read and write files on an SD card.
- WiFi — connecting to the internet.
- WebServer — turning the ESP32 into a tiny website host.
- JPEGDEC — unpacking compressed JPEG photo files.
Lines 9–12: Pin numbers with names
#define TFT_CS   PIN_TFT_CS
#define TFT_DC    PIN_TFT_DC
#define TFT_RST   PIN_TFT_RST
#define SD_CS     PIN_SD_CS
#define sticks a name onto a number — like labelling a drawer. The numbers come from the board block at the very top of the sketch. TFT_CS means “the leg (pin) on the ESP32 that the screen’s chip-select wire connects to” — leg 15 on the ESP32-S3 (C6: leg 3). Chip-select is like raising your hand so only the screen listens, not the SD card. SD_CS is the same idea for the SD card.
Lines 14–15: WiFi details
const char* ssid     = "YourWiFiName";
const char* password = "YourWiFiPassword";
const char* stores a piece of text. const means “don’t change this.” Replace the placeholder text with your real WiFi name and password.
Lines 17–19: Creating the screen, web server, and JPEG decoder
Adafruit_ILI9341 tft = Adafruit_ILI9341(TFT_CS, TFT_DC, TFT_RST);
WebServer server(80);
JPEGDEC jpeg;
Like naming a dog so you can call it. tft is the name we give the screen — we tell it which pins it uses. server is our tiny website on port 80 (port 80 is how browsers talk to websites). jpeg is the photo unpacker. From now on, tft.doSomething() talks to the screen, server.doSomething() controls the website.
Lines 21–25: Photo memory and timing
String photoFiles[100];
int photoCount   = 0;
int currentPhoto = 0;
unsigned long lastSlide  = 0;
const unsigned long SLIDE_INTERVAL = 15000;
String photoFiles[100]— a shelf with 100 compartments, each holding a filename like/photos/family.jpg.int photoCount— a tally counter: how many photos are on the SD card.intmeans a whole number.int currentPhoto— which photo we’re currently showing.unsigned long lastSlide— a sticky note: “I last changed the photo at this many milliseconds.”SLIDE_INTERVAL = 15000— 15,000 milliseconds = 15 seconds per photo.
jpegDrawCallback(): the photo painter
int jpegDrawCallback(JPEGDRAW *pDraw) {
  tft.startWrite();
  tft.setAddrWindow(pDraw->x, pDraw->y, pDraw->iWidth, pDraw->iHeight);
  tft.writePixels((uint16_t *)pDraw->pPixels, pDraw->iWidth * pDraw->iHeight);
  tft.endWrite();
  return 1;
}
This is a callback function — a mini recipe that gets called automatically by the JPEG decoder as it unpacks the photo in small chunks. Each chunk is a small rectangle of pixels.
startWrite()/endWrite()— like opening and closing a paint session with the screen.setAddrWindow()— “I’m about to paint pixels in this rectangle.”writePixels()— send the actual pixel colours to the screen.return 1— tells the decoder “I’m ready for the next chunk.”
displayPhoto(): showing one photo
void displayPhoto(String filename) {
  if (jpeg.open(SD.open(filename), jpegDrawCallback)) {
    tft.fillScreen(ILI9341_BLACK);
    jpeg.decode(0, 0, 0);
    jpeg.close();
  }
}SD.open(filename)— open the photo file from the SD card.jpeg.open(...)— start unpacking the JPEG, and tell it to calljpegDrawCallbackfor each chunk.tft.fillScreen(ILI9341_BLACK)— wipe the screen black before drawing the new photo, so old content doesn’t show.jpeg.decode(0, 0, 0)— actually unpack the whole photo, chunk by chunk, calling the callback each time.jpeg.close()— clean up when done.
scanSDForPhotos(): finding all photos on the card
void scanSDForPhotos() {
  photoCount = 0;
  File root = SD.open("/photos");
  if (!root) return;
  File f = root.openNextFile();
  while (f && photoCount < 100) {
    String name = f.name();
    if (name.endsWith(".jpg") || name.endsWith(".JPG")) {
      photoFiles[photoCount++] = "/photos/" + name;
    }
    f = root.openNextFile();
  }
}- Reset the count to 0, then open the
/photosfolder. if (!root) return—!means NOT. If the folder doesn’t exist, stop here.while (f && photoCount < 100)—whilemeans “keep doing this as long as.” Keep looking at files until there are none left or we’ve found 100.name.endsWith(".jpg")— only collect files ending in.jpg(skip anything else).photoFiles[photoCount++]— store the full path in the next shelf compartment.++adds 1 to photoCount after storing.||means OR — accept either.jpgor.JPG(both upper and lower case).
setup(): the morning routine — runs once on power-on
void setup() {
  Serial.begin(115200);
  SPI.begin(PIN_SPI_SCK, PIN_SPI_MISO, PIN_SPI_MOSI);
  tft.begin();
  tft.setRotation(1);
  tft.fillScreen(ILI9341_BLACK);
  tft.setTextColor(ILI9341_WHITE);
  tft.setTextSize(2);
  tft.setCursor(10, 100);
tft.print("Starting...");Serial.begin(115200)— turn on the “phone line” to your computer at 115200 speed.SPI.begin(PIN_SPI_SCK, PIN_SPI_MISO, PIN_SPI_MOSI)— start the shared communication bus for the screen and SD card on its three wires: clock GPIO 12, data in GPIO 13, data out GPIO 11 (C6: GPIO 21, 20, 19).tft.begin()— wake up the screen.tft.setRotation(1)— rotate the display to landscape (wide) orientation. 0 is portrait.tft.fillScreen(ILI9341_BLACK)— paint the whole screen black.tft.setTextColor(ILI9341_WHITE)— write in white.tft.setTextSize(2)— medium-sized text.tft.setCursor(10, 100)— move to column 10, row 100 pixels. 0,0 is top-left.tft.print("Starting...")— write text on screen.
  if (!SD.begin(SD_CS)) {
    ...
    while (1) delay(1000);
  }
  scanSDForPhotos();
if (!SD.begin(SD_CS)) — ! means NOT. Try to start the SD card. If it failed, show an error and while (1) loops forever (halts the program — there’s no point continuing without photos).
  WiFi.begin(ssid, password);
  tft.print("Connecting WiFi");
  while (WiFi.status() != WL_CONNECTED) {
    delay(500);
    tft.print(".");
  }
while (WiFi.status() != WL_CONNECTED) — != means “not equal to.” Keep waiting (print dots) until WiFi connects.
  String ip = WiFi.localIP().toString();
  tft.print("Add photos at:");
  tft.print(ip);
  Serial.println("Frame ready! Upload photos at: http://" + ip);
  delay(4000);
WiFi.localIP() gives the frame’s address on your network (like a house number). Show it on screen for 4 seconds. Write it down — this is what people type into their phone browser.
  server.on("/", []() {
    server.send(200, "text/html", uploadPage);
  });
server.on("/", ...) — when someone visits the frame’s address in a browser, send them the upload page. 200 means “everything’s fine” in web language. The []() { ... } is a mini function with no name — called a lambda.
  server.on("/upload", HTTP_POST, ...);
  server.begin();
Register the upload route. When someone submits a photo, receive it in chunks and write each chunk to the SD card. server.begin() starts listening for connections.
loop(): the heartbeat — runs forever
void loop() {
  server.handleClient();

  if (photoCount > 0 && millis() - lastSlide > SLIDE_INTERVAL) {
    currentPhoto = (currentPhoto + 1) % photoCount;
    displayPhoto(photoFiles[currentPhoto]);
    lastSlide = millis();
  }
}server.handleClient()— check if anyone is visiting the website or uploading a photo. Must be called every loop so the web server stays responsive.millis() - lastSlide > SLIDE_INTERVAL— has 15 seconds passed since the last photo change?(currentPhoto + 1) % photoCount— advance to the next photo.%means remainder — after the last photo, it wraps back to 0.displayPhoto(...)— show the next photo.lastSlide = millis()— update the sticky note: “I changed photos just now.”
This loop never uses delay() for the 15-second wait. That’s important — delay(15000) would freeze the web server for 15 seconds and miss anyone trying to upload a photo.
The whole thing in one sentence
When powered on, the frame finds its photos, connects to WiFi, shows its address on screen, and starts the slideshow (setup). Then it keeps serving the upload website while cycling through photos every 15 seconds (loop).
First thing to try: change SLIDE_INTERVAL from 15000 to 3000 and watch it cycle quickly through all your photos to confirm they all loaded.
Check: The TFT screen should show “Starting…”, then “Connecting WiFi…”, then the IP address for ~4 seconds, then your first photo. If it shows “SD card failed!” — check your SD card wiring and make sure the card is formatted FAT32 with a /photos folder containing at least one .jpg file.
Step 4: Test the upload from your phone
Time: ~5 minutes
- Write down the IP address shown on the TFT during startup (e.g.
192.168.1.55). - On your phone, open a browser. Make sure you’re on the same WiFi network.
- Type
http://192.168.1.55(your frame’s IP). - You should see the “Add a Photo” upload form.
- Upload a JPEG photo from your camera roll.
- Within 30 seconds it should appear in the slideshow.
Check: The photo appears within the next 15-second slide cycle. If nothing happens, make sure the photo is a JPEG (not PNG or HEIC), and that it’s small enough to display (photos don’t need to be pre-resized if they’re landscape orientation, but 320x240 looks sharpest).
Step 5: Build the frame
Time: ~20 minutes
3D print a frame with:
- A front recess for the TFT screen (2.8” = 50mm × 50mm visible area, check your specific module dimensions)
- A hidden slot in the back for the ESP32
- A channel routed for the USB-C power cable so it exits cleanly at the bottom
Print in any colour. Sand the edges. This is what makes the difference between “a prototype” and “a gift.”
Include a small card with the frame: write down the IP address and the instructions “Go to [IP] in your phone’s browser to add photos.”
What just happened (what you learned)
-
SPI bus sharing — two devices (TFT and SD card) sharing the same 4 wires, each with its own CS pin. Like a classroom where the teacher addresses students one at a time even though everyone can hear.
-
JPEG decoding on a microcontroller — JPEGDEC decompresses images block-by-block and hands each block directly to the TFT via a callback. The ESP32 never holds the full uncompressed image in RAM — just one strip at a time.
-
Web server on ESP32 —
WebServer.hlets your board host real HTTP endpoints. The/uploadroute handles chunked file data, writing to SD as it arrives. This is why large photos work without crashing. -
millis()timing instead ofdelay()—millis() - lastSlide > SLIDE_INTERVALis non-blocking.delay(15000)would freeze the web server for 15 seconds and miss incoming upload connections.
Level Up
Add a caption overlay: Read a text file from SD named the same as each photo (photo1.txt for photo1.jpg) and display the caption text at the bottom using tft.print().
Physical “next photo” button: Wire a button to GPIO 0 (C6: GPIO 9) — the same pin as the board’s BOOT button. Short press = skip to next photo immediately. Long press = toggle single-photo pause mode.
Auto sleep: Add NTP sync and use esp_sleep_enable_timer_wakeup() to power down between midnight and 7am. Extends display backlight life and saves power for anyone running from a USB power bank.
Troubleshooting
| Problem | Fix |
|---|---|
| “SD card failed!” on screen | Check CS pin is GPIO 5, not GPIO 15 (C6: GPIO 18, not GPIO 3). Card must be FAT32 formatted. Reseat the card. |
| Photos appear garbled or wrong colours | Check TFT DC pin is GPIO 2, CS is GPIO 15, RST is GPIO 4 (C6: DC GPIO 10, CS GPIO 3, RST GPIO 0). One swap causes garbled output. |
| Phone can’t access the upload page | Phone must be on the same WiFi network as the ESP32. Disable mobile data on the phone. |
| Photo uploads but doesn’t appear | Photo must be JPEG (.jpg). PNG and HEIC won’t decode. Convert first. |
| Screen shows corrupted image | Photo needs to be 320x240 pixels. Taller/wider images sometimes display incorrectly. |
| IP address changed after restart | Your router assigned a new IP. Check Serial Monitor for the new address, or set a static IP in your router’s DHCP settings. |