Parent info
Parts you need
Affiliate links — we may earn a small commission
Try this circuit in your browser!
Run the code, press the buttons and watch what happens — before you buy any parts. No account needed.
Open in Simulator →Your own encrypted radio. No WiFi needed. No logs. No trace.
Imagine this: you and your best friend are on opposite ends of the house. You type a message. In under a second, it appears on a small screen in their room — encrypted in transit, decoded only on arrival. Nobody scanning your WiFi can see it. It doesn’t go through the internet at all.
That’s ESP-NOW. It’s built into every ESP32 chip. It bypasses the router entirely and talks directly between the two boards at the hardware level, invisible to network scanners.
Two boards. Two screens. One shared secret key. 250-meter range.
What you’ll need
| Part | What it does | Price |
|---|---|---|
| ESP32-S3-DevKitC-1 ×2 | One for you, one for your accomplice | ~$24 |
| OLED Display 0.96” ×2 | Shows incoming messages on each board | ~$8 |
| USB cables ×2 | Power and programming (use existing cables) | $0 |
| Breadboard + jumper wires | Connects the OLED displays | ~$5 |
Total: ~$32 | Time: ~2 hours | Difficulty: ●●●○○
Two boards are required. This project only works with two ESP32s. You can’t test the messenger with one board — you need both ends of the communication channel.
How it works (60 seconds)
Think of it like walkie-talkies that nobody else can tune into.
ESP-NOW is a peer-to-peer protocol built into the ESP32’s WiFi chip. When you use regular WiFi, traffic goes: your device → router → internet → destination. ESP-NOW skips all of that. It goes: Board A → Board B. Directly. No router. No internet address. No logs.
To send a message: you type it in the Serial Monitor. The code XOR-encrypts it using a secret key that both boards share. The encrypted bytes fly across the air. The other board receives them, runs the same XOR with the same key (XOR is its own reverse), and shows the decoded text on the OLED screen.
Range: 250 meters line-of-sight. 100-150 meters through house walls.
Step 0: Find each board’s MAC address
Time: ~10 minutes
Before building the messenger, you need to know each board’s hardware address — ESP-NOW uses MAC addresses to know where to send messages.
Flash this tiny sketch to each board and note the MAC address it prints:
// Works on any ESP32 board (S3, C6, etc.) — no board-specific pins needed.
#include <WiFi.h>
void setup() {
  Serial.begin(115200);
  WiFi.mode(WIFI_STA);
  Serial.println("My MAC: " + WiFi.macAddress());
}
void loop() {}
Write down both MACs. You’ll need them in the next step.
Example:
- Board A MAC:
AA:BB:CC:DD:EE:01 - Board B MAC:
AA:BB:CC:DD:EE:02
Check: Both boards print their MAC address in Serial Monitor. If you see
00:00:00:00:00:00, try a different USB port or check that you selected the correct board in Arduino IDE.
Step 1: Wire the OLED displays
Time: ~10 minutes
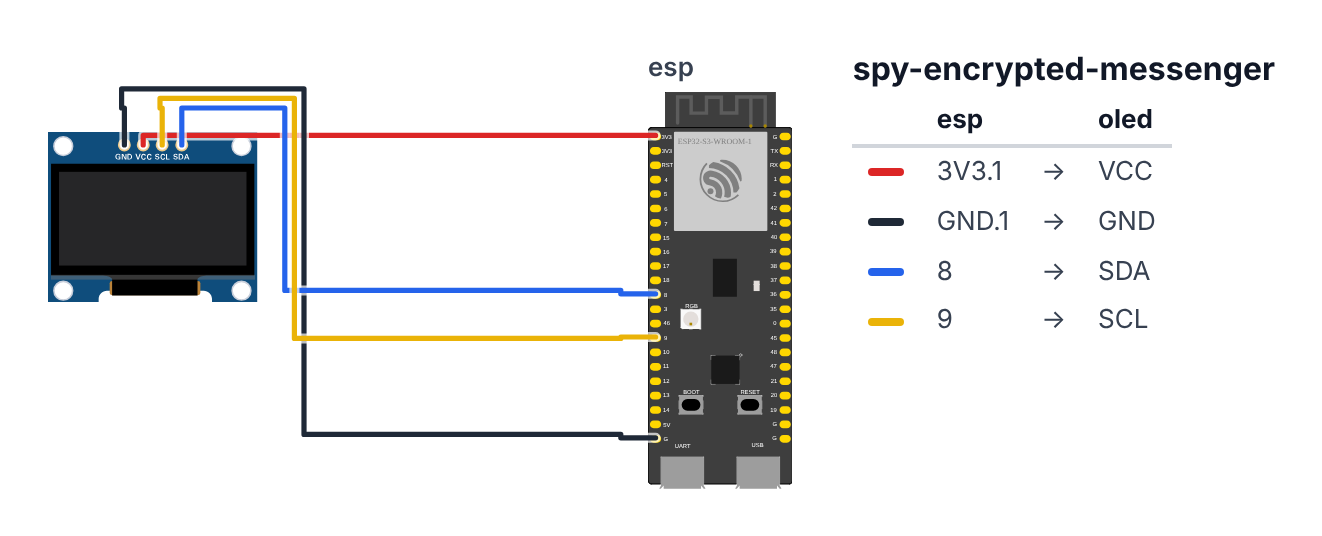
Wire both boards identically — each has its own OLED:
| ESP32 Pin | Wire Color | OLED Pin |
|---|---|---|
| 3.3V | Red | VCC |
| GND | Black | GND |
| GPIO 8 | Blue | SDA |
| GPIO 9 | Yellow | SCL |
That’s 4 wires per board, 8 total. Both boards are wired the same way.
Using ESP32-C6 boards? Wire SDA to GPIO 6 and SCL to GPIO 7, and change
Wire.begin(8, 9);in the messenger code toWire.begin(6, 7);.
Check: Before uploading the messenger code, upload a simple OLED test to each board to confirm the screen works. If you see a flicker when powered on, the OLED is alive.
Step 2: Install libraries
In Arduino IDE: Sketch → Include Library → Manage Libraries
- Search “Adafruit SSD1306” → Install (by Adafruit)
- When prompted, click Install All (this also installs Adafruit GFX, which it needs)
ESP-NOW (esp_now.h) is already built into the ESP32 board package — no extra install needed.
Step 3: Flash the messenger to both boards
Time: ~10 minutes
Fill in the MAC addresses you found in Step 0, then upload this code to Board A first (enter Board B’s MAC). Then swap the MAC and upload to Board B (enter Board A’s MAC).
The big picture first. This program turns two ESP32s into a private radio communication system:
- Both boards share one secret key (like a combination lock code). You choose it.
- When you type a message in Serial Monitor, the code scrambles it using XOR encryption, then fires it over the ESP-NOW radio directly to the other board — no router, no internet.
- The receiving board unscrambles it with the same key and shows the message on the OLED screen.
- Nobody scanning your WiFi can see the messages — they never touch the internet.
#include <esp_now.h>
#include <WiFi.h>
#include <Wire.h>
#include <Adafruit_GFX.h>
#include <Adafruit_SSD1306.h>

#define SCREEN_WIDTH 128
#define SCREEN_HEIGHT 64
Adafruit_SSD1306 display(SCREEN_WIDTH, SCREEN_HEIGHT, &Wire, -1);

const char* CIPHER_KEY = "BuildCoolSpy2026";

uint8_t peerAddress[] = {0xAA, 0xBB, 0xCC, 0xDD, 0xEE, 0x02};

String xorCipher(String input, const char* key) {
  String output = input;
  int keyLen = strlen(key);
  for (int i = 0; i < input.length(); i++) {
    output[i] = input[i] ^ key[i % keyLen];
  }
  return output;
}

void OnDataRecv(const uint8_t* mac, const uint8_t* incomingData, int len) {
  char buf[len + 1];
  memcpy(buf, incomingData, len);
  buf[len] = '\0';

  String encrypted = String(buf);
  String decrypted = xorCipher(encrypted, CIPHER_KEY);

  Serial.println("Received (decrypted): " + decrypted);

  display.clearDisplay();
  display.setTextSize(1);
  display.setTextColor(SSD1306_WHITE);
  display.setCursor(0, 0);
  display.println("-- Incoming Msg --");
  display.println();
  display.println(decrypted);
  display.display();
}

void setup() {
  Serial.begin(115200);

  Wire.begin(8, 9);
  if (!display.begin(SSD1306_SWITCHCAPVCC, 0x3C)) {
    Serial.println("OLED not found! Check wiring.");
    while (1);
  }
  display.clearDisplay();
  display.setCursor(0, 0);
  display.println("Op: Silent Channel");
  display.println("Initializing...");
  display.display();

  WiFi.mode(WIFI_STA);
  Serial.println("My MAC: " + WiFi.macAddress());

  if (esp_now_init() != ESP_OK) {
    Serial.println("ESP-NOW init failed!");
    return;
  }

  esp_now_register_recv_cb(OnDataRecv);

  esp_now_peer_info_t peerInfo = {};
  memcpy(peerInfo.peer_addr, peerAddress, 6);
  peerInfo.channel = 0;
  peerInfo.encrypt = false;
  if (esp_now_add_peer(&peerInfo) != ESP_OK) {
    Serial.println("Failed to add peer. Check MAC address.");
  } else {
    Serial.println("Peer registered. Type in Serial to send.");
  }

  display.clearDisplay();
  display.setCursor(0, 0);
  display.println("ARMED");
  display.println("Type in Serial");
  display.println("to send a msg.");
  display.display();
}

void loop() {
  if (Serial.available()) {
    String message = Serial.readStringUntil('\n');
    message.trim();

    if (message.length() > 0) {
      String encrypted = xorCipher(message, CIPHER_KEY);

      esp_err_t result = esp_now_send(
        peerAddress,
        (uint8_t*)encrypted.c_str(),
        encrypted.length()
      );

      if (result == ESP_OK) {
        Serial.println("Sent: " + message);
      } else {
        Serial.println("Send failed. Is the other board powered on and in range?");
      }
    }
  }
}
Line-by-line: what every line does and why
Lines 1–5: Borrowing ready-made tools
#include <esp_now.h>
#include <WiFi.h>
#include <Wire.h>
#include <Adafruit_GFX.h>
#include <Adafruit_SSD1306.h>
#include means “grab this instruction book.”
- esp_now is the instruction book for the peer-to-peer radio built into every ESP32. No router needed.
- WiFi — even though we don’t connect to the internet, we still need this to turn the WiFi chip on in “Station” mode, which activates the radio hardware ESP-NOW uses.
- Wire — the I2C bus instruction book. The OLED talks over I2C.
- Adafruit_GFX and Adafruit_SSD1306 — the instruction books for drawing text and graphics on the OLED screen.
Lines 7–9: Setting up the display size
#define SCREEN_WIDTH 128
#define SCREEN_HEIGHT 64
Adafruit_SSD1306 display(SCREEN_WIDTH, SCREEN_HEIGHT, &Wire, -1);
#define gives a number a name. The screen is 128 dots wide and 64 dots tall — those dots are called pixels.
Adafruit_SSD1306 display(...) creates the display object and names it display. We tell it the size and that it talks through Wire (two wires). -1 means “there is no reset pin.”
Line 11: The shared secret key
const char* CIPHER_KEY = "BuildCoolSpy2026";This is the encryption password. Both boards must have this exact string — character for character. Think of it as the combination to a lock. Both sides need the same combination to lock (encrypt) and unlock (decrypt) messages.
Change it to something only you and your friend know.
Line 13: The other board’s address
uint8_t peerAddress[] = {0xAA, 0xBB, 0xCC, 0xDD, 0xEE, 0x02};uint8_t is a number from 0 to 255. A MAC address is 6 of these numbers. The 0x prefix means the number is written in hexadecimal (base 16). So 0xAA is the number 170.
Replace these six numbers with the actual bytes from your other board’s MAC address. If the other board’s MAC is AA:BB:CC:11:22:33, write {0xAA, 0xBB, 0xCC, 0x11, 0x22, 0x33}.
Lines 15–21: The XOR cipher
String xorCipher(String input, const char* key) {
  String output = input;
  int keyLen = strlen(key);
  for (int i = 0; i < input.length(); i++) {
    output[i] = input[i] ^ key[i % keyLen];
  }
  return output;
}
This is a function — a recipe with a name. It takes a message and a key, and scrambles (or unscrambles) them.
^ is the XOR operator. XOR has a magical property: XOR is its own opposite. If A XOR B = C, then C XOR B = A — running the same function with the same key both encrypts and decrypts. So there is only one function for both directions.
key[i % keyLen] — the % operator gives the remainder after dividing. If the key is 16 characters long and the message is 30 characters, i % 16 wraps around: 0,1,2…15,0,1,2…15… The key repeats like a loop, like a clock face. This means the key works for messages of any length.
Lines 23–36: OnDataRecv() — the incoming message handler
void OnDataRecv(const uint8_t* mac, const uint8_t* incomingData, int len) {
  char buf[len + 1];
  memcpy(buf, incomingData, len);
  buf[len] = '\0';
  String encrypted = String(buf);
  String decrypted = xorCipher(encrypted, CIPHER_KEY);
  ...
  display.display();
}
This is a callback function — a function you never call yourself. The ESP-NOW library calls it automatically the moment a message arrives, like a doorbell you didn’t ring.
char buf[len + 1] — a temporary storage box big enough for the incoming data plus one extra slot.
memcpy(buf, incomingData, len) — copy the raw bytes into our box. Think of copying letters from one envelope to another.
buf[len] = '\0' — place a null terminator at the end. This is a special marker (value zero) that tells C “the text ends here.” Without it, String(buf) would keep reading memory past the end and produce garbage.
xorCipher(encrypted, CIPHER_KEY) — run the XOR function. Since both boards use the same key, this turns the scrambled bytes back into readable text.
display.display() — all the display.println() calls before this drew only in the ESP32’s memory (like drawing on paper inside a drawer). display.display() pushes that drawing to the actual screen. Nothing appears until you call this.
Lines 38–71: setup() — runs once at power-on
Wire.begin(8, 9) — start the I2C bus on GPIO 8 (data) and GPIO 9 (clock).
display.begin(SSD1306_SWITCHCAPVCC, 0x3C) — start the OLED. 0x3C is the OLED’s I2C address (like a house number on the two-wire I2C street). Most SSD1306 OLEDs use this address.
WiFi.mode(WIFI_STA) — put the radio in “Station” mode. This activates the antenna hardware without connecting to any router. ESP-NOW needs the radio on but does not need the internet.
esp_now_init() — start the ESP-NOW protocol stack. Returns ESP_OK (a value meaning “success”) if everything worked.
esp_now_register_recv_cb(OnDataRecv) — register the callback. This tells ESP-NOW: “when a message arrives, call OnDataRecv.”
esp_now_peer_info_t peerInfo = {} — a settings form for the other board. The = {} fills it with zeros (empty/default values).
memcpy(peerInfo.peer_addr, peerAddress, 6) — copy the 6 MAC address bytes into the settings form.
esp_now_add_peer(&peerInfo) — register the other board. ESP-NOW only sends messages to boards you have registered as peers.
Lines 73–95: loop() — sends messages
void loop() {
  if (Serial.available()) {
    String message = Serial.readStringUntil('\n');
    message.trim();
    if (message.length() > 0) {
      String encrypted = xorCipher(message, CIPHER_KEY);
      esp_err_t result = esp_now_send(peerAddress, (uint8_t*)encrypted.c_str(), encrypted.length());
      ...
    }
  }
}
Serial.available() — checks if you typed something in the Serial Monitor. Returns true if there are characters waiting to be read.
Serial.readStringUntil('\n') — read everything you typed until you pressed Enter. '\n' is the newline character — the invisible character that Enter key sends.
message.trim() — remove any trailing spaces or invisible characters (like carriage returns from Windows computers).
xorCipher(message, CIPHER_KEY) — encrypt the message before sending.
esp_now_send(peerAddress, (uint8_t*)encrypted.c_str(), encrypted.length()) — send the encrypted bytes over the radio. c_str() converts the Arduino String to a raw C pointer. (uint8_t*) casts it to the type the ESP-NOW function expects.
esp_err_t result — a variable holding the result (success or error code). if (result == ESP_OK) checks if the send succeeded.
The whole thing in one sentence
You type a message in Serial Monitor, the board encrypts it with XOR and fires it over ESP-NOW radio directly to the other board, which decrypts it with the same key and shows it on the OLED — no internet, no logs, no trace.
First thing to try: before worrying about encryption, just confirm both boards can communicate. Change the CIPHER_KEY to the same single character "A" on both boards and send the word "HELLO" — you should see "HELLO" appear on the other screen (single-character XOR with a repeated key is transparent). Then restore the full key.
Check: Each board should print “Peer registered. Type in Serial to send.” in its Serial Monitor. If it says “Failed to add peer” — the MAC address format in
peerAddress[]is wrong. The bytes need to be in hex, like{0xAA, 0xBB, ...}.
Step 4: Send your first secret message
Time: ~2 minutes
- Both boards are powered on.
- Open Serial Monitor for Board A.
- Type a message and press Enter.
- Look at Board B’s OLED screen.
Your message appears on the screen, decrypted, in under a second.
Now try the other direction: open Serial Monitor for Board B, type a reply.
Check: Messages flow both directions. Each board can both send and receive. If messages only go one direction, check that the MAC addresses are swapped correctly between the two sketches.
What just happened (what you learned)
This one uses some genuinely advanced concepts:
-
ESP-NOW is a protocol built into the ESP32’s WiFi chip that communicates directly between two boards — like walkie-talkies on their own frequency. No router, no internet, no IP addresses, nothing to log anywhere.
-
MAC address is a unique hardware identifier burned into every WiFi chip at the factory. ESP-NOW uses it like a postal address — you need to know the other board’s MAC to send it messages.
-
Callback function is a function you write that the library calls for you when something happens.
OnDataRecvnever gets called by your code — ESP-NOW calls it internally the moment data arrives, even mid-loop. -
XOR cipher works because XOR is its own inverse: if
A XOR B = C, thenC XOR B = A. This means the same function both encrypts and decrypts, which is why the code only needs onexorCipher()function. -
Null terminator (
'\0') marks the end of a C-style string. Without it,String(buf)would keep reading memory past the end of your data and produce garbage characters.
Level Up
AES-128 encryption: XOR with a short key is weak — a codebreaker could spot patterns. Upgrade to AES-128 using mbedtls_aes_crypt_ecb() from the mbedtls/aes.h library — it’s already included in the ESP32 Arduino core. Military-grade encryption on a $12 chip.
Message history: Show the last 3 messages on the OLED instead of just the latest. Store received messages in a String history[3] array and shift them up when a new one arrives.
Physical keyboard: Wire a 4×4 matrix keypad to 8 GPIO pins and add the Keypad library. When Enter is pressed, send the accumulated string. Now the board is a standalone device — no laptop required to type messages.
★★ You completed: Secret Encrypted Messenger!
Troubleshooting
| Problem | Fix |
|---|---|
| “Failed to add peer” | MAC address format is wrong. Each byte needs to be hex with 0x prefix. Convert AA to 0xAA. Check all 6 bytes. |
| Messages sent but nothing appears on OLED | Check that OLED is wired to GPIO 8 (SDA) and GPIO 9 (SCL). Check I2C address — most OLEDs are 0x3C, some are 0x3D. |
| “ESP-NOW init failed” | WiFi mode must be WIFI_STA. Add WiFi.mode(WIFI_STA) before esp_now_init(). |
| Garbled text on OLED | CIPHER_KEY is different between the two boards. Copy the exact key string character by character — it must be identical. |
| Board can receive but not send (or vice versa) | MAC addresses are swapped incorrectly. Board A should have Board B’s MAC, Board B should have Board A’s MAC. |
| OLED shows nothing at all | Try I2C address 0x3D instead of 0x3C. Some OLEDs ship with a different address. |