Parent info
Parts you need
Affiliate links — we may earn a small commission
Try this circuit in your browser!
Run the code, press the buttons and watch what happens — before you buy any parts. No account needed.
Open in Simulator →Three remotes just became one — and it lives on your phone.
Imagine opening a browser on your phone and seeing buttons for your TV, soundbar, and AC — all on one page. Tap “Volume Up” and your soundbar responds. Tap “Cool 22°C” and your air conditioner obeys. No app to install. Anyone on your WiFi can use it.
That’s what this builds. In 1.5 hours. For about $18.
What you’ll need
| Part | What it does | Price |
|---|---|---|
| ESP32-S3 Dev Board | The brain — runs a web server and fires the IR LED | ~$12 |
| IR LED + Receiver Kit (VS1838B) | Learns codes from your remotes, replays them to your devices | ~$3 |
| 100Ω resistor | Limits current to the IR LED so it doesn’t burn out | ~$0.10 |
| Breadboard + jumper wires | Connects everything. No soldering. | ~$5 |
| USB-C data cable | Uploads code to the board | ~$5 |
You also need: home WiFi and a computer with Arduino IDE 2 installed.
Total: ~$18 | Time: ~1.5 hours | Difficulty: ●○○○○
How it works (60 seconds)
Think of your TV remote as a flashlight that talks in Morse code. Every button fires an invisible light (infrared) in a specific pattern — like 1010110011.... Your TV recognizes the pattern and does what you asked.
The VS1838B receiver watches for those patterns. Point your remote at it and press a button — the ESP32 captures the code. Now it knows the TV’s secret language. The IR LED then replays any code on command.
The web page running on the ESP32 is just a list of buttons. Tap a button → ESP32 fires the IR LED → your device obeys. Your phone never leaves your WiFi.
Step 0: Set up Arduino IDE
Time: ~10 minutes (skip if already done)
- Download Arduino IDE 2
- Open Arduino → File → Preferences → “Additional Boards URLs” → paste:
https://raw.githubusercontent.com/espressif/arduino-esp32/gh-pages/package_esp32_index.json - Tools → Board Manager → search “esp32” → install esp32 by Espressif Systems (v3.x or later)
- Select board: ESP32S3 Dev Module
- Install library: Tools → Manage Libraries → search IRremoteESP8266 → install
Check: File → Examples → WiFi → WiFiScan. Plug in your board, press Upload. If it compiles and uploads, you’re set.
Step 1: Wire it up
Time: ~5 minutes
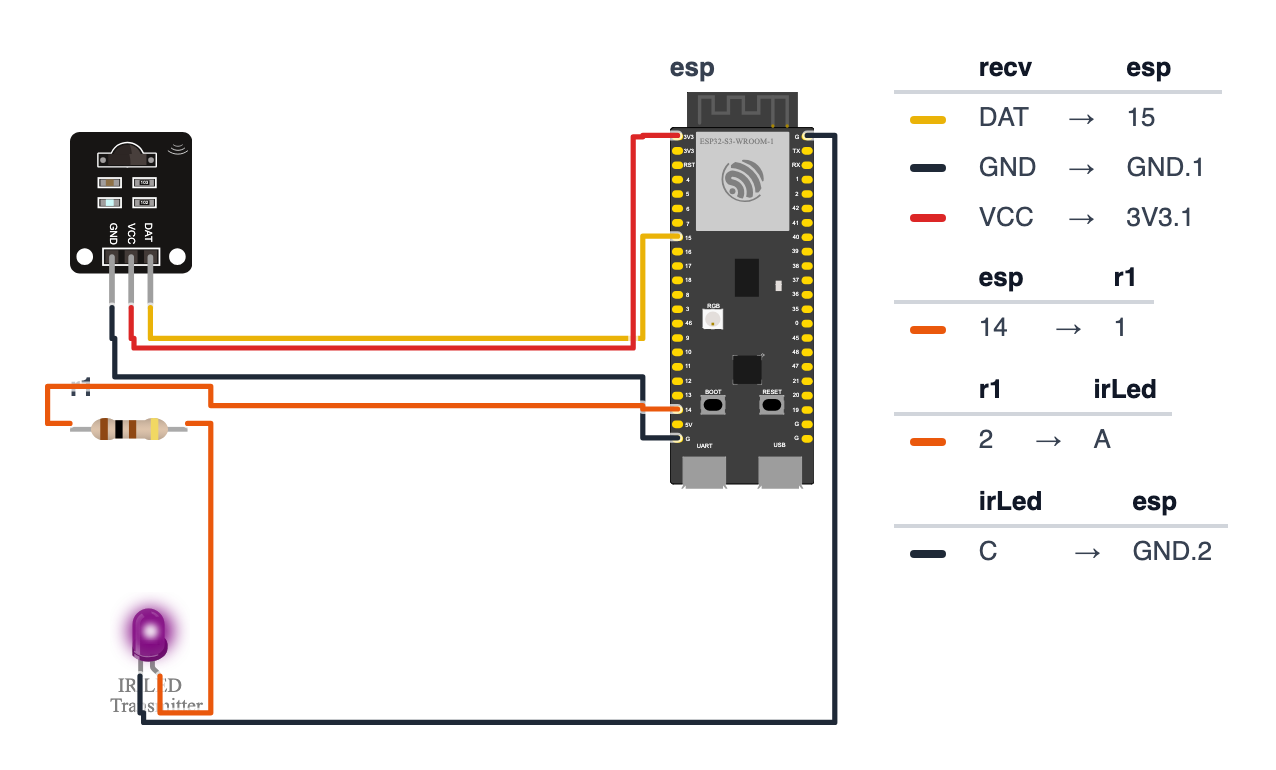
You have 4 connections total.
IR Receiver VS1838B (the black blob with 3 legs — flat side faces you):
- Receiver OUT (pin 1, leftmost) → board GPIO 15 (C6: GPIO 3) — yellow wire
- Receiver GND (pin 2, middle) → board GND — black wire
- Receiver VCC (pin 3, rightmost) → board 3.3V — red wire
IR LED (round, clear, longer leg is +): 4. IR LED Anode (+, longer leg) → 100Ω resistor → board GPIO 14 (C6: GPIO 4) — orange wire 5. IR LED Cathode (-, shorter leg) → board GND — black wire
Check: Receiver flat side faces outward (toward the device you’ll learn from). IR LED points toward the TV. Count connections: 5 wires total. Board is NOT plugged into USB yet.
Common mistake: Mixing up the IR receiver legs. The flat side of the VS1838B faces you when reading the pin order (left to right: OUT, GND, VCC). If the flat side faces away, the order reverses. When in doubt, look up “VS1838B pinout” for a photo.
Step 2: Flash the code
Time: ~10 minutes
Copy this complete code into Arduino IDE. Change YourWiFiName and YourWiFiPassword to your actual credentials.
The big picture first. This program turns the ESP32 into a universal remote with two jobs: listening and sending. Listening uses the VS1838B receiver — point any remote at it and the ESP32 captures the secret code that button broadcasts. Sending uses the IR LED — flash a captured code and the device responds as if the original remote fired it. A web page running on the ESP32 shows a button for each saved code. Tap a button on your phone → the ESP32 fires the LED → your TV obeys. Your phone never leaves your WiFi and no app is ever installed.
// ========== CHOOSE YOUR BOARD ==========
// Uncomment the line for YOUR board:
#define BOARD_S3 // ESP32-S3-DevKitC-1
//#define BOARD_C6 // ESP32-C6-DevKitC-1
// ========================================
#ifdef BOARD_S3
#define PIN_IR_RECV 15
#define PIN_IR_SEND 14
#endif
#ifdef BOARD_C6
#define PIN_IR_RECV 3
#define PIN_IR_SEND 4
#endif
#include <Arduino.h>
#include <WiFi.h>
#include <WebServer.h>
#include <IRremoteESP8266.h>
#include <IRrecv.h>
#include <IRsend.h>
#include <IRutils.h>
const char* ssid = "YourWiFiName";
const char* password = "YourWiFiPassword";
struct IRCode {
decode_type_t protocol;
uint16_t bits;
uint64_t value;
const char* name;
};
IRCode codes[] = {
{ NEC, 32, 0x20DF10EF, "TV Power" },
{ NEC, 32, 0x20DFE01F, "Volume Up" },
{ NEC, 32, 0x20DFD02F, "Volume Down" },
{ NEC, 32, 0x20DF906F, "Mute" },
{ NEC, 32, 0x20DF40BF, "Channel Up" },
{ NEC, 32, 0x20DFC03F, "Channel Down" },
};
const int NUM_CODES = sizeof(codes) / sizeof(codes[0]);
IRrecv irRecv(PIN_IR_RECV);
IRsend irSend(PIN_IR_SEND);
WebServer server(80);
decode_results results;
String buildPage() {
String html = R"rawhtml(
<!DOCTYPE html><html><head>
<meta name="viewport" content="width=device-width,initial-scale=1">
<style>
body { font-family: sans-serif; background: #111; color: #fff;
text-align: center; padding: 20px; }
h1 { color: #4fc3f7; margin-bottom: 30px; }
.btn { display: inline-block; background: #1565c0; color: white;
padding: 18px 28px; margin: 8px; border-radius: 12px;
text-decoration: none; font-size: 16px; min-width: 120px; }
.btn:active { background: #4fc3f7; }
</style></head><body>
<h1>📷 TV Remote</h1>
)rawhtml";
for (int i = 0; i < NUM_CODES; i++) {
html += "<a class='btn' href='/send?id=";
html += i;
html += "'>";
html += codes[i].name;
html += "</a>\n";
}
html += "</body></html>";
return html;
}
void handleRoot() { server.send(200, "text/html", buildPage()); }
void handleSend() {
if (!server.hasArg("id")) {
server.send(400, "text/plain", "Missing id");
return;
}
int id = server.arg("id").toInt();
if (id < 0 || id >= NUM_CODES) {
server.send(400, "text/plain", "Invalid id");
return;
}
irSend.send(codes[id].protocol, codes[id].value, codes[id].bits);
Serial.printf("Sent: %s\n", codes[id].name);
server.sendHeader("Location", "/");
server.send(303);
}
void setup() {
Serial.begin(115200);
delay(500);
WiFi.begin(ssid, password);
Serial.print("Connecting");
while (WiFi.status() != WL_CONNECTED) { delay(500); Serial.print("."); }
Serial.printf("\nConnected! IP: %s\n", WiFi.localIP().toString().c_str());
Serial.println("Open that IP in your phone browser.");
Serial.println("Point your remote at the receiver to capture codes.");
irRecv.enableIRIn();
irSend.begin();
server.on("/", handleRoot);
server.on("/send", handleSend);
server.begin();
Serial.println("Web server running.");
}
void loop() {
server.handleClient();
if (irRecv.decode(&results)) {
Serial.printf("Protocol: %s Bits: %d Value: 0x%llX\n",
typeToString(results.decode_type).c_str(),
results.bits,
results.value);
irRecv.resume();
}
}Line-by-line: what every line does and why
The tool kit — #include lines
#include <Arduino.h>
#include <WiFi.h>
#include <WebServer.h>
#include <IRremoteESP8266.h>
#include <IRrecv.h>
#include <IRsend.h>
#include <IRutils.h>Seven instruction books. Arduino.h is the base layer — it provides setup(), loop(), Serial, and all the standard Arduino functions. WiFi.h and WebServer.h handle the networking side. The last four are all from the IRremoteESP8266 library: IRrecv.h teaches the ESP32 to listen for incoming IR flashes, IRsend.h teaches it to fire the IR LED in patterns, and IRutils.h adds the helper function typeToString() that prints protocol names like “NEC” instead of a number.
Pin and credential labels
const char* ssid     = "YourWiFiName";
const char* password = "YourWiFiPassword";
  #define PIN_IR_RECV  15
  #define PIN_IR_SEND  14
const means these values are locked — the compiler will refuse to let the program accidentally change them. char* is text. #define gives a pin number a name, so the rest of the code can say PIN_IR_RECV instead of a bare number. Pin 15 is where the VS1838B receiver connects; pin 14 is where the IR LED connects (through a 100Ω resistor). These two lines come from the BOARD_S3 block at the top of the sketch — on a C6 board the pins are 3 and 4.
struct IRCode — a four-field recipe card
struct IRCode {
  decode_type_t protocol;
  uint16_t      bits;
  uint64_t      value;
  const char*   name;
};
struct means “a custom container that groups related things together.” Like a recipe card that always has four fields: the protocol (NEC, SONY, Samsung — which “language” the remote uses), the number of bits in the code (NEC uses 32), the actual numeric value of the code (a big hex number like 0x20DF10EF), and a display name for the web button. Without a struct you’d need four separate arrays all lined up perfectly — messy and easy to break. uint16_t is a specific type of whole number — unsigned, 16 bits, meaning it can hold values from 0 to 65535.
codes[] — the remote control’s memory
IRCode codes[] = {
  { NEC, 32, 0x20DF10EF, "TV Power"     },
  { NEC, 32, 0x20DFE01F, "Volume Up"    },
  ...
};
const int NUM_CODES = sizeof(codes) / sizeof(codes[0]);
codes[] is a list (array) of IRCode recipe cards — one per button. Each row in curly braces fills in one card. NEC is the protocol constant defined by the library. 0x20DF10EF is a hexadecimal number — hex uses digits 0–9 plus letters A–F. The 0x prefix tells the compiler “this is hex, not decimal.” NUM_CODES uses a classic trick: sizeof(codes) is the total size of the whole array in bytes; sizeof(codes[0]) is the size of one entry in bytes. Dividing them gives the count automatically. Change the list and NUM_CODES updates itself — no manual counting needed.
The specialist objects
IRrecv   irRecv(PIN_IR_RECV);
IRsend   irSend(PIN_IR_SEND);
WebServer server(80);
decode_results results;
irRecv is the listener — it watches GPIO 15 (C6: GPIO 3) for incoming IR flashes. irSend is the speaker — it fires GPIO 14 (C6: GPIO 4) in precise timed patterns. server answers HTTP requests on port 80. decode_results results is an empty box that will hold the most recently captured IR code — protocol, bits, value, and more — whenever the receiver catches something.
buildPage() — the web remote
String buildPage() {
  String html = R"rawhtml(...)rawhtml";
  for (int i = 0; i < NUM_CODES; i++) {
    html += "<a class='btn' href='/send?id=";
    html += i;
    html += "'>";
    html += codes[i].name;
    html += "</a>\n";
  }
  html += "</body></html>";
  return html;
}
R"rawhtml(...)rawhtml" is a raw string literal — the R"..." syntax lets you write HTML with quotes inside without escaping every one. Everything between ( and ) is treated as plain text.
The for loop runs once for each entry in codes[]. int i = 0 starts at zero. i < NUM_CODES keeps going as long as i is less than the count. i++ adds one each time. Each pass through the loop adds one <a> button to the HTML string. The href is /send?id=0, /send?id=1, etc. — tapping a button tells the server exactly which code to fire. codes[i].name pulls the label (“TV Power”, “Volume Up”) from the struct.
handleSend() — the action handler
void handleSend() {
  if (!server.hasArg("id")) { server.send(400, ...); return; }
  int id = server.arg("id").toInt();
  if (id < 0 || id >= NUM_CODES) { server.send(400, ...); return; }
  irSend.send(codes[id].protocol, codes[id].value, codes[id].bits);
  server.sendHeader("Location", "/");
  server.send(303);
}
When your phone taps a button, the browser requests /send?id=2 (for example). server.hasArg("id") checks whether the id part is present — if someone manually types a bad URL, send error code 400 (HTTP for “bad request”) and stop.
server.arg("id").toInt() reads the id value from the URL and converts the text “2” into the integer 2. The bounds check id < 0 || id >= NUM_CODES means “is id out of range?” — someone could type /send?id=999 to try to crash the board. If valid, irSend.send(...) fires the IR LED in the exact pattern stored in the struct. server.sendHeader("Location", "/") followed by server.send(303) tells the browser “go back to the main page” — 303 is the HTTP code for “redirect after an action.” Without this, the browser would stay on a blank /send page.
setup() — startup sequence
void setup() {
  Serial.begin(115200);
  delay(500);
  WiFi.begin(ssid, password);
  while (WiFi.status() != WL_CONNECTED) { delay(500); Serial.print("."); }
  irRecv.enableIRIn();
  irSend.begin();
  server.on("/",     handleRoot);
  server.on("/send", handleSend);
  server.begin();
}
delay(500) gives the ESP32 half a second to fully boot before trying WiFi — skipping it can cause connection failures on some boards. irRecv.enableIRIn() arms the receiver — it starts watching GPIO 15 (C6: GPIO 3) for 38kHz IR pulses. irSend.begin() initializes the LED driver on GPIO 14 (C6: GPIO 4). server.on("/", handleRoot) and server.on("/send", handleSend) register the two routes — the server now knows which function to call for each URL path.
loop() — the forever cycle
void loop() {
  server.handleClient();
  if (irRecv.decode(&results)) {
    Serial.printf("Protocol: %s  Bits: %d  Value: 0x%llX\n",
                  typeToString(results.decode_type).c_str(),
                  results.bits,
                  results.value);
    irRecv.resume();
  }
}
server.handleClient() checks for incoming browser requests and routes them. irRecv.decode(&results) checks whether the receiver has captured a complete IR code. The & means “put the result into the results box” — it’s called passing by reference. If a code was captured, Serial.printf prints it: the protocol name (converted from a number to text by typeToString()), the bit count, and the hex value with %llX format (ll = 64-bit number, X = uppercase hex). You copy these three values from Serial Monitor and paste them into the codes[] array. irRecv.resume() resets the receiver to listen for the next code.
The whole thing in one sentence
The ESP32 captures IR codes from any remote using the VS1838B receiver, stores them in a struct array, and serves a phone-friendly web page where each button fires the matching IR code from the LED — turning any phone on your WiFi into a universal remote.
First thing to try: After uploading, open Serial Monitor. Point your TV remote at the VS1838B and press Power. You’ll see the protocol, bits, and hex value printed. Copy that line — those three numbers are what you paste into the codes[] array to make your own buttons.
Upload: plug in board → select the correct COM port → press Upload → wait for “Done uploading.”
Check: Open Serial Monitor (115200 baud). You should see “Connected! IP: 192.168.x.x” within 10 seconds. If you see dots forever, double-check your WiFi name and password — they’re case sensitive.
Step 3: Capture your remote’s codes
Time: ~10 minutes
Your TV uses different codes than the examples in the code. Here’s how to capture yours:
- Serial Monitor is open (from Step 2 — you should see the IP address)
- Point your TV remote directly at the IR receiver
- Press the Power button
- Serial Monitor prints:
Protocol: NEC Bits: 32 Value: 0x20DF10EF - Write down the protocol, bits, and hex value
- Repeat for every button you want: Volume Up, Volume Down, Mute, etc.
- Update the
codes[]array in the code with your real values - Press Upload again
Check: After re-uploading with your real codes, tap “TV Power” in the browser. Your TV should respond. If it doesn’t, try pointing the IR LED more directly at the TV’s receiver (usually a dark window near the bottom of the screen).
Step 4: Use it!
Open the IP address in your phone browser. Tap any button — the IR LED fires and your device responds.
More things to try:
Add your soundbar: Point your soundbar remote at the IR receiver and capture its codes. Add new entries to codes[] with names like “Soundbar Volume Up” and re-upload.
Add your AC: Air conditioner remotes send longer codes. They still work — just capture the full “cool to 22°C” button press and add it to the list.
Bookmark it on your home screen: In iOS, tap Share → “Add to Home Screen.” On Android, tap the menu → “Add to Home Screen.” Now it’s one tap from anywhere.
Use it from another room: As long as the IR LED has line of sight to your TV, distance doesn’t matter much. A 30cm USB extension cable can move the LED to the right angle.
What just happened
You used some real engineering concepts — without even noticing:
-
Infrared remote control works by flashing an invisible LED in a specific pattern — like Morse code at 38kHz. Every button on every remote has a unique “fingerprint” you can capture and replay. This is the same technology used in industrial automation and robotics for position sensing.
-
NEC protocol is the most common IR format used by LG, Sony, Samsung, and most brands. It encodes 32 bits: 8-bit address (which device), 8-bit command (which button), and their inverses for error checking. The hex value you copied from Serial is that 32-bit number.
-
Web server on a microcontroller: When you open the IP in your browser, your phone sends an HTTP GET request to the ESP32 — the same kind of request your browser makes to any website. The ESP32 responds with HTML. This is how all web services work, scaled down to run on a $12 chip.
-
HTTP 303 redirect: After sending a command, the code redirects your browser back to the main page. Without this, tapping “Volume Up” would leave you on a blank
/send?id=1URL. The redirect makes it feel like a native app.
Level Up
Add voice control with Siri Shortcuts. On iPhone, create a Shortcut that sends an HTTP GET to http://[ESP32 IP]/send?id=0. Assign the phrase “Turn off the TV.” Siri triggers the shortcut → ESP32 fires the IR LED. No HomeKit, no hub — just HTTP.
Save codes to flash memory. Right now your codes are hardcoded. Add a /learn web endpoint that listens for IR signals and saves new codes to SPIFFS (flash storage). Codes survive a reboot and you can add new buttons without reflashing.
Add your AC temperature buttons. The IRremoteESP8266 library has built-in support for most AC brands (Daikin, Mitsubishi, LG, Samsung). Look up your brand in the library examples and add temperature preset buttons to the web page.
Troubleshooting
| Problem | Fix |
|---|---|
| Nothing prints when I press a button | Make sure the flat side of the VS1838B faces the remote. Check that VCC is on 3.3V (not 5V). Try a shorter distance from remote to receiver. |
| Serial shows codes but TV doesn’t respond | Point the IR LED directly at the TV’s sensor (usually a small dark window on the front). Reduce room lighting — bright LED lights can interfere. |
| Wrong protocol printed | That’s fine — just write down whatever protocol appears. The library handles NEC, SONY, Samsung, and more automatically. |
| Code uploads but WiFi never connects | Check your SSID and password — both are case sensitive. The ESP32 only connects to 2.4GHz WiFi (not 5GHz). |
| Buttons appear on page but TV ignores them | You need to capture YOUR TV’s actual codes (Step 3). The example codes in the code are for a different TV. |