Parent info
Parts you need
Affiliate links — we may earn a small commission
Try this circuit in your browser!
Run the code, press the buttons and watch what happens — before you buy any parts. No account needed.
Open in Simulator →It detects something. Near the refrigerator. Near the laptop. Near whatever you point at.
Imagine this: you walk into a room holding a prop that looks like it came off a sci-fi movie set. The LEDs creep up the bar graph. The buzzer rises in pitch. You walk it toward the laptop. The meter pegs at maximum. Your friends look at each other.
Here’s the secret: it’s real. A tiny $1 Hall effect sensor genuinely responds to magnetic fields — and there are hidden magnets everywhere: in speakers, in laptop lids, in fridge doors, in motors. You’re not faking anything — you’re just not explaining what you’re actually detecting.
And for the moments when there’s no magnet nearby? Your phone is a secret remote: tap “Haunt!” and the meter goes wild for 10 seconds.
In 3 hours. For about $28.
What you’ll need
| Part | What it does | Price |
|---|---|---|
| ESP32-S3-DevKitC-1 or ESP32-C6-DevKitC-1 | The brain + WiFi for the secret phone remote | ~$12 |
| SS49E linear Hall effect sensor (or a “KY-035” / “49E” analog Hall module) | Measures magnetic field strength as a voltage | ~$1 |
| Passive buzzer | Outputs a tone you control with tone() — pitch rises with ghost activity | ~$2 |
| LED Bar Graph (10-segment) | 10 LEDs in a single package — lights up from bottom to top | ~$4 |
| 9V Battery + holder | Powers the whole prop portably — no USB cable trailing behind you | ~$4 |
| 9V to 5V step-down module | Converts 9V battery to 5V for the board’s 5V pin | ~$3 |
| 220Ω resistors × 10 | One per LED in the bar graph — protects them from overcurrent | ~$2 |
Total: ~$28 | Time: ~3 hours | Difficulty: ●●●○○
Which Hall sensor? Get a linear (analog) one: SS49E, 49E or the KY-035 module. NOT the A3144 — that one is just an on/off switch, so your meter could only show “nothing” or “everything”.
Battery tip: WiFi is hungry. A 9V block lasts only about 2–3 hours with the phone remote running. A small USB power bank plugged into the board’s USB port lasts the whole Halloween night — you can skip the 9V battery and step-down module then.
The PKE enclosure: Search Thingiverse for “PKE meter prop.” These fan-designed STL files print in 4–6 parts: body, two wing arms, front panel, and battery door. They have a slot for the LED bar graph and holes for the buzzer built in. Print in gray PLA, then paint silver/chrome for maximum prop authenticity.
How it works (60 seconds)
The SS49E Hall sensor has three legs: power, ground and output. With no magnet nearby, its output sits in the middle — about 1650 millivolts (half of 3.3V). Bring the north pole of a magnet close and the voltage goes up; the south pole makes it go down. The ESP32 reads that voltage with analogReadMilliVolts().
At power-on, the detector measures the voltage in “empty air” and remembers it as zero. After that it only cares how far the reading moves away from zero — in either direction. It maps that distance onto a 0–10 scale, then does two things: lights up the first N LEDs of the bar graph (more = stronger “ghost activity”), and plays a tone on the passive buzzer that rises in pitch as N climbs. At level 1 you get a low 280Hz hum. At level 10 you get a 1000Hz whine.
At the same time the ESP32 runs a tiny web page — your secret remote. It shows the live meter, lets you set the sensitivity, and has the Haunt! button.
Honest physics: The sensor reacts to magnets — speaker magnets, fridge magnets, the magnets that hold a laptop lid shut, motors. The invisible fields around running appliances are mostly far too weak for it. So if you want a big spike near the “haunted” laptop, aim for its speaker or the edge of its lid.
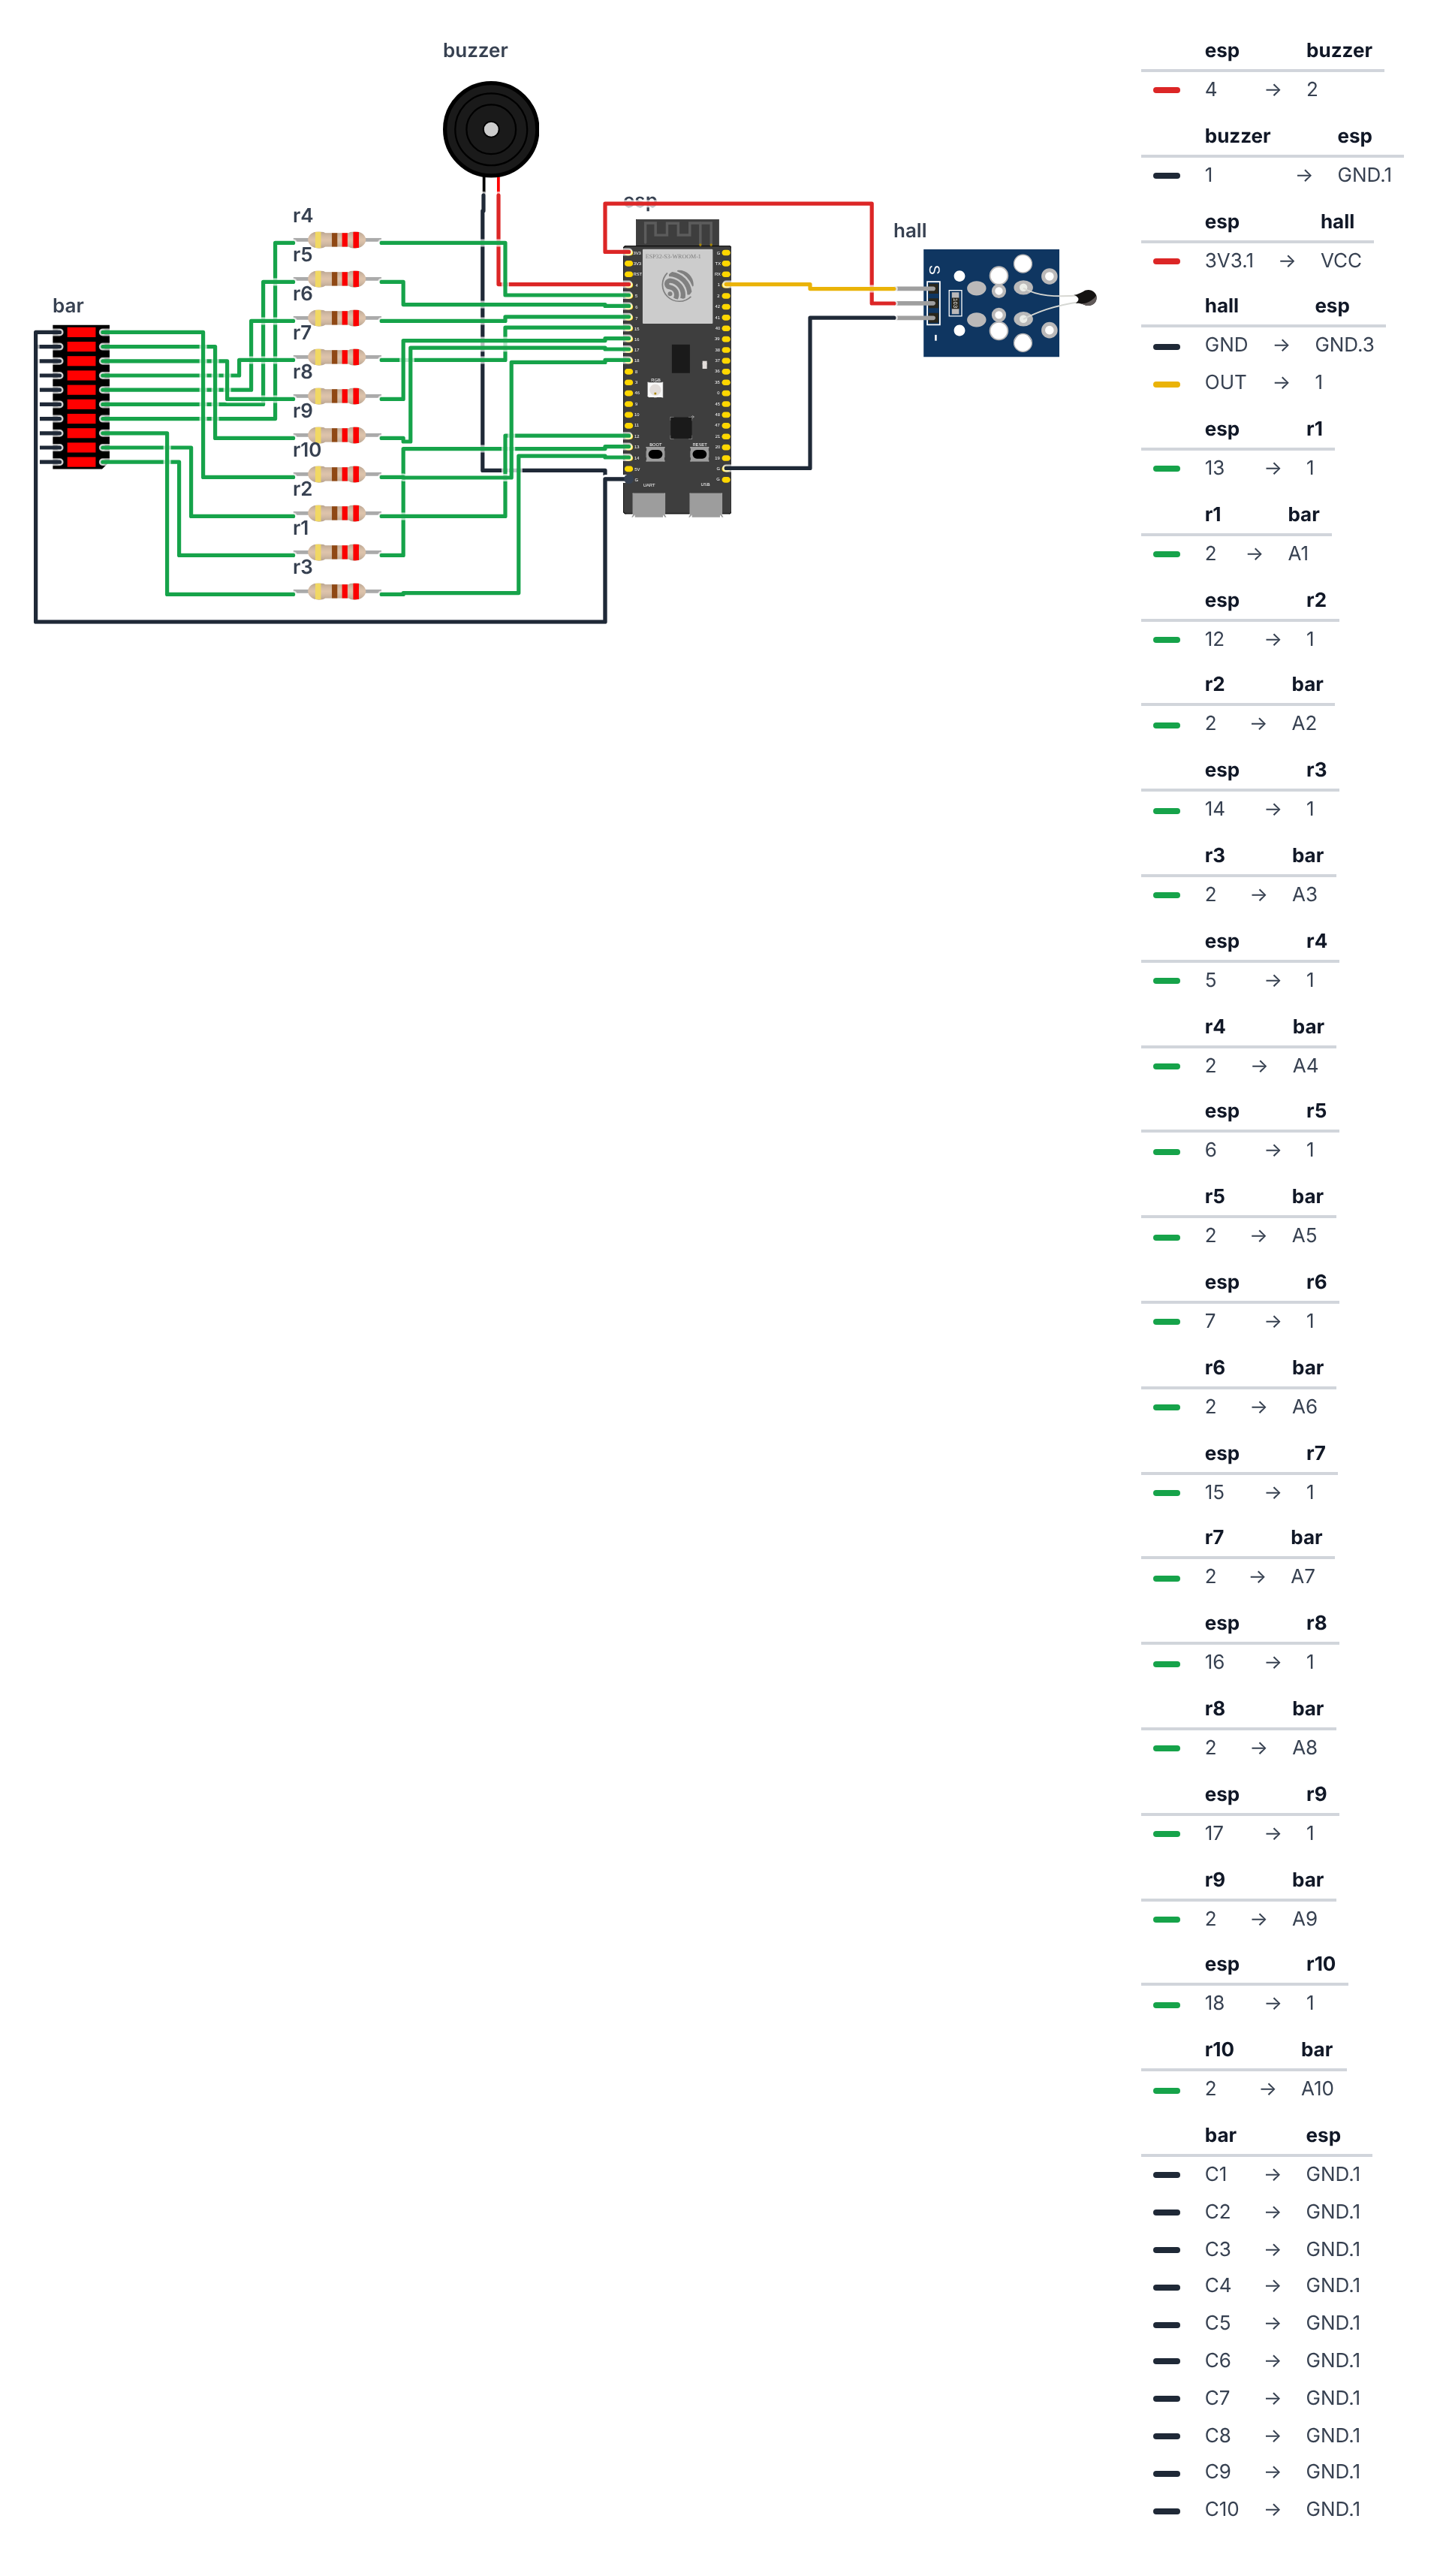
Step 0: Print and paint the enclosure
Time: ~6 hours print time (print overnight)
Search Thingiverse for “PKE meter prop.” Download the design with the LED bar graph slot and buzzer cavity. Print in gray PLA at 0.2mm.
Painting for prop authenticity:
- Sand lightly with 400-grit sandpaper.
- Prime with gray spray primer.
- Base coat in silver or chrome spray paint.
- Dry-brush black acrylic paint into recesses, vents, and details.
- Seal with matte varnish.
The difference between “I can tell it’s 3D printed” and “Where did you buy that?” is entirely the paint job. Take an extra 30 minutes here.
For parents: Spray painting and varnish belong outdoors or in a well-ventilated room, with gloves.
Step 1: Wire it up
Time: ~30 minutes
The LED bar graph has 10 cathodes (negative legs, one per LED) and either a common anode row or individual anodes depending on the model. Check your datasheet. Most 10-segment bar graph modules have all anodes connected on one side and all cathodes on the other (two rows of 5 pins each).
Hall sensor (3 wires): Hold the SS49E with the flat face with the writing toward you, legs pointing down:
- Left leg (VCC) → board 3V3 — red wire
- Middle leg (GND) → board GND — black wire
- Right leg (OUT) → board GPIO 1 — yellow wire (same pin on S3 and C6)
On a KY-035 module: + → 3V3, − → GND, S → GPIO 1.
Important: Power the Hall sensor from 3V3, not 5V. At 5V its output can go higher than the ESP32’s analog pin likes.
Passive Buzzer (2 wires): 4. Buzzer + → board GPIO 4 (S3) or GPIO 0 (C6) — red wire 5. Buzzer − → board GND — black wire
LED Bar Graph (10 wires + GND): 6–15. LED Bar segments 1–10 (anodes, from bottom to top) → each via its own 220Ω resistor to:
| Segment | 1 | 2 | 3 | 4 | 5 | 6 | 7 | 8 | 9 | 10 |
|---|---|---|---|---|---|---|---|---|---|---|
| ESP32-S3 | 13 | 12 | 14 | 5 | 6 | 7 | 15 | 16 | 17 | 18 |
| ESP32-C6 | 5 | 2 | 18 | 22 | 23 | 10 | 11 | 3 | 4 | 19 |
- LED Bar GND rail (cathode common) → board GND — black wire
Power (from 9V battery via step-down module): 17. Step-down OUT+ → board 5V pin 18. Step-down OUT− → board GND 19. Step-down IN+ → battery + (red) 20. Step-down IN− → battery − (black)
Check: Set the step-down module to 5V with a multimeter BEFORE connecting it to the board — many come set to a higher voltage. The LED bar graph anodes (positive legs, usually the longer ones or the row marked with a +) connect to the GPIO pins through 220Ω resistors. The cathode rail (common negative) connects to GND directly. Buzzer is a PASSIVE buzzer (a coil inside), not an active buzzer (which has its own oscillator and only beeps at one pitch).
Step 2: Upload the code
No extra libraries needed — WiFi, WebServer, ESPmDNS, analogReadMilliVolts(), tone() and rgbLedWrite() are all built into the ESP32 Arduino core (version 3.x).
In Tools → Board pick ESP32S3 Dev Module (or ESP32C6 Dev Module), and in Tools → Partition Scheme pick Huge APP (3MB No OTA).
Two things to change at the top of the code before uploading:
- Choose your board — leave
#define BOARD_S3as it is for an ESP32-S3, or put//in front of it and remove the//in front of#define BOARD_C6for an ESP32-C6. - Your WiFi name and password — or leave them as they are, and the detector makes its own WiFi hotspot (see Step 3). For a ghost hunt away from home, the hotspot is actually better.
The big picture first. This program turns the ESP32 into a ghost detector prop that genuinely responds to real magnetic fields:
- The Hall sensor is the nose — it sniffs out magnetic fields and turns them into a voltage.
- The ESP32 is the brain — it measures that voltage, decides how “haunted” it is, and runs the secret web remote.
- The LED bar graph is the display — 10 LEDs that light up from bottom to top, like a meter rising.
- The buzzer is the voice — the pitch rises the closer you are to a magnetic source.
A program is like a recipe. The computer reads it top to bottom and does exactly what’s written, nothing more. Copy this entire recipe into Arduino IDE and upload it:
// ========== CHOOSE YOUR BOARD ==========
// Uncomment the line for YOUR board:
#define BOARD_S3    // ESP32-S3-DevKitC-1
//#define BOARD_C6  // ESP32-C6-DevKitC-1
// ========================================

#ifdef BOARD_S3
  #define PIN_HALL             1
  #define PIN_BUZZER           4
  #define PIN_BOARD_RGB        38
  #define PIN_LED0             13
  #define PIN_LED1             12
  #define PIN_LED2             14
  #define PIN_LED3             5
  #define PIN_LED4             6
  #define PIN_LED5             7
  #define PIN_LED6             15
  #define PIN_LED7             16
  #define PIN_LED8             17
  #define PIN_LED9             18
#endif
#ifdef BOARD_C6
  #define PIN_HALL             1
  #define PIN_BUZZER           0
  #define PIN_BOARD_RGB        8
  #define PIN_LED0             5
  #define PIN_LED1             2
  #define PIN_LED2             18
  #define PIN_LED3             22
  #define PIN_LED4             23
  #define PIN_LED5             10
  #define PIN_LED6             11
  #define PIN_LED7             3
  #define PIN_LED8             4
  #define PIN_LED9             19
#endif

#include <WiFi.h>
#include <WebServer.h>
#include <ESPmDNS.h>

// ---------- Settings ----------
#define LED_COUNT 10
const int LED_PINS[LED_COUNT] = {PIN_LED0, PIN_LED1, PIN_LED2, PIN_LED3, PIN_LED4, PIN_LED5, PIN_LED6, PIN_LED7, PIN_LED8, PIN_LED9};

#define BASE_FREQ 200
#define FREQ_STEP 80
#define NOISE_MV 8
#define FULL_MV 150
#define SAMPLES 16
#define READ_INTERVAL 100
#define HAUNT_MS 10000

// ---------- Wi-Fi ----------
const char* WIFI_NAME = "YOUR_WIFI_NAME";
const char* WIFI_PASSWORD = "YOUR_PASSWORD";
const char* HOTSPOT_NAME = "BuildCool-Ghost";
const char* HOTSPOT_PASSWORD = "buildcool";
const char* WEB_NAME = "ghost";

// ---------- Parts ----------
WebServer server(80);

// ---------- Memory ----------
int baselineMv = 0;
int fieldMv = 0;
int fullMv = FULL_MV;
int level = 0;
int peakLevel = 0;
int playingFreq = 0;
bool muted = false;
unsigned long lastRead = 0;
unsigned long hauntUntil = 0;
String webAddress = "";

// ---------- Web page ----------
const char PAGE[] PROGMEM = R"rawliteral(
<!doctype html><html lang="en"><head><meta charset="utf-8">
<meta name="viewport" content="width=device-width,initial-scale=1">
<title>Ghost Detector · BuildCool</title>
<style>
:root{--o:#f97316;--o6:#ea580c;--o7:#c2410c;--o50:#fff7ed;--o200:#fed7aa;--g9:#111827;--g7:#374151;--g5:#6b7280;--g2:#e5e7eb;--g0:#f9fafb;--ok:#16a34a;--bad:#dc2626}
*{box-sizing:border-box}
body{margin:0;font-family:-apple-system,BlinkMacSystemFont,"Segoe UI",Roboto,"Helvetica Neue",Arial,sans-serif;color:var(--g9);background:var(--g0)}
header{position:sticky;top:0;z-index:9;background:rgba(255,255,255,.9);backdrop-filter:blur(8px);border-bottom:1px solid var(--g2)}
.wrap{max-width:640px;margin:0 auto;padding:12px 16px}
.bar{display:flex;align-items:center;justify-content:space-between}
.logo{font-size:20px;font-weight:800;letter-spacing:-.02em;color:var(--g9);text-decoration:none}
.logo span{color:var(--o)}
.badge{display:inline-flex;align-items:center;gap:8px;background:var(--o50);border:1px solid var(--o200);color:var(--o7);font-size:13px;font-weight:500;padding:4px 12px;border-radius:999px}
.dot{width:8px;height:8px;border-radius:50%;background:var(--o);animation:p 2s infinite}
.off .dot{background:var(--g5);animation:none}
@keyframes p{50%{opacity:.35}}
h1{font-size:30px;font-weight:800;letter-spacing:-.02em;line-height:1.1;margin:20px 0 6px}
h1 span{color:var(--o)}
.sub{color:var(--g5);margin:0 0 20px}
.grid{display:grid;grid-template-columns:repeat(auto-fit,minmax(140px,1fr));gap:12px}
.card{background:#fff;border:1px solid var(--g2);border-radius:16px;padding:16px}
.wide{grid-column:1/-1}
.label{font-size:13px;color:var(--g5);font-weight:500}
.value{font-size:32px;font-weight:800;letter-spacing:-.02em;margin-top:4px}
.unit{font-size:16px;color:var(--g5);font-weight:600}
.row{display:flex;gap:8px;flex-wrap:wrap;margin-top:10px}
.btn{display:inline-flex;justify-content:center;align-items:center;padding:12px 20px;background:var(--o);color:#fff;font-weight:600;border:0;border-radius:12px;font-size:15px;text-decoration:none;cursor:pointer;box-shadow:0 10px 15px -3px var(--o200)}
.btn:active{transform:scale(.95)}
.btn.ghost{background:#fff;color:var(--g7);border:1px solid var(--g2);box-shadow:none}
.btn.big{width:100%;padding:18px;font-size:18px}
input[type=range]{width:100%;accent-color:var(--o);margin-top:12px}
.meter{display:flex;gap:4px;margin-top:12px}
.seg{flex:1;height:28px;border-radius:6px;background:var(--g2)}
.seg.on{background:var(--o)}
.seg.hot{background:var(--bad)}
footer{color:var(--g5);font-size:13px;text-align:center;padding:28px 16px}
footer a{color:var(--o);font-weight:600;text-decoration:none}
</style></head><body>
<header><div class="wrap bar"><a class="logo" href="https://buildcool.fun">Build<span>Cool</span></a>
<span class="badge" id="live"><span class="dot"></span><span id="livetxt">Live</span></span></div></header>
<main class="wrap">
<h1>Ghost <span>Detector</span></h1>
<p class="sub">Secret remote · keep this page hidden from your victims</p>
<div class="grid">
<div class="card wide"><div class="label">Ghost activity</div><div class="value"><span id="lv">–</span><span class="unit"> / 10</span></div>
<div class="meter" id="m"></div></div>
<div class="card"><div class="label">Magnetic field</div><div class="value"><span id="mv">–</span><span class="unit"> mV</span></div></div>
<div class="card"><div class="label">Highest level</div><div class="value" id="pk">–</div></div>
<div class="card wide"><div class="label">Secret haunt</div>
<p class="sub" style="margin:8px 0 0">Makes the meter go wild for 10 seconds, even with no magnet nearby.</p>
<div class="row"><button class="btn big" id="hb" onclick="act('haunt','1')">Haunt!</button></div></div>
<div class="card wide"><div class="label">Sensitivity · full scale at <b id="fv">–</b> mV</div>
<input type="range" min="20" max="500" step="10" id="full" onchange="act('full',this.value)">
<div class="row"><button class="btn ghost" onclick="act('zero','1')">Re-zero here</button>
<button class="btn ghost" id="mu" onclick="act('mute',muted?'0':'1')">Mute</button></div></div>
</div></main>
<footer>Made with <a href="https://buildcool.fun">buildcool.fun</a></footer>
<script>
const $=id=>document.getElementById(id);let muted=false;
for(let i=0;i<10;i++){const s=document.createElement("div");s.className="seg";$("m").appendChild(s)}
function live(ok){$("live").classList.toggle("off",!ok);$("livetxt").textContent=ok?"Live":"Offline"}
async function act(k,v){try{await fetch("/api/set?"+k+"="+encodeURIComponent(v),{method:"POST"});tick()}catch(e){live(false)}}
async function tick(){
 try{const d=await (await fetch("/api")).json();
  $("lv").textContent=d.level;$("mv").textContent=d.mv;$("pk").textContent=d.peak;$("fv").textContent=d.full;
  if(document.activeElement!==$("full"))$("full").value=d.full;
  [...$("m").children].forEach((s,i)=>s.className="seg"+(i<d.level?(i>6?" on hot":" on"):""));
  $("hb").textContent=d.haunt>0?"Haunting… "+d.haunt+" s":"Haunt!";
  muted=d.mute==1;$("mu").textContent=muted?"Sound on":"Mute";
  live(true)}catch(e){live(false)}
}
tick();setInterval(tick,1000);
</script></body></html>
)rawliteral";

// ---------- Helpers ----------
void blinkError(int times) {
  for (int i = 0; i < times; i++) {
    rgbLedWrite(PIN_BOARD_RGB, 255, 0, 0);
    delay(150);
    rgbLedWrite(PIN_BOARD_RGB, 0, 0, 0);
    delay(150);
  }
  delay(700);
}

int readHallMv() {
  long sum = 0;
  for (int i = 0; i < SAMPLES; i++) {
    sum += analogReadMilliVolts(PIN_HALL);
  }
  return sum / SAMPLES;
}

void measureBaseline() {
  long sum = 0;
  for (int i = 0; i < 20; i++) {
    sum += readHallMv();
    delay(10);
  }
  baselineMv = sum / 20;
}

bool sensorLooksOk() {
  return baselineMv > 800 && baselineMv < 2500;
}

void showLevel(int n) {
  for (int i = 0; i < LED_COUNT; i++) {
    digitalWrite(LED_PINS[i], i < n ? HIGH : LOW);
  }
}

void playLevel(int n) {
  int freq = 0;
  if (n > 0 && !muted) freq = BASE_FREQ + n * FREQ_STEP;
  if (freq == playingFreq) return;
  playingFreq = freq;
  if (freq > 0) tone(PIN_BUZZER, freq);
  else noTone(PIN_BUZZER);
}

// ---------- Wi-Fi and web server ----------
void startWiFi() {
  if (String(WIFI_NAME) != "YOUR_WIFI_NAME") {
    WiFi.mode(WIFI_STA);
    WiFi.begin(WIFI_NAME, WIFI_PASSWORD);
    Serial.print("# Joining Wi-Fi");
    unsigned long start = millis();
    while (WiFi.status() != WL_CONNECTED && millis() - start < 15000) {
      delay(250);
      Serial.print(".");
    }
    Serial.println();
    if (WiFi.status() == WL_CONNECTED) {
      webAddress = WiFi.localIP().toString();
      if (MDNS.begin(WEB_NAME)) {
        Serial.print("# Also try: http://");
        Serial.print(WEB_NAME);
        Serial.println(".local");
      }
      Serial.print("# Open in your browser: http://");
      Serial.println(webAddress);
      return;
    }
    Serial.println("# Could not join Wi-Fi, starting own hotspot instead");
  }
  WiFi.mode(WIFI_AP);
  WiFi.softAP(HOTSPOT_NAME, HOTSPOT_PASSWORD);
  webAddress = WiFi.softAPIP().toString();
  Serial.print("# Connect your phone to Wi-Fi \"");
  Serial.print(HOTSPOT_NAME);
  Serial.print("\" (password: ");
  Serial.print(HOTSPOT_PASSWORD);
  Serial.print("), then open http://");
  Serial.println(webAddress);
}

void handlePage() {
  server.send(200, "text/html", PAGE);
}

int hauntSecondsLeft() {
  if (millis() >= hauntUntil) return 0;
  return (hauntUntil - millis()) / 1000 + 1;
}

void handleApi() {
  String json = "{";
  json += "\"level\":" + String(level);
  json += ",\"mv\":" + String(fieldMv);
  json += ",\"peak\":" + String(peakLevel);
  json += ",\"full\":" + String(fullMv);
  json += ",\"haunt\":" + String(hauntSecondsLeft());
  json += ",\"mute\":" + String(muted ? 1 : 0);
  json += "}";
  server.send(200, "application/json", json);
}

void handleSet() {
  if (server.hasArg("haunt")) {
    hauntUntil = millis() + HAUNT_MS;
    Serial.println("# Secret haunt started");
  }
  if (server.hasArg("full")) {
    fullMv = constrain(server.arg("full").toInt(), 20, 500);
  }
  if (server.hasArg("mute")) {
    muted = server.arg("mute") == "1";
  }
  if (server.hasArg("zero")) {
    measureBaseline();
    peakLevel = 0;
    Serial.print("# New zero point: ");
    Serial.print(baselineMv);
    Serial.println(" mV");
  }
  handleApi();
}

void startWebServer() {
  server.on("/", handlePage);
  server.on("/api", handleApi);
  server.on("/api/set", handleSet);
  server.begin();
}

// ---------- Setup ----------
void setup() {
  Serial.begin(115200);
  for (int i = 0; i < LED_COUNT; i++) {
    pinMode(LED_PINS[i], OUTPUT);
    digitalWrite(LED_PINS[i], LOW);
  }
  analogSetPinAttenuation(PIN_HALL, ADC_11db);

  measureBaseline();
  while (!sensorLooksOk()) {
    Serial.print("# Hall sensor not found (reads ");
    Serial.print(baselineMv);
    Serial.println(" mV, expected about 1650). Check VCC, GND and OUT wires. Trying again...");
    blinkError(3);
    measureBaseline();
  }

  for (int i = 0; i < LED_COUNT; i++) {
    digitalWrite(LED_PINS[i], HIGH);
    tone(PIN_BUZZER, BASE_FREQ + (i * FREQ_STEP));
    delay(80);
  }
  noTone(PIN_BUZZER);
  delay(300);
  for (int i = LED_COUNT - 1; i >= 0; i--) {
    digitalWrite(LED_PINS[i], LOW);
    delay(50);
  }

  measureBaseline();
  Serial.print("# Zero point: ");
  Serial.print(baselineMv);
  Serial.println(" mV");

  startWiFi();
  startWebServer();

  Serial.println("# Ghost Detector ready. Find some ghosts.");
  Serial.println("seconds,field_mV,level");
}

// ---------- Reading ----------
void takeReading() {
  fieldMv = abs(readHallMv() - baselineMv);

  if (fieldMv <= NOISE_MV) level = 0;
  else level = constrain(map(fieldMv, NOISE_MV, fullMv, 1, 10), 1, 10);

  if (millis() < hauntUntil) {
    level = max(level, (int)random(5, 11));
  }
  if (level > peakLevel) peakLevel = level;

  showLevel(level);
  playLevel(level);

  Serial.print(millis() / 1000.0, 1);
  Serial.print(",");
  Serial.print(fieldMv);
  Serial.print(",");
  Serial.println(level);
}

// ---------- Loop ----------
void loop() {
  server.handleClient();
  unsigned long now = millis();

  if (now - lastRead >= READ_INTERVAL) {
    lastRead = now;
    takeReading();
    int pulse = (int)((sin(now / 600.0) + 1.0) * 20.0);
    rgbLedWrite(PIN_BOARD_RGB, 0, pulse / 2, pulse);
  }
}
Line-by-line: what every line does and why
Lines 1–36: Choosing your board
#define BOARD_S3    // ESP32-S3-DevKitC-1
//#define BOARD_C6  // ESP32-C6-DevKitC-1

#ifdef BOARD_S3
  #define PIN_HALL             1
  #define PIN_BUZZER           4
  #define PIN_BOARD_RGB        38
  #define PIN_LED0             13
  ...
#endif
This is like a light switch for the whole program. #define BOARD_S3 flips the switch to “S3”. The // in front of the C6 line turns that line into a comment, so the computer skips it. #ifdef BOARD_S3 means “only if the S3 switch is on, read the next lines”. Each #define gives a pin number a nickname: PIN_HALL is where the sensor’s output wire goes, PIN_BUZZER is the buzzer, PIN_LED0 to PIN_LED9 are the ten bar-graph segments. The C6 block has the same nicknames with different numbers — so the rest of the code works on both boards without changing a thing.
PIN_BOARD_RGB is the tiny color LED that’s already soldered on the board — GPIO 38 on the S3, GPIO 8 on the C6. Nothing to wire. We use it to show “I’m alive” and error codes. (Very early S3 boards, v1.0, have this LED on GPIO 48 — if yours stays dark, change 38 to 48.)
Lines 38–40: Borrowing instruction books
#include <WiFi.h>
#include <WebServer.h>
#include <ESPmDNS.h>
#include means “grab this instruction book.” WiFi connects to your home network or makes a hotspot. WebServer answers your phone’s requests. ESPmDNS gives the detector the name ghost.local, so you don’t have to remember a number address. All three come with the ESP32 board package — nothing to install.
Lines 42–52: Settings that control behavior
#define LED_COUNT 10
const int LED_PINS[LED_COUNT] = {PIN_LED0, PIN_LED1, ..., PIN_LED9};

#define BASE_FREQ 200
#define FREQ_STEP 80
#define NOISE_MV 8
#define FULL_MV 150
#define SAMPLES 16
#define READ_INTERVAL 100
#define HAUNT_MS 10000
const int LED_PINS[LED_COUNT] creates a shelf with 10 numbered compartments (0 through 9). Each compartment holds one pin number. The bottom LED of the bar graph is in compartment 0, the next in compartment 1, and so on. const means “this shelf never changes.” Using a shelf lets us loop over all 10 LEDs instead of writing 10 separate lines.
More nicknames for settings:
BASE_FREQ 200andFREQ_STEP 80— the pitch is 200 + level × 80 Hz. Level 1 = 280 Hz (a low hum), level 10 = 1,000 Hz (a high whine).NOISE_MV 8— wiggles smaller than 8 millivolts are just noise, not ghosts. They count as level 0.FULL_MV 150— a field that moves the sensor 150 millivolts away from zero lights all 10 LEDs. You can change this from your phone later.SAMPLES 16— how many times we read the sensor and average them to reduce jitter.READ_INTERVAL 100— measure every 100 milliseconds, 10 times per second.HAUNT_MS 10000— a secret haunt lasts 10,000 ms = 10 seconds.
Lines 54–59: WiFi names and passwords
const char* WIFI_NAME = "YOUR_WIFI_NAME";
const char* WIFI_PASSWORD = "YOUR_PASSWORD";
const char* HOTSPOT_NAME = "BuildCool-Ghost";
const char* HOTSPOT_PASSWORD = "buildcool";
const char* WEB_NAME = "ghost";
const char* stores text. The first two lines are YOUR home WiFi (case-sensitive). The next two are the detector’s own WiFi — the hotspot it makes when it can’t join yours. WEB_NAME gives it a nickname on your home network: http://ghost.local.
Lines 61–74: Parts and memory boxes
WebServer server(80);

int baselineMv = 0;
int fieldMv = 0;
int fullMv = FULL_MV;
int level = 0;
int peakLevel = 0;
int playingFreq = 0;
bool muted = false;
unsigned long lastRead = 0;
unsigned long hauntUntil = 0;
WebServer server(80) is the web server, listening on port 80 — the standard door for websites.
baselineMvis the zero point: what the sensor reads in empty air.fieldMvis how far the latest reading is away from zero — the “ghost strength”.fullMvis the sensitivity (starts atFULL_MV, the phone slider changes it).levelis the current ghost level (0–10), andpeakLevelthe highest one so far.playingFreqremembers which pitch the buzzer is playing right now.mutedis a yes/no box (bool) for the Mute button.lastReadis a sticky note with the time of the last measurement, andhauntUntilis the time when the secret haunt ends.
Lines 76–151: The secret remote web page
const char PAGE[] PROGMEM = R"rawliteral(
<!doctype html>...
)rawliteral";
This is a real web page — HTML, CSS and JavaScript — stored inside the ESP32. PROGMEM says “keep it in flash memory, not in RAM.” The R"rawliteral(...)rawliteral" trick lets us write text full of quotation marks without confusing C++.
On the page: the BuildCool header with a Live badge, a 10-segment meter that copies the real bar graph (the top three turn red), the magnetic field in millivolts, the highest level so far, the big Haunt! button, a sensitivity slider, Re-zero here and Mute. Every second the page asks the detector for news (fetch("/api")). If no answer comes, the badge switches to Offline.
Lines 153–162: blinkError() — a secret code with light
void blinkError(int times) {
  for (int i = 0; i < times; i++) {
    rgbLedWrite(PIN_BOARD_RGB, 255, 0, 0);
    delay(150);
    rgbLedWrite(PIN_BOARD_RGB, 0, 0, 0);
    delay(150);
  }
  delay(700);
}
When something is wrong, the detector can’t talk — but it can blink. rgbLedWrite(pin, red, green, blue) sets the on-board color LED: 255, 0, 0 is full red, 0, 0, 0 is off. The loop blinks red times times, then pauses 0.7 seconds so you can count. 3 red blinks = Hall sensor not found. It’s like Morse code for robots.
Lines 164–183: Reading the sensor and finding zero
int readHallMv() {
  long sum = 0;
  for (int i = 0; i < SAMPLES; i++) {
    sum += analogReadMilliVolts(PIN_HALL);
  }
  return sum / SAMPLES;
}
analogReadMilliVolts() measures the voltage on the sensor wire and gives the answer directly in millivolts (1000 mV = 1 V). It also uses the chip’s factory calibration, so it’s more accurate than plain analogRead(). We read it 16 times and divide the sum by 16 to get the average — like asking 16 friends to guess a number and taking the middle instead of trusting just one.
void measureBaseline() {
  ...
  baselineMv = sum / 20;
}
measureBaseline() averages 20 of those readings and saves the result as the zero point. It’s exactly what a kitchen scale does when you press “TARE”: whatever is there right now counts as zero. Every sensor and every room is a bit different — so instead of guessing a number, the detector measures its own zero.
bool sensorLooksOk() {
  return baselineMv > 800 && baselineMv < 2500;
}
With no magnet nearby, a healthy SS49E reads about 1650 mV. If the zero point is below 800 or above 2500, something is wrong — most likely a loose or wrong wire. && means “AND”: both must be true.
Lines 185–198: Showing the level — LEDs and sound
digitalWrite(LED_PINS[i], i < n ? HIGH : LOW);This lights the bottom n LEDs. The ? is a ternary operator — a tiny if/else in one line: “If i < n, turn this LED on (HIGH), otherwise off (LOW).” When n is 3, LEDs 0, 1 and 2 light up.
if (n > 0 && !muted) freq = BASE_FREQ + n * FREQ_STEP;
if (freq == playingFreq) return;
playingFreq = freq;
!muted means “NOT muted”. Then the clever part: if the buzzer is already playing this pitch, return — do nothing. The old code restarted the tone 10 times per second even when nothing changed, and you could hear little clicks. Now the buzzer only changes when the level changes.
Lines 201–234: startWiFi() — join home WiFi, or make your own
if (String(WIFI_NAME) != "YOUR_WIFI_NAME") {
  WiFi.begin(WIFI_NAME, WIFI_PASSWORD);
  while (WiFi.status() != WL_CONNECTED && millis() - start < 15000) {
First: did you type in your WiFi name? If yes, try to join — but wait at most 15 seconds. Joined? Serial Monitor prints the address, and MDNS.begin("ghost") lets you also use http://ghost.local. Didn’t work, or you never changed the name? Then the ESP32 makes its own WiFi hotspot BuildCool-Ghost (password buildcool) at http://192.168.4.1. This is called a hotspot fallback — the remote works anywhere, even in a “haunted” garden with no home WiFi.
Lines 236–283: The web server — three doors
server.on("/", handlePage);
server.on("/api", handleApi);
server.on("/api/set", handleSet);
Each server.on() says “when someone knocks on this door, call this function.”
/—handlePage()sends the web page./api—handleApi()answers with the detector’s state in JSON, a tiny text format computers love:{"level":4,"mv":63,"peak":9,"full":150,"haunt":0,"mute":0}./api/set—handleSet()receives your taps:
if (server.hasArg("haunt")) hauntUntil = millis() + HAUNT_MS;
fullMv = constrain(server.arg("full").toInt(), 20, 500);
Haunt! sets an “end time” 10 seconds in the future. The sensitivity value is squeezed with constrain() into 20–500 mV — anyone can type silly numbers into a browser address bar, so we never trust what comes in over the network. Re-zero here calls measureBaseline() again, so the current spot becomes the new zero.
hauntSecondsLeft() calculates how many seconds of haunting are left, so the button can count down on your phone.
Lines 286–325: setup() — runs once at power-on
for (int i = 0; i < LED_COUNT; i++) {
  pinMode(LED_PINS[i], OUTPUT);
  digitalWrite(LED_PINS[i], LOW);
}
analogSetPinAttenuation(PIN_HALL, ADC_11db);
for (int i = 0; i < LED_COUNT; i++) is a counting loop: i starts at 0, and i++ adds 1 each round, so this runs exactly 10 times. Each round, one LED pin becomes an OUTPUT and is switched off. analogSetPinAttenuation(..., ADC_11db) sets the analog pin’s measuring range to about 0–3.1 V, so the sensor’s 1650 mV middle fits comfortably.
measureBaseline();
while (!sensorLooksOk()) {
  Serial.print("# Hall sensor not found ...");
  blinkError(3);
  measureBaseline();
}
Measure zero. If the sensor doesn’t look OK, print a message, blink red 3 times, and try again — forever, until you fix the wire. No crash, no silent dead prop: the detector tells you what’s wrong.
for (int i = 0; i < LED_COUNT; i++) {
  digitalWrite(LED_PINS[i], HIGH);
  tone(PIN_BUZZER, BASE_FREQ + (i * FREQ_STEP));
  delay(80);
}
noTone(PIN_BUZZER);
The power-on sweep: light each LED from bottom to top while playing a rising scale. tone(pin, frequency) makes the passive buzzer vibrate at that pitch. Right after the sweep up, noTone() silences the buzzer, then the LEDs sweep back down (the loop counts backwards with i--). Small delay()s are fine here — it’s a one-time show at start-up.
Then: measure zero again (now that everything is calm), start WiFi and the web server, and print the CSV header seconds,field_mV,level.
Lines 328–347: takeReading() — one measurement
fieldMv = abs(readHallMv() - baselineMv);Reading minus zero = how far the field moved. A north pole gives a positive number, a south pole a negative one. abs() (absolute value) removes the minus sign, so both poles make the meter rise.
if (fieldMv <= NOISE_MV) level = 0;
else level = constrain(map(fieldMv, NOISE_MV, fullMv, 1, 10), 1, 10);
Tiny wiggles = level 0. Otherwise map() works like a ruler conversion: it stretches the range from NOISE_MV to fullMv onto 1 to 10. Halfway = level 5. constrain() makes sure a super-strong magnet can’t produce an impossible “level 15”.
if (millis() < hauntUntil) {
  level = max(level, (int)random(5, 11));
}
The secret! While a haunt is running, the level jumps to a random number from 5 to 10 every 100 ms (random(5, 11) never gives 11 itself). max() keeps the real reading if it’s even higher.
Then the bar graph and buzzer are updated, and one CSV line goes to Serial, like 12.3,63,4. Open Tools → Serial Plotter and you’ll see the magnetic field as a live graph — or copy the lines into a spreadsheet.
Lines 350–360: loop() — repeats forever
server.handleClient();
if (now - lastRead >= READ_INTERVAL) {
  lastRead = now;
  takeReading();
  int pulse = (int)((sin(now / 600.0) + 1.0) * 20.0);
  rgbLedWrite(PIN_BOARD_RGB, 0, pulse / 2, pulse);
}
server.handleClient() checks: “is my phone knocking?” — every single pass through loop(). Then the timer check: has 100 ms passed since the last reading? If not, skip. There is no delay() in loop(), so the detector reacts to your phone instantly.
sin() makes a smooth wave between -1 and +1; adding 1 and multiplying by 20 turns it into 0–40. That’s the brightness for the on-board LED, in a ghostly blue-green. Result: the little LED slowly “breathes” to show the detector is alive and scanning.
The whole thing in one sentence
When powered on, the detector checks its Hall sensor, plays the start-up sweep, measures its zero point and starts its secret web remote (setup); then 10 times per second forever (loop) it measures how far the magnetic field moved from zero, turns that into a level from 0–10 (or a wild random one during a secret haunt), lights that many LEDs, plays a matching pitch, and tells your phone.
First thing to try: open Tools → Serial Plotter at 115200 baud and slowly bring a fridge magnet toward the sensor. Watch the field_mV line climb. Flip the magnet around — it climbs again (that’s abs() at work).
Check: After upload, all 10 LEDs sweep up and down with a rising tone, Serial Monitor prints
# Zero point: ...(about 1650 mV) and the address of the web page, and the on-board LED slowly breathes blue-green. If it blinks red 3 times instead, check the Hall sensor wires.
Step 3: Calibrate and deploy
Time: ~10 minutes
Open the secret remote. The detector tells you its address in Serial Monitor:
| Mode | When | What to do on your phone |
|---|---|---|
| Home WiFi | You entered your WiFi name and it joined | Stay on your home WiFi and open http://ghost.local — or the number address printed in Serial Monitor |
| Hotspot | WiFi name not changed, or joining failed within 15 s | Connect to the WiFi BuildCool-Ghost (password buildcool), then open http://192.168.4.1 |
Calibrate without re-uploading:
- Hold the detector in empty air, away from magnets, and tap Re-zero here. The meter should drop to 0.
- Hold a magnet at the distance that should mean “full alert” (for example 5 cm).
- Move the Sensitivity slider until the meter reads about 10. Lower number = more sensitive.
Aim for:
- Resting in open air: 0 LEDs, silent — the “calm before the storm”
- Near a laptop lid or fridge door: a few LEDs, medium hum
- Right at a speaker magnet: Full 10 LEDs, high-pitched scream
The theatrical performance: When someone asks if a room is “haunted,” walk the meter around, keeping it at background level. Then casually walk it toward a hidden speaker, the fridge door, or an accomplice with a magnet in their pocket. Or keep your phone in your pocket with the page open and secretly tap Haunt!. The meter climbs. Hold it there. Look concerned.
For parents: Anyone who is connected to the same WiFi (or knows the hotspot password) can open the page and press Haunt! — that’s part of the fun, but you can change
HOTSPOT_PASSWORDin the code. The 9V battery lasts only about 2–3 hours with WiFi on; for a whole evening use a USB power bank. If you don’t want the phone remote at all, delete the two linesstartWiFi();andstartWebServer();insetup()— the battery will last much longer.
What just happened (what you learned)
-
Hall effect sensors — when a magnetic field goes through a thin plate that carries electric current, it pushes the electrons slightly to one side, and a small voltage appears across the plate. That’s the Hall effect. The SS49E turns it into a voltage that moves up or down from its middle value. Every modern smartphone uses Hall sensors to detect when a flip case is closed.
-
Auto-zero (tare) — instead of fixed numbers, the detector measures its own zero point at start-up and on “Re-zero”, just like a kitchen scale.
-
map() and constrain() —
map(value, inMin, inMax, outMin, outMax)scales a number from one range to another.constrain()clips the result to a valid range so values outside your calibration range don’t produce impossible outputs like level 15. -
Averaging for noise reduction — taking 16 readings and averaging them reduces random fluctuation by roughly the square root of 16 (4x). This is the same principle behind audio “smoothing” and financial moving averages.
-
tone() on a passive buzzer — a passive buzzer is just a coil and membrane.
tone()generates a square wave at the specified frequency, which vibrates the membrane to produce sound. Changing the tone only when the level changes keeps the sound clean. -
Blink codes, hotspot fallback, input validation — the detector tells you what’s wrong with a red blink code, works with or without your home WiFi, and checks every number that comes in from the network.
-
Non-blocking loops —
millis()timers instead ofdelay()let the detector measure, beep and answer your phone at the same time.
Level Up
Secret haunt button: Your board already has a button: BOOT (GPIO 0 on the S3, GPIO 9 on the C6). In loop(), check digitalRead() on that pin (after pinMode(..., INPUT_PULLUP) in setup()). When it reads LOW, set hauntUntil = millis() + HAUNT_MS; — a secret haunt without a phone. (Don’t hold BOOT while you power on — that starts upload mode.)
Dramatic startup: After the upward LED sweep, flash all 10 LEDs three times rapidly, hold full brightness for 500ms, then sweep down. Turns the power-on test into a theatrical moment.
Steeper pitch curve: Instead of linear steps, try squaring the level: freq = BASE_FREQ + (n * n * 10) in playLevel(). At level 5 this gives 450Hz; at level 10 it gives 1200Hz — a steeper, more alarming climb.
★★ You completed: Ghost Detector (EMF Meter Prop)!
Troubleshooting
Blink codes (on-board LED):
| On-board LED | Meaning | Fix |
|---|---|---|
| Slow blue-green “breathing” | All good, detector is scanning | — |
| 3 red blinks, repeating | Hall sensor not found (zero point not near 1650 mV) | Check the 3 sensor wires: VCC to 3V3, GND to GND, OUT to GPIO 1. Check the leg order (flat face with text toward you). It keeps retrying — fix the wire and it starts by itself. |
| Problem | Fix |
|---|---|
| Meter doesn’t react to magnets | Is it a linear Hall sensor (SS49E / 49E / KY-035)? An A3144 is only an on/off switch. Watch field_mV in Serial Plotter while you bring a magnet within 1–2 cm. |
| Meter always reads high, even in empty air | Tap Re-zero here on the phone page, away from magnets. Or move the Sensitivity slider to a higher number. |
| Meter barely moves | Move the Sensitivity slider to a lower number (it sets how many mV mean “full”). |
| Phone page won’t load | Home-WiFi mode: phone on the same WiFi; try the number address from Serial Monitor if ghost.local doesn’t work (some Android phones don’t support .local). Hotspot mode: connect to BuildCool-Ghost, then open http://192.168.4.1. The ESP32 only joins 2.4GHz WiFi. |
| Page says “Offline” | The detector restarted, the battery died, or your phone left its WiFi. Reload the page. |
| Buzzer makes no sound | Is Mute on? Verify it’s a PASSIVE buzzer (has a coil, no self-resonating). Check connection to GPIO 4 (S3) / GPIO 0 (C6) and GND. |
| Some LEDs in the bar graph don’t light | Check the 220Ω resistor is in series and the anode (positive leg) goes to the GPIO pin from the table in Step 1. Check the right #define BOARD_... line is active. |
| Power-on sweep doesn’t complete | A missing or shorted 220Ω resistor can prevent that LED from lighting. Check each LED individually — digitalWrite(LED_PINS[X], HIGH) in a quick test sketch. |
| “Sketch too big” error | Tools → Partition Scheme → Huge APP (3MB No OTA). |
| Battery drains quickly | WiFi uses most of the power. Use a USB power bank, or delete startWiFi(); and startWebServer(); in setup() if you don’t need the remote. |